Moodle MySQL Replication using PHPMyAdmin

The phpMyAdmin that is bundled with cPanel doesn’t include user management so the following commands needed to be run to give the replication user the correct permissions:

Setting up the Master , add the slave replication user. The IP below is the slave IP.

mysql -e “GRANT REPLICATION CLIENT ON *.* TO ‘user_replicate’@’216.xx.xxx.xxx’;”
mysql -e “GRANT REPLICATION SLAVE ON *.* TO ‘user_replicate’@’216.xx.xxx.xxx’;
mysql -e “FLUSH PRIVILEGES;”

You should now be able to add the user user_replicate under Replication in phpMyAdmin.

PEAR – PHP Extension and Application Repository, PEAR is a framework and distribution system for reusable PHP components.
The mail() function is using for sending emails from a php script. This is the most simplest way to send emails from a server and also its not secure process.

The mail sending scripts will shows some errors/warning while sending emails due to the absence of mail function[mail()].

Solution:
Step 1: Check PhPear is already installed or not

# rpm -qa|grep php-pear
#

If it is not installed on the server, please install it by executing the foillowing command from the command line;

# yum install php-pear
# rpm -qa|grep php-pear
php-pear-1.4.9-8.el5

Step 2: Install Php-mail extension by executing the following command;

# pear install Mail

Step 3: Restart webserver

# service httpd restart

Check

# yum install libmemcached libmemcached-devel
# pecl install memcached
libmemcached directory [no]:

checking whether libmemcached supports sasl… no
configure: error: no, libmemcached sasl support is not enabled. Run configure with –disable-memcached-sasl to disable this check
ERROR: `/tmp/pear/temp/memcached/configure –with-libmemcached-dir=no’ failed

yum install cyrus-sasl-devel

# cd /usr/local/src
# wget https://launchpad.net/libmemcached/1.0/1.0.18/+download/libmemcached-1.0.18.tar.gz
# tar -zxvf libmemcached-1.0.18.tar.gz
# cd libmemcached-1.0.18
# ./configure
# make
# make install

# pecl install memcached

Memcached (Memcache Daemon) is a caching daemon designed especially for dynamic web applications to decrease database load by storing objects in memory. It is commonly used to speed up dynamic database-driven websites by caching data and objects in server memory to reduce the number of times the data source must be read. Memcached is free and open-source software, licensed under the Revised BSD license. Also, there are PHP extensions which allow you to work with memcached. There are two PHP memcache extensions available from the PHP Extension Community Library, PHP memcached and PHP memcache.

PHP Memcache vs PHP Memcached

These two PHP extensions are not identical. PHP Memcache is older, very stable but has a few limitations. The PHP memcache module utilizes the daemon directly while the PHP memcached module uses the libMemcached client library and also contains some added features.

Installing Memcache Daemon + PHP memcache or PHP memcached

Before selecting a PHP extension be sure to install the memcache daemon.

How-To: Install Memcache on CentOS (WHM/cPanel)

    1. Login into your WHM panel and using easyapache to enable Memcache

Go to Software – Module Installers – PHP Pecl. Search for memcache and then install both memcache and memcached
Restart apache:

# service httpd restart

Check your memcached server is running successfully: ps -eaf | grep memcached

Installing Memcache Daemon + PHP memcache or PHP memcached on CentOS or Ubuntu

Before selecting a PHP extension be sure to install the memcache daemon:

Centos / Red Hat:


# yum install memcached

Ubuntu/ Debian:


# apt-get update
# apt-get install memcached

After installing Memcached, open the configuration file for Memcached and make any changes:

Centos / Red Hat:


# nano /etc/sysconfig/memcached

Ubuntu / Debian:


# nano /etc/memcached.conf

Exit and save the configuration file, and then restart Memcached


# service memcached restart

Remember to set the memcache daemon to start on server boot.
Centos / Red Hat:


# chkconfig memcached on

Ubuntu / Debian:


# update-rc.d memcached enable

Install a PHP memcache extension

PHP memcache

You can browse the version here – https://pecl.php.net/package/memcache The current version as of this writing is 3.0.8


wget https://pecl.php.net/get/memcache-3.0.8.tgz
tar xvf memcache-3.0.8.tgz
cd memcache-3.0.8
phpize
./configure
make 
make install
make test
Then add memcache.so to your php.ini file:

# nano /etc/php.ini
extension="memcache.so"

PHP memcached:

Remember to install libmemcached dependancy (Ubuntu/Debian):


yum install cyrus-sasl-devel zlib-devel gcc-c++
wget https://launchpad.net/libmemcached/1.0/1.0.16/+download/libmemcached-1.0.16.tar.gz
tar -xvf libmemcached-1.0.16.tar.gz
cd libmemcached-1.0.16
./configure --disable-memcached-sasl
make
make install

Then install PHP Memcached:

wget https://pecl.php.net/get/memcached-3.0.8.tgz
tar xf memcached-3.0.8.tgz
cd memcached-3.0.8
phpize
./configure
make 
make install
make test

Then add memcached.so to your php.ini file:


extension="memcached.so"

You will need to connect your PHP application to memcached. For example, using W3 Total Cache with WordPress, memcached module with Drupal, Magento config, etc.

Finally restart memcached, httpd (or apache, apache2 for Ubuntu/Debian)

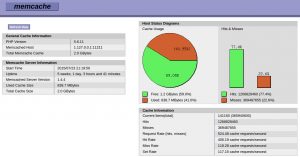
If you would like to view stats of hit rate etc you can download memcachephp stats at GitHub – HERE. Which will look something like this:

Installation
OpCache is compiled by default on PHP5.5+. However it is disabled by default. In order to start using OpCache in PHP5.5+ you will first have to enable it. To do this you would have to do the following.

Add the following line to your php.ini:


# zend_extension=/full/path/to/opcache.so (nix)
# zend_extension=C:\path\to\php_opcache.dll (win)

Note that when the path contains spaces you should wrap it in quotes:


# zend_extension="C:\Program Files\PHP5.5\ext\php_opcache.dll"

Also note that you will have to use the zend_extension directive instead of the “normal” extension directive because it affects the actual Zend engine (i.e. the thing that runs PHP).

Usage
Currently there are four functions which you can use:

opcache_get_configuration():

Returns an array containing the currently used configuration OpCache uses. This includes all ini settings as well as version information and blacklisted files.

var_dump(opcache_get_configuration());
opcache_get_status():

This will return an array with information about the current status of the cache. This information will include things like: the state the cache is in (enabled, restarting, full etc), the memory usage, hits, misses and some more useful information. It will also contain the cached scripts.

var_dump(opcache_get_status());
opcache_reset():

Resets the entire cache. Meaning all possible cached scripts will be parsed again on the next visit.

opcache_reset();
opcache_invalidate():

Invalidates a specific cached script. Meaning the script will be parsed again on the next visit.

opcache_invalidate(‘/path/to/script/to/invalidate.php’, true);

Here are several ways to kill all the processes in linux.
Where username is my userid.


# pkill -u username

or


# ps -o pid -u pu | xargs kill -1


# pgrep -u username | sudo xargs kill -9 

Show processes run for a username and sshd


# pgrep -u username sshd

How to start protecting your Joomla Site

  1. Always keep Joomla core up-to date
  2. Always make sure you run the latest patched versions of extensions
  3. Make sure you choose strong passwords for all logins
  4. Check your own website for vulnerabilities
  5. Always check the webserver’s log files for potential hack attempts
  6. Secure your server if you host your Joomla website on a VPS or even a dedicated server
  7. Create a list of all extensions you use and try to monitor them. For example you can use Google or security websites for staying informed about the latest vulnerabilities. Only use secure extensions.
  8. Use SEO for URL’s. Activate the SEO features, use SEF URLs
  9. Furthermore most tools and scanners are not able to work with search engine friendly URLs
  10. This might be a big surprise, but with these measures you already gained a decent protection level.
  11. The last things to do would be to rename the Joomla backend folder from “administrator” to may be “admin_acp_1234567” in order to prevent script kiddies and scanners from finding your Joomla backend.
  12. And, last but not least, protect the PHPMyAdmin login (if you have any) with .htaccess files. You can’t do this with the Joomla admin control panel since some components need to have access to administrator/components.)

Source: http://www.exploit-db.com/papers/15780/