Attaching a file in Horde Email error:
Unable to create VFS dir /.horde/imp.
# chown -R horde_sysuser:horde_sysgroup /tmp/.horde/
Linux, Windows, Software Tips, Articles and Hacks
Attaching a file in Horde Email error:
Unable to create VFS dir /.horde/imp.
# chown -R horde_sysuser:horde_sysgroup /tmp/.horde/
If your server is sending spam or compromised, here are a few tip.
First thing is to do a password audit, you can view these passwords in plain text in this file:
C:Program FilesParallelsPleskMail ServersMail EnableConfigAUTH.TAB
If some passwords in use are very weak they will eventually become compromised. Pay extra attention to common business type addresses like info@ sales@ contact@ as they are almost always the first to be brute forced. Also make sure that no password contains any words from the domain name.
Disable options that wallow spam to be relayed through your server in the form of backscatter: http://en.wikipedia.org/wiki/Backscatter_%28email%29
Specifically NDR’s – so your server is no longer sending bounces to spoofed email addresses. Also disable the notification that tells the remote sender when an inbox is full which can also be used to relay spam.
For the brute force you have a few options – one is to consider disabling the administrator account and setting up a brute policy to lock users after a set number of failed attempts. You could also change the port that RDP is using (http://support.microsoft.com/kb/306759) to something more obscure.
There are also software based utilities that can help however I’m not personally familiar with them I have seen them in use before on client machines.
RdpGuard: http://rdpguard.com/
Syspeace: http://www.syspeace.com/start/
EvlWatcher: http://nerderies.blogspot.com/
IPban: https://github.com/jjxtra/Windows-IP-Ban-Service/downloads
From a PCI scan, this error.
Answer: Your scanning provider is apparently relying on the version information in the banner to determine vulnerability. Redhat frequently backports fixes into previous versions of applications which is the case with your version of OpenSSL (openssl-0.9.8e-27.el5_10.4). This is a false positive. The vulnerability does not affect this server.
You can read about this at https://access.redhat.com/articles/904433
# rpm -q --changelog openssl |grep CVE-2014
- fix CVE-2014-0221 - recursion in DTLS code leading to DoS
- fix CVE-2014-3505 - doublefree in DTLS packet processing
- fix CVE-2014-3506 - avoid memory exhaustion in DTLS
- fix CVE-2014-3508 - fix OID handling to avoid information leak
- fix CVE-2014-3510 - fix DoS in anonymous (EC)DH handling in DTLS
- fix for CVE-2014-0224 - SSL/TLS MITM vulnerability
[root@localhost Downloads]# yum grouplist
Loaded plugins: fastestmirror, refresh-packagekit, security
Setting up Group Process
Loading mirror speeds from cached hostfile
 * base: yum.tamu.edu
 * extras: mirror.raystedman.net
 * rpmforge: repoforge.spinellicreations.com
 * updates: mirrors.centarra.com
google-talkplugin                                                                                                                                                                                                     |  951 B     00:00
google-talkplugin/primary                                                                                                                                                                                             | 1.4 kB     00:00
Installed Groups:
   Additional Development
   Base
   Console internet tools
   Desktop
   Desktop Platform
   Dial-up Networking Support
   Directory Client
   E-mail server
   FCoE Storage Client
   Fonts
   General Purpose Desktop
   Graphical Administration Tools
   Hardware monitoring utilities
   Internet Applications
   Internet Browser
   Legacy UNIX compatibility
   Legacy X Window System compatibility
   Network Infrastructure Server
   Networking Tools
   Office Suite and Productivity
   Performance Tools
   Perl Support
   Remote Desktop Clients
   Security Tools
   Storage Availability Tools
   X Window System
   iSCSI Storage Client
Installed Language Groups:
   Arabic Support [ar]
   Armenian Support [hy]
   Bhutanese Support [dz]
   Chinese Support [zh]
   Georgian Support [ka]
   Hebrew Support [he]
   Inuktitut Support [iu]
   Japanese Support [ja]
   Khmer Support [km]
   Konkani Support [kok]
   Korean Support [ko]
   Kurdish Support [ku]
   Lao Support [lo]
   Myanmar (Burmese) Support [my]
   Tajik Support [tg]
   Venda Support [ve]
Available Groups:
   Backup Client
   Backup Server
   CIFS file server
   Client management tools
   Compatibility libraries
   Debugging Tools
   Desktop Debugging and Performance Tools
   Desktop Platform Development
   Development tools
   Directory Server
   Eclipse
   Emacs
   FTP server
   Graphics Creation Tools
   High Availability
   High Availability Management
   Identity Management Server
   Infiniband Support
   Input Methods
   Java Platform
   KDE Desktop
   Large Systems Performance
   Load Balancer
   Mainframe Access
   Messaging Client Support
   MySQL Database client
   MySQL Database server
   NFS file server
   Network Storage Server
   Network file system client
   PHP Support
   PostgreSQL Database client
   PostgreSQL Database server
   Print Server
   Printing client
   Resilient Storage
   Ruby Support
   SNMP Support
   Scientific support
   Server Platform
   Server Platform Development
   Smart card support
   System Management
   System administration tools
   TeX support
   Technical Writing
   TurboGears application framework
   Virtualization
   Virtualization Client
   Virtualization Platform
   Virtualization Tools
   Web Server
   Web Servlet Engine
   Web-Based Enterprise Management
Available Language Groups:
   Afrikaans Support [af]
   Albanian Support [sq]
   Amazigh Support [ber]
   Assamese Support [as]
   Azerbaijani Support [az]
   Basque Support [eu]
   Belarusian Support [be]
   Bengali Support [bn]
   Brazilian Portuguese Support [pt_BR]
   Breton Support [br]
   Bulgarian Support [bg]
   Catalan Support [ca]
   Chhattisgarhi Support [hne]
   Chichewa Support [ny]
   Coptic Support [cop]
   Croatian Support [hr]
   Czech Support [cs]
   Danish Support [da]
   Dutch Support [nl]
   English (UK) Support [en_GB]
   Esperanto Support [eo]
   Estonian Support [et]
   Ethiopic Support [am]
   Faroese Support [fo]
   Fijian Support [fj]
   Filipino Support [fil]
   Finnish Support [fi]
   French Support [fr]
   Frisian Support [fy]
   Friulian Support [fur]
   Gaelic Support [gd]
   Galician Support [gl]
   German Support [de]
   Greek Support [el]
   Gujarati Support [gu]
   Hiligaynon Support [hil]
   Hindi Support [hi]
   Hungarian Support [hu]
   Icelandic Support [is]
   Indonesian Support [id]
   Interlingua Support [ia]
   Irish Support [ga]
   Italian Support [it]
   Kannada Support [kn]
   Kashmiri Support [ks]
   Kashubian Support [csb]
   Kazakh Support [kk]
   Kinyarwanda Support [rw]
   Latin Support [la]
   Latvian Support [lv]
   Lithuanian Support [lt]
   Low Saxon Support [nds]
   Luxembourgish Support [lb]
   Macedonian Support [mk]
   Maithili Support [mai]
   Malagasy Support [mg]
   Malay Support [ms]
   Malayalam Support [ml]
   Maltese Support [mt]
   Manx Support [gv]
   Maori Support [mi]
   Marathi Support [mr]
   Mongolian Support [mn]
   Nepali Support [ne]
   Northern Sotho Support [nso]
   Norwegian Support [nb]
   Occitan Support [oc]
   Oriya Support [or]
   Persian Support [fa]
   Polish Support [pl]
   Portuguese Support [pt]
   Punjabi Support [pa]
   Romanian Support [ro]
   Russian Support [ru]
   Sanskrit Support [sa]
   Sardinian Support [sc]
   Serbian Support [sr]
   Sindhi Support [sd]
   Sinhala Support [si]
   Slovak Support [sk]
   Slovenian Support [sl]
   Somali Support [so]
   Southern Ndebele Support [nr]
   Southern Sotho Support [st]
   Spanish Support [es]
   Swahili Support [sw]
   Swati Support [ss]
   Swedish Support [sv]
   Tagalog Support [tl]
   Tamil Support [ta]
   Telugu Support [te]
   Tetum Support [tet]
   Thai Support [th]
   Tibetan Support [bo]
   Tsonga Support [ts]
   Tswana Support [tn]
   Turkish Support [tr]
   Turkmen Support [tk]
   Ukrainian Support [uk]
   Upper Sorbian Support [hsb]
   Urdu Support [ur]
   Uzbek Support [uz]
   Vietnamese Support [vi]
   Walloon Support [wa]
   Welsh Support [cy]
   Xhosa Support [xh]
   Zulu Support [zu]
# yum groupinstall "Development Tools"
# wget http://chrome.richardlloyd.org.uk/install_chrome.sh
# chmod u+x install_chrome.sh
# ./install_chrome.sh
Plesk 9.5
To change your server’s Hostname within Plesk
Log into your Plesk control panel.
Click on Settings on the right hand side.
Click on Change Hostname, under General.
Where it says “Full hostname” is where you would want to put your servers new hostname, typically it is set up as something like server.domain.com or mail.domain.com and is normally always the same as what is set up as the primary reverse DNS.
Once you have set it click OK.
Plesk 10
To change your server’s Hostname within Plesk
Log into your Plesk control panel.
Click on Tools & Settings on the right hand side under Server Management.
Click on Server Settings, under General.
Where it says “Full hostname” is where you would want to put your servers new hostname, typically it is set up as something like server.domain.com or mail.domain.com and is normally always the same as what is set up as the primary reverse DNS.
Once you have set it click OK.
Plesk 11
To change your server’s Hostname within Plesk
Log into your Plesk control panel.
Click on Tools & Settings on the right hand side.
Click on Server Settings, under General.
Where it says “Full hostname” is where you would want to put your servers new hostname, typically it is set up as something like server.domain.com or mail.domain.com and is normally always the same as what is set up as the primary reverse DNS.
Once you have set it click OK.
Error:
Error: Failed to create session directory in '/usr/local/psa/PMM/sessions': [Errno 31] Too many links: '/usr/local/psa/PMM/sessions/2014-09-05-151358.796' Resolution: Clean directory '/usr/local/psa/PMM/sessions'
Solution
server# cd /usr/local/psa/PMM/sessions
Check the tree
server # tree -i -L 1
31999 directories, 0 files
Ext 3 has a limit for the number of directories.
server# cd /usr/local/psa/PMM
server# mv sessions sessions.bak
server# mkdir sessions
Error:
Sending an email message via Roundcube fails with “SMTP Error (250): Authentication failed”
Rebuild your server’s mail configuration. The command is:
# /usr/local/psa/admin/sbin/mchk --with-spam
Install screen
Ubuntu
apt install screen
CentOS & Rocky
yum install screen
Run screen
screen
Detach the screen out by pressing Ctrl+ a at the same time – release and then press d.:
ctrl+a - release then press d
[detached from 11115.pts-0.capnel]
This releases the screen and the task so you can do other things while the task runs in the background.
You’re returned to the terminal window from which you launched the screen session. A message tells you that a screen window labeled [detached from 11115.pts-0.capnel] has been detached.
To install cPanel & WHM on your server, run the following command:
cd /home && curl -o latest -L https://securedownloads.cpanel.net/latest && sh latest
To manage screen.
You need the number from the start of the window name to reattach it. If you forget it, you can always use the -ls (list) option, as shown below, to get a list of the detached windows:
screen -ls
There is a screen on:
        11115.pts-0.capnel      (Detached)
1 Socket in /var/run/screen/S-root.
You can check on the task by typing this to resume the screen:
screen -r 11115
When the process ends, you can type exit to exit from the screen. Alternatively, you can press Ctrl+A, and then d to forcibly kill a window.
ctrl+a - release then press k
[detached from 11115.pts-0.capnel]
Need to setup a VPN? Here’s how to download and install OpenVPN.
Download the installer from https://openvpn.net/index.php/download/community-downloads.html and run it on the server computer.
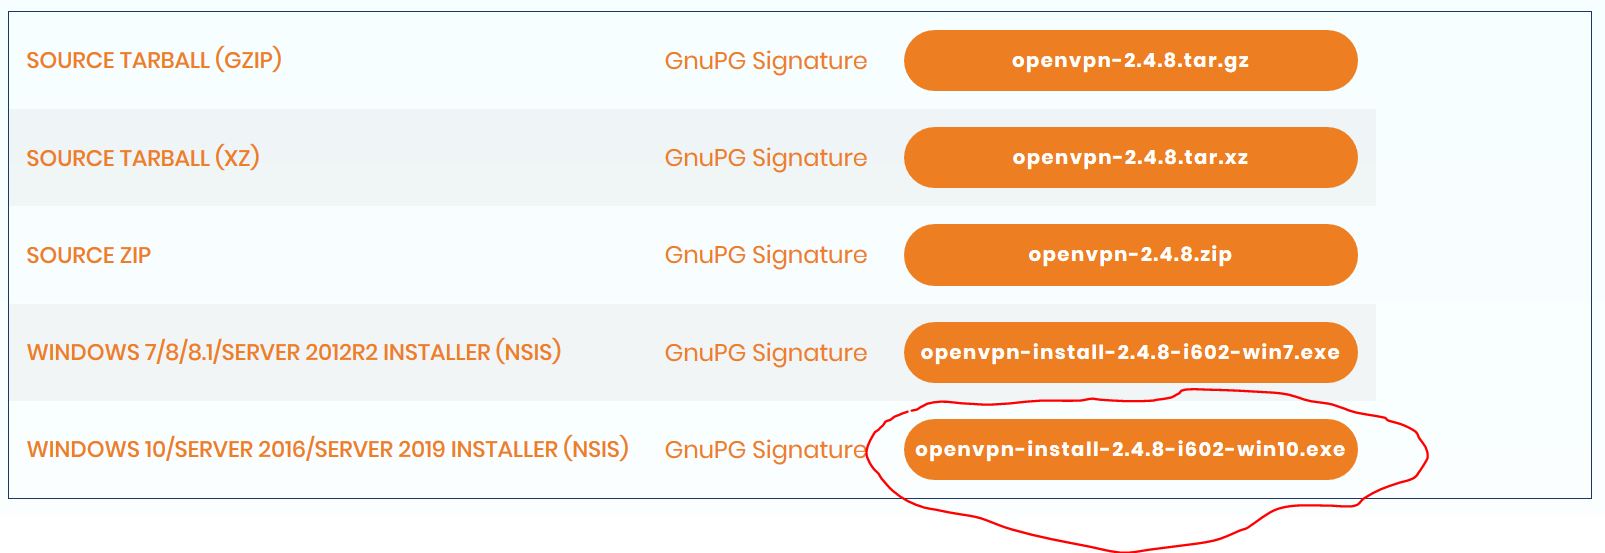
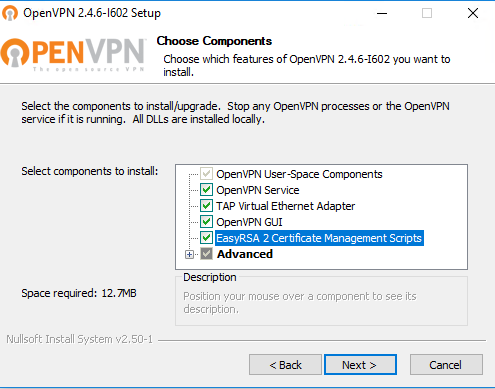
Open the installer file and start the installation.
Preparatory Steps
Navigate to the C:\Program Files\OpenVPN\easy-rsa folder in the command prompt:
Press Windows Key + R
Type “cmd.exe” and press Enter.
cmd.exe
Right click to run as administrator
Navigate to the correct folder:
cd "C:\Program Files\OpenVPN\easy-rsa"
<a href="https://www.geekdecoder.com/wp-content/uploads/2014/08/cmdcall.jpg"><img class="alignnone size-large wp-image-5187" src="https://www.geekdecoder.com/wp-content/uploads/2014/08/cmdcall-1024x593.jpg" alt="" width="648" height="375" /></a>
Initialize the OpenVPN configuration:
init-config
<a href="https://www.geekdecoder.com/wp-content/uploads/2014/08/init.jpg"><img class="alignnone size-full wp-image-5188" src="https://www.geekdecoder.com/wp-content/uploads/2014/08/init.jpg" alt="" width="597" height="133" /></a>
NOTE: Only run init-config once, during installation.
Open the vars.bat file in a text editor:
notepad vars.bat
Edit the following lines in vars.bat, replacing “US”, “CA,” etc. with your company’s information:
set KEY_COUNTRY=US
set KEY_PROVINCE=CA
set KEY_CITY=SanFrancisco
set KEY_ORG=OpenVPN
set KEY_EMAIL=mail@host.domain
Save the file and exit notepad.
Run the following commands:
vars
clean-all
The certificate authority (CA) certificate and key:
build-ca
When prompted, enter your country, etc. These will have default values, which appear in brackets. For your “Common Name,” a good choice is to pick a name to identify your company’s Certificate Authority. For example, “OpenVPN-CA”:
Country Name (2 letter code) [US]:
State or Province Name (full name) [CA]:
Locality Name (eg, city) [SanFrancisco]:
Organization Name (eg, company) [OpenVPN]:
Organizational Unit Name (eg, section) []:
Common Name (eg, your name or your server's hostname) []:OpenVPN-CA
Email Address [mail@host.domain]:

* This builds the ca key in C:\Program Files\OpenVPN\easy-rsa\keys
The server certificate and key:
build-key-server server
When prompted, enter the “Common Name” as “server”
When prompted to sign the certificate, enter “y”
When prompted to commit, enter “y”
Client certificates and keys:
For each client, choose a name to identify that computer, such as “mike-laptop” in this example.
build-key mike-laptop
When prompted, enter the “Common Name” as the name you have chosen (e.g. “mike-laptop”)
Repeat this step for each client computer that will connect to the VPN.
Generate Diffie Hellman parameters (This is necessary to set up the encryption)
build-dh
Set up the ta.key file.
In command prompt as administrator, go to cd “C:\Program Files\OpenVPN\bin”
# openvpn --genkey --secret ta.key
copy the file to the C:\Program Files\OpenVPN\config directory and to your config directory on your local machine.
Find the sample configuration files:
Start Menu > All Programs > OpenVPN > OpenVPN Sample Configuration Files
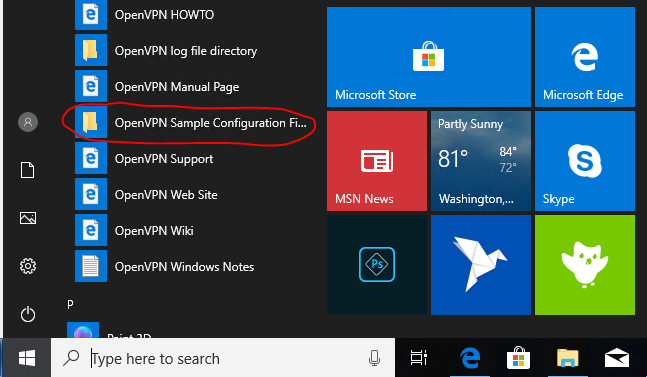
go to C:\Program Files\OpenVPN\sample-config
Open server.ovpn
Find the following lines:
ca ca.crt
cert server.crt
key server.key
dh dh2048.pem
Edit them as follows:
ca "C:\\Program Files\\OpenVPN\\easy-rsa\\keys\\ca.crt"
cert "C:\\Program Files\\OpenVPN\\easy-rsa\\keys\\server.crt"
key "C:\\Program Files\\OpenVPN\\easy-rsa\\keys\\server.key"
Find the following line for the Diffie hellman parameters:
dh
And edit as follows:
"C:\\Program Files\\OpenVPN\\easy-rsa\\keys\\dh2048.pem"
Save the file as C:\Program Files\OpenVPN\easy-rsa\server.ovpn
Set up the ta.key file.
In the server configuration, add:
Set the ta.key path to C:\Program Files\OpenVPN\config\ta.key
tls-auth “C:\\Program Files\\OpenVPN\\config\\ta.key” ta.key 0
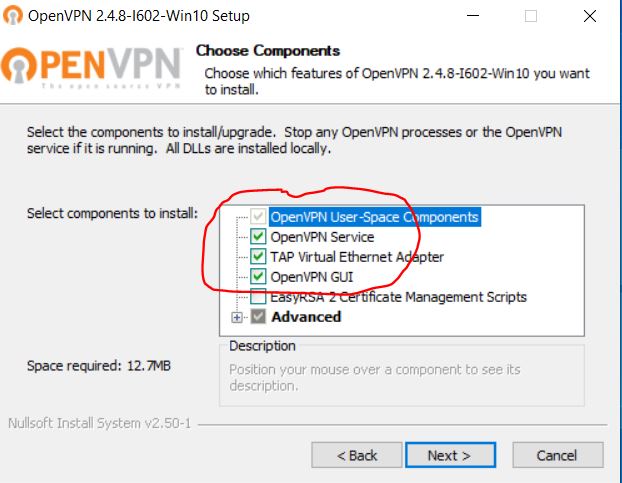
Download the installer to the client Windows 10 Machine and run the intsaller. Leave the defaults selected.
This is similar to the server configuration.
Open client.ovpn ON THE SERVER MACHINE located at C:\Program Files\OpenVPN\sample-config
Find the following lines:
ca ca.crt
cert client.crt
key client.key
Edit them as follows:
ca "C:\\Program Files\\OpenVPN\\config\\ca.crt"
cert "C:\\Program Files\\OpenVPN\\config\\mike-laptop.crt"
key "C:\\Program Files\\OpenVPN\\config\\mike-laptop.key"
Notice that the name of the client certificate and key files depends upon the Common Name of each client.
You can also include the ca, cert and key content in the client file. You have to copy the file content inside the tag .
Edit the following line, replacing “my-server-1” with your server’s public Internet IP Address or Domain Name. If you need help, see Static Internet IP below.
remote my-server-1 1194
Save the file as C:\Program Files\OpenVPN\easy-rsa\mike-laptop.ovpn (in this example. Each client will need a different, but similar, config file depending upon that client’s Common Name.)
Copying the Server and Client Files to Their Appropriate Directories
Copy these files from C:\Program Files\OpenVPN\easy-rsa\keys to C:\Program Files\OpenVPN\config\ on the server:
ca.crt
dh1024.pem
server.crt
server.key

Copy this file from C:\Program Files\OpenVPN\easy-rsa\ to C:\Program Files\OpenVPN\config\ on the server:
server.ovpn
Copy these files from C:\Program Files\OpenVPN\easy-rsa\keys on the server to C:\Program Files\OpenVPN\config\ on each client (mike-laptop, in this example):
ca.crt
mike-laptop.crt
mike-laptop.key

Copy these files from C:\Program Files\OpenVPN\easy-rsa\ on the server to C:\Program Files\OpenVPN\config\ on each client (mike-laptop, in this example):

mike-laptop.ovpn

Copy this file from C:\Program Files\OpenVPN\config\ on the server to C:\Program Files\OpenVPN\config\ on each client (mike-laptop, in this example):

ta.key

Also, instead of setting up the paths in the files, you can add them directly like follows.

<ca></ca>
<cert></cert>
<key></key>
On both client and server, run OpenVPN from:
Start Menu -> All Programs -> OpenVPN -> OpenVPN GUI
Double click the icon which shows up in the system tray to initiate the connection. The resulting dialog should close upon a successful start.
OpenVPN to be run from a non-administrator account.
OpenVPN to be started automatically on system startup. This is often preferred on the server machine, as well as any machines which will be constantly connected to the server.
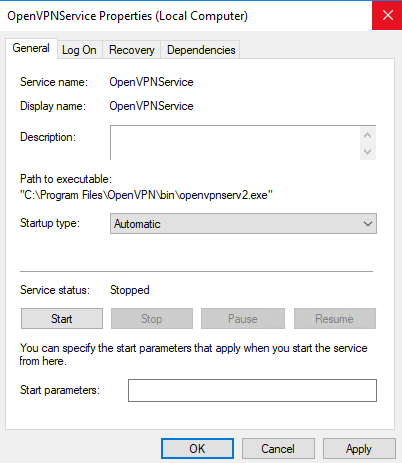
Run the Windows Service administrative tool:
Press Windows Key + R
Type “services.msc” and press Enter.
services.msc
Find the OpenVPN service, and set its Startup Type to “automatic.”
Optionally, start the service now.
Firewall Configuration
If you have connection problems, make sure to set a rule on your server’s firewall allowing incoming traffic on UDP port 1194.
Port Forwarding
If your server is behind a firewall/router, you will need to forward the port chosen for OpenVPN (in this example UDP 1194) to the server. Consult your router’s documentation for details on this.
To set up port forwarding, you will likely need to set up the server with a static local IP address instead of the default dynamic (changing) IP. Make sure to choose a static IP address that is not in the range your router might assign as a dynamic IP, but is within the router’s subnet (usually 192.168.0.xxx , 10.0.0.xxx , or similar).
Transmit all needed files to the client computers using a secure means such as a USB drive (email is not always a secure means).
Choose a port other than UDP 1194, and replace the port number wherever this guide mentions UDP port 1194.
This has all internet traffic route to the server IP so your IP is not disclosed.
Generate a TA key and place it in the same folder as the other certificates/keys:
cd C:\Program Files\OpenVPN\bin
openvpn --genkey --secret ta.key
Copy the key to the C:\Program Files\OpenVPN\config directory
Append the following lines to your server.ovpn profile:
# Route all traffic through VPN
push "redirect-gateway def1"
# Push Google DNS to prevent leak
push "dhcp-option DNS 8.8.8.8"
tls-auth ta.key 0 # This file is secret
Set the serer.ovpn file to use the following network as the network sharing below will use this network for the adaptor.
# server 192.168.137.0 255.255.255.0
Append the following lines to your client.ovpn profile:
# Block DNS leak
block-outside-dns
tls-auth ta.key 1 # This file is secret
Service tweaks on the Windows server
Open the Services window
Find Routing and Remote Access and set it to: Startup type – Automatic
Start the service
Adapter tweaks
Open the network adapters window
Right-click your internet adapter (e.g. Ethernet) and then: Properties -> Sharing -> Allow other network users to connect through this computer’s Internet connection
(if applicable) From the drop-down list select your OpenVPN TAP adapter (e.g. Ethernet?)
Note: Only one adapter can be shared at a time, so if you don’t see the Sharing tab, make sure no other adapter is being shared.
Registry tweaks
Key: HKEY_LOCAL_MACHINE\SYSTEM\CurrentControlSet\Services\Tcpip\Parameters
Value: IPEnableRouter
Type: REG_DWORD
Data: 0x00000001 (1)
Optional: Configure a static route (if behind router)
You have to route all packets sent to the client’s virtual IP back to the VPN server.
Example using Cisco router:
10.8.0.0 – virtual network subnet
255.255.255.0 – virtual network subnet mask
192.168.1.175 – VPN server internal IP (in the subnet of the router)
Hardening iformation; https://community.openvpn.net/openvpn/wiki/Hardening
Navigate to the C:\Program Files\OpenVPN\easy-rsa\ folder in the command prompt. NOTE: Make sure that the ca.crt and ca.key are located in the C:\Program Files\OpenVPN\easy-rsa\keys directory!
Press Windows Key + R
Type “cmd.exe” and press Enter.
cmd.exe
Right click to run as administrator
Navigate to the correct folder:
cd "C:\Program Files\OpenVPN\easy-rsa\keys"
Run the following:
vars
For each client, choose a name to identify that computer, such as “newuser-openvpn” in this example.
build-key newuser-openvpn
Open the C:\Program Files\OpenVPN\sample-config directory. Copy the client.ovpn to the name for the new user, ie, newuser-openvpn.ovpn.
Copy these files from C:\Program Files\OpenVPN\easy-rsa\keys and C:\Program Files\OpenVPN\easy-rsa\sample-config on the server to C:\Program Files\OpenVPN\config\ on each client (newuser-openvpn.ovpn, in this example):
ta.key
ca.crt
newuser-openvpn.ovpn.crt
newuser-openvpn.ovpn.key
newuser-openvpn.ovpn.ovpn
Copy to the C:\Program Files\OpenVPN\config on the new user computer.
Other resources: https://community.openvpn.net/openvpn/wiki/Easy_Windows_Guide