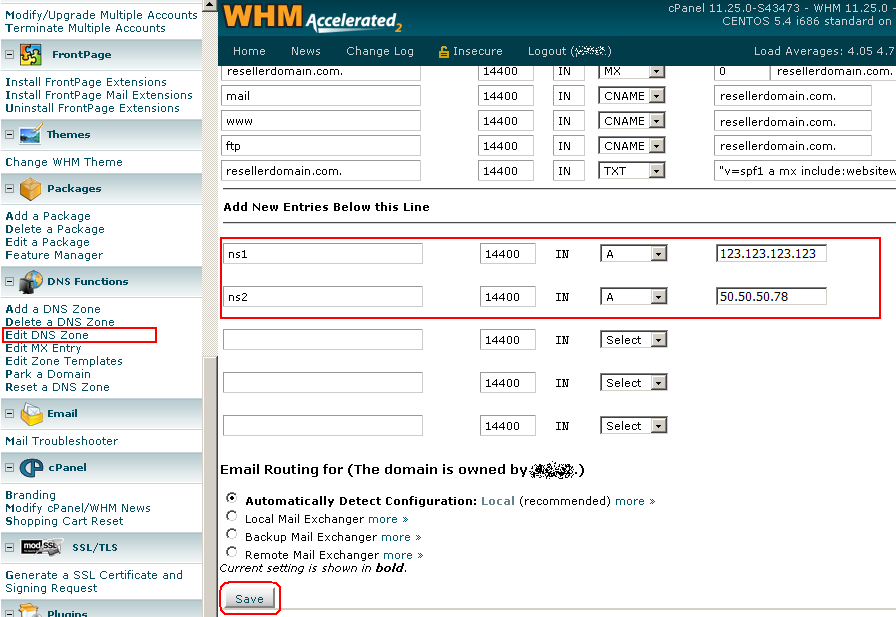
You must add this DNS glue record to use you nameservers.

  1. Log into WHM.
  2. Navigate to the DNS Functions section.
  3. Click on the Edit DNS Zone option.
  4. Select the domain that you need to add the Records to.
  5. Click the Edit button and wait for the page to load.
  6. In the first blank, type ns1.
  7. Skip the box with 14400, and go to the drop-down box.
  8. In the drop-down box, select A. A new box will appear.
  9. Erase the IP or hostname within the box.
  10. Type in the IP address for the NS1 private nameserver.
  11. In the second blank, type ns2.
  12. Skip the box with 14400, and go to the drop-down box.
  13. In the drop-down box, select A. A new box will appear.
  14. Erase the IP or hostname within the box.
  15. Type in the IP address for the NS2 private nameserver.
  16. Scroll all the way down to the bottom of the page and click the Save button.

When you get to the last step, your A record entries should look similar to the following:

Glue Record

Mysql Recovery. Error logs shows:


InnoDB: Database page corruption on disk or a failed
InnoDB: file read of page 7.
InnoDB: You may have to recover from a backup.
080703 23:46:16 InnoDB: Page dump in ascii and hex (16384 bytes):
… A LOT OF HEX AND BINARY DATA…
080703 23:46:16 InnoDB: Page checksum 587461377, prior-to-4.0.14-form checksum 772331632
InnoDB: stored checksum 2287785129, prior-to-4.0.14-form stored checksum 772331632
InnoDB: Page lsn 24 1487506025, low 4 bytes of lsn at page end 1487506025
InnoDB: Page number (if stored to page already) 7,
InnoDB: space id (if created with >= MySQL-4.1.1 and stored already) 6353
InnoDB: Page may be an index page where index id is 0 25556
InnoDB: (index “PRIMARY” of table “test”.”test”)
InnoDB: Database page corruption on disk or a failed

When page in clustered key index is corrupted. It is worse compared to having data corrupted in secondary indexes, in which case simple OPTIMIZE TABLE could be enough to rebuild it, but it is much better compared to table dictionary corruption when it may be much harder to recover the table.

Manually edited test.ibd file replacing few bytes so corruption is mild.

First I should note CHECK TABLE in INNODB is pretty useless. For my manually corrupted table I am getting:

mysql check table test;
ERROR 2013 (HY000): Lost connection to MySQL server during query

mysql> check table test;
+-----------+-------+----------+----------+
| Table | Op | Msg_type | Msg_text |
+-----------+-------+----------+----------+
| test.test | check | status | OK |
+-----------+-------+----------+----------+
1 row in set (0.69 sec)

First run is check table in normal operation mode – in which case Innodb simply crashes if there is checksum error (even if we’re running CHECK operation). In second case I’m running with innodb_force_recovery=1 and as you can see even though I get the message in the log file about checksum failing CHECK TABLE says table is OK. This means You Can’t Trust CHECK TABLE in Innodb to be sure your tables are good.

In this simple corruption was only in the data portion of pages so once you started Innodb with innodb_force_recovery=1 you can do the following:


mysql> CREATE TABLE `test2` (
    ->   `c` char(255) DEFAULT NULL,
    ->   `id` int(10) unsigned NOT NULL AUTO_INCREMENT,
    ->   PRIMARY KEY (`id`)
    -> ) ENGINE=MYISAM;
Query OK, 0 rows affected (0.03 sec)
mysql> insert into test2 select * from test;
Query OK, 229376 rows affected (0.91 sec)
Records: 229376  Duplicates: 0  Warnings: 0

Now you got all your data in MyISAM table so all you have to do is to drop old table and convert new table back to Innodb after restarting without innodb_force_recovery option. You can also rename the old table in case you will need to look into it more later. Another alternative is to dump table with MySQLDump and load it back. It is all pretty much the same stuff. I’m using MyISAM table for the reason you’ll see later.

You may think why do not you simply rebuild table by using OPTIMIZE TABLE ? This is because Running in innodb_force_recovery mode Innodb becomes read only for data operations and so you can’t insert or delete any data (though you can create or drop Innodb tables):


mysql> optimize table test;
+-----------+----------+----------+----------------------------------+
| Table     | Op       | Msg_type | Msg_text                         |
+-----------+----------+----------+----------------------------------+
| test.test | optimize | error    | Got error -1 from storage engine |
| test.test | optimize | status   | Operation failed                 |
+-----------+----------+----------+----------------------------------+
2 rows in set, 2 warnings (0.09 sec)

That was easy, right ?

I also thought so, so I went ahead and edited test.ibd a little more wiping one of the page headers completely. Now CHECK TABLE would crash even with innodb_force_recovery=1


080704 0:22:53 InnoDB: Assertion failure in thread 1158060352 in file btr/btr0btr.c line 3235
InnoDB: Failing assertion: page_get_n_recs(page) > 0 || (level == 0 && page_get_page_no(page) == dict_index_get_page(index))
InnoDB: We intentionally generate a memory trap.
InnoDB: Submit a detailed bug report to http://bugs.mysql.com.
InnoDB: If you get repeated assertion failures or crashes, even

If you get such assertion failures most likely higher innodb_force_recovery values would not help you – they are helpful in case there is corruption in various system areas but they can’t really change anything in a way Innodb processes page data.

The next comes trial and error approach:

mysql> insert into test2 select * from test;
ERROR 2013 (HY000): Lost connection to MySQL server during query

You may think will will scan the table until first corrupted row and get result in MyISAM table ? Unfortunately test2 ended up to be empty after the run. At the same time I saw some data could be selected. The problem is there is some buffering taking place and as MySQL crashes it does not store all data it could recover to MyISAM table.

Using series of queries with LIMIT can be handly if you recover manually:

mysql> insert ignore into test2 select * from test limit 10;
Query OK, 10 rows affected (0.00 sec)
Records: 10  Duplicates: 0  Warnings: 0
 
mysql> insert ignore into test2 select * from test limit 20;
Query OK, 10 rows affected (0.00 sec)
Records: 20  Duplicates: 10  Warnings: 0
 
mysql> insert ignore into test2 select * from test limit 100;
Query OK, 80 rows affected (0.00 sec)
Records: 100  Duplicates: 20  Warnings: 0
 
mysql> insert ignore into test2 select * from test limit 200;
Query OK, 100 rows affected (1.47 sec)
Records: 200  Duplicates: 100  Warnings: 0
 
mysql> insert ignore into test2 select * from test limit 300;
ERROR 2013 (HY000): Lost connection to MySQL server during query

As you can see I can get rows from the table in the new one until we finally touch the row which crashes MySQL. In this case we can expect this is the row between 200 and 300 and we can do bunch of similar statements to find exact number doing “binary search”

Note even if you do not use MyISAM table but fetch data to the script instead make sure to use LIMIT or PK Rangers when MySQL crashes you will not get all data in the network packet you potentially could get due to buffering.

So now we found there is corrupted data in the table and we need to somehow skip over it. To do it we would need to find max PK which could be recovered and try some higher values

mysql> select max(id) from test2;
+---------+
| max(id) |
+---------+
|     220 |
+---------+
1 row in set (0.00 sec)
 
mysql> insert ignore into test2 select * from test where id>250;
ERROR 2013 (HY000): Lost connection to MySQL server during query
 
mysql> insert ignore into test2 select * from test where id>300;
Query OK, 573140 rows affected (7.79 sec)
Records: 573140  Duplicates: 0  Warnings: 0

So we tried to skip 30 rows and it was too little while skipping 80 rows was OK. Again using binary search you can find out how many rows do you need to skip exactly to recover as much data as possible. Row size can be good help to you. In this case we have about 280 bytes per row so we get about 50 rows per page so not a big surprise 30 rows was not enough – typically if page directory is corrupted you would need to skip at least whole page. If page is corrupted at higher level in BTREE you may need to skip a lot of pages (whole subtree) to use this recovery method.

It is also well possible you will need to skip over few bad pages rather than one as in this example.

Another hint – you may want to CHECK your MyISAM table you use for recovery after MySQL crashes to make sure indexes are not corrupted.

So we looked at how to get your data back from simple Innodb Table Corruption. In more complex cases you may need to use higher innodb_force_recovery modes to block purging activity, insert buffer merge or recovery from transactional logs all together. Though the lower recovery mode you can run your recovery process with better data you’re likely to get.

In some cases such as if data dictionary or “root page” for clustered index is corrupted this method will not work well – in this case you may wish to use Innodb Recovery Toolkit which is also helpful in cases you’ve want to recover deleted rows or dropped table.

Domain Masking (a.k.a. Blind Forwarding) is using a domain name to display a different domain, but still shows the original domain’s name in the address bar.

Generally, this is considered a bad idea and not good for SEO, but it is possible.
Plesk
(Applies to 10 – 11.0)

In order to forward a domain blindly, you will create it in Plesk as you would any other domain, only select the Hosting Type as Forwarding, then select “Frame Forwarding” to spoof the domain name to your your domain name.

Domains > domainname.com > Websites & Domains
Scroll to the bottom of the page and click the domain name
Locate the Hosting type and click ‘Change’
Now select Forwarding and Frame Forwarding.

Want to see the number and list of IP addresses in the access log for a Plesk Domain?


cd /var/www/vhosts/domainname.com/statistics/logs
sed -e 's/\([0-9]\+\.[0-9]\+\.[0-9]\+\.[0-9]\+\).*$/\1/' -e t -e d access_log | sort | uniq -c

You should see a list like this…


30 100.3.125.44
4 101.226.65.105
6 103.6.190.208
11 105.227.211.73
168 107.213.9.254

For all Plesk access logs

# cd /var/log/httpd
# sed -e 's/\([0-9]\+\.[0-9]\+\.[0-9]\+\.[0-9]\+\).*$/\1/' -e t -e d access_log | sort | uniq -c

With respect to hard drives, the acronym “SMART” stands for Self-Monitoring, Analysis and Reporting Technology. This was built into many ATA-3 and later ATA, IDE and SCSI-3 hard drives. Basically anything after about 2005 should have it.

Ubuntu/Debian:

sudo apt-get install smartmontools

CentOS/Fedora/RH:

sudo yum install smartmontools

Gentoo:

sudo emerge sys-apps/smartmontools

Wiki: http://sourceforge.net/apps/trac/smartmontools/wiki

smartctl

The program smartctl is used to interface with the SMART features on the drive firmware. Here are a couple of easy things to get started with (however some versions do not have the –scan option):


$ smartctl --scan -d ata
/dev/hda -d ata # /dev/hda, ATA device
/dev/hdc -d ata # /dev/hdc, ATA device
$ sudo smartctl --info /dev/hdc
smartctl 5.42 2011-10-20 r3458 [i686-linux-2.6.33.1-xedvia] (local
build)
Copyright (C) 2002-11 by Bruce Allen,
http://smartmontools.sourceforge.net

=== START OF INFORMATION SECTION ===
Model Family:     Seagate Barracuda 7200.7 and 7200.7 Plus
Device Model:     ST3160023A
Serial Number:    5JS9MDKW
Firmware Version: 8.01
User Capacity:    160,041,885,696 bytes [160 GB]
Sector Size:      512 bytes logical/physical
Device is:        In smartctl database [for details use: -P show]
ATA Version is:   6
ATA Standard is:  ATA/ATAPI-6 T13 1410D revision 2
Local Time is:    Thu Feb  7 09:27:18 2013 PST
SMART support is: Available - device has SMART capability.
SMART support is: Disabled

Note that the “SMART support” is listed as available but disabled. To enable full diagnostic checking turn it on with something like this:


$ sudo smartctl --smart=on --offlineauto=on --saveauto=on /dev/hdc
=== START OF ENABLE/DISABLE COMMANDS SECTION ===
SMART Enabled.
SMART Attribute Autosave Enabled.
SMART Automatic Offline Testing Enabled every four hours.

In theory this should only need to be done once and the drive should remember this (because of the saveauto directive). The offlineauto will cause automatic testing every 4 hours. In theory it will wait “nicely” if the drive is already busy so performance should not be seriously impacted.
Testing

Here’s a way to run a “short” off-line test. This tests electrical and mechanical performance of the drive and does read testing.


$ sudo smartctl --test=short /dev/hda
=== START OF OFFLINE IMMEDIATE AND SELF-TEST SECTION ===
Sending command: "Execute SMART Short self-test routine immediately in off-line mode".
Drive command "Execute SMART Short self-test routine immediately in off-line mode" successful.
Testing has begun.
Please wait 1 minutes for test to complete.
Test will complete after Thu Feb  7 10:13:19 2013
Use smartctl -X to abort test.

$ sudo smartctl --log=selftest /dev/hda
=== START OF READ SMART DATA SECTION ===
SMART Self-test log structure revision number 1
Num  Test_Description    Status                  Remaining LifeTime(hours)  LBA_of_first_error
# 1  Short offline       Completed without error       00%     43398        -

$ sudo smartctl --log=selftest /dev/hdc
=== START OF READ SMART DATA SECTION ===
SMART Self-test log structure revision number 1
Num  Test_Description    Status                  Remaining  LifeTime(hours)  LBA_of_first_error
# 1  Short offline       Completed: read failure       90%     37994         7234643

The first command starts the test off and it tells you to come back in 1 or 2 minutes. The second command shows how to query the log file to see if anything bad came up. In this case hda was fine (“Completed without error”) but hdc had a very important “read error”. Replace that drive ASAP!

Sysstat is a package of performance monitoring tools for Linux operating systems. It provides a collection of utilities to collect, process and analyze system utilization data over time. The sysstat package includes tools like sar, iostat, mpstat, and pidstat, which provide various system performance metrics such as CPU, memory, disk and network usage, process statistics, and more. The data collected by sysstat can be used to identify performance bottlenecks, troubleshoot system issues, and make informed decisions about system resource usage.

This article shows how to install sysstat and to check the system.

Read More

Find out if your server is affected

http://filippo.io/Heartbleed/
Run the command:

[root@austin ~]# openssl version
OpenSSL 1.0.1e-fips 11 Feb 2013

to get the version number of openssl. If the command shows e.g.:

[root@austin ~]# rpm -qa | grep openssl
openssl-1.0.1e-16.el6_5.7.x86_64

Your server might be vulnerable as the version is below 1.0.1g. But some Linux distributions patch packages, see below for instructions to find out if the package on your server has been patched.

If your server uses a 0.9.8 release like it is used on Debian squeeze, then the server is not vulnerable as the heartbeat function has been implemented in OpenSSL 1.0.1 and later versions only.

Fix the vulnerability

To fix the vulnerability, install the latest updates for your server.

Debian

apt-get update
apt-get upgrade

Ubuntu

apt-get update
apt-get upgrade

Fedora and CentOS

yum update

OpenSuSE

zypper update

Then restart all services that use OpenSSL.

On a ISPConfig 3 server, restart e.g. these services (when they are installed): sshd, apache, nginx, postfix, dovecot, courier, pure-ftpd, bind and mysql. If you want to be absolutely sure that you did not miss a service, then restart the whole server by running “reboot” on the shell.

Check if the Linux update installed the correct package

After you installed the Linux updates, check if the openssl package has been upgraded correctly. Some Linux distributions
patch packages, so “openssl version” does not always show whether the correct patch that fixes the vulnerability has been installed.

Check the package on Debian and Ubuntu:

dpkg-query -l 'openssl'

Here the output for a correctly patched Debian 7 (Wheezy) server:

dpkg-query -l ‘openssl’
Desired=Unknown/Install/Remove/Purge/Hold
| Status=Not/Inst/Conf-files/Unpacked/halF-conf/Half-inst/trig-aWait/Trig-pend
|/ Err?=(none)/Reinst-required (Status,Err: uppercase=bad)
||/ Name Version Architecture Description
+++-===================-===============-==============-============================================
ii openssl 1.0.1e-2+deb7u5 amd64 Secure Socket Layer (SSL) binary and related

For Fedora and CentOS, use this command to find the installed package name:

rpm -qa | grep openssl

Here are the links with the release notes that contain the package names of the fixed versions:

Check Here for the packages:

https://rhn.redhat.com/errata/RHSA-2014-0376.html

Affected versions of the OpenSSL:

Status of different versions:

OpenSSL 1.0.1 through 1.0.1f (inclusive) are vulnerable
OpenSSL 1.0.1g is NOT vulnerable
OpenSSL 1.0.0 branch is NOT vulnerable
OpenSSL 0.9.8 branch is NOT vulnerable

Bug was introduced to OpenSSL in December 2011 and has been out in the wild since OpenSSL release 1.0.1 on 14th of March 2012. OpenSSL 1.0.1g released on 7th of April 2014 fixes the bug.
Operating Systems

Some operating system distributions that have shipped with potentially vulnerable OpenSSL version:

Debian Wheezy (stable), OpenSSL 1.0.1e-2+deb7u4
Ubuntu 12.04.4 LTS, OpenSSL 1.0.1-4ubuntu5.11
CentOS 6.5, OpenSSL 1.0.1e-15
Fedora 18, OpenSSL 1.0.1e-4
OpenBSD 5.3 (OpenSSL 1.0.1c 10 May 2012) and 5.4 (OpenSSL 1.0.1c 10 May 2012)
FreeBSD 8.4 (OpenSSL 1.0.1e) and 9.1 (OpenSSL 1.0.1c)
NetBSD 5.0.2 (OpenSSL 1.0.1e)
OpenSUSE 12.2 (OpenSSL 1.0.1c)
Operating system distribution with versions that are not vulnerable:

Debian Squeeze (oldstable), OpenSSL 0.9.8o-4squeeze14
SUSE Linux Enterprise Server
How to fix:

Even though the actual code fix may appear trivial, OpenSSL team is the expert in fixing it properly so latest fixed version 1.0.1g or newer should be used. If this is not possible software developers can recompile OpenSSL with the handshake removed from the code by compile time option -DOPENSSL_NO_HEARTBEATS.

With regards to the openSSL heartbleed issue and resolution, should I revoke OR re-key my existing SSL cert?

Any certificate that was ever hosted on an internet-facing vulnerable version of OpenSSL should be revoked and replaced. The cost of exhaustively evaluating whether a certificate was in jeopardy is almost certainly going to be higher than the cost of simply replacing the certificate. This is also a good opportunity to make sure that your certificate key length and signature algorithms are ‘up to code.'”

Because the private key might be compromised you need to re-key the certificate instead of just renew it, e.g. use a new public/private key pair instead of renewing one. Revoking the compromised certificate need to be done too, which may be done automatically if you create the new certificate by the same CA but you should check this with the issuer (CA).

Note, that the revoking process of the current PKI structure in the browsers is bad, e.g. some don’t check, some ignore OCSP errors etc. And it is worse outside the browsers (e.g. scripts, mobile apps…). That’s why in the last big compromises or wrong behavior of CA (Comodo, DigiNotar, FGC/A …) you always got a new browser version 🙁

As noted on the Heartbleed site, appropriate reponse steps are broadly:

  •         Patch vulnerable systems.
  •         Regenerate new private keys.
  •         Submit new CSR to your CA.
  •         Obtain and install new signed certificate.
  •         Revoke old certificates.