Error:

Sorry, the domain is already pointed to an IP address that does not appear to use DNS servers associated with this server. Please transfer the domain to this servers nameservers or have your administrator add one of its nameservers to /etc/ips.remotedns and make the proper A entries on that remote nameserver.

Logon to WHM Select Tweak Settings under Server Setup Put checkboxes next to both: Allow Creation of Parked/Addon Domains that are not registered Allow Creation of Parked/Addon Domains that resolve to other servers (ie domain transfers) [This can be a major security problem. If you must have it enabled, be sure to not allow users to park common internet domains.]

Source: http://www.howtogeek.com/121650/how-to-secure-ssh-with-google-authenticators-two-factor-authentication/

Also, for CentOS: http://www.tecmint.com/ssh-two-factor-authentication/

Want to secure your SSH server with easy-to-use two-factor authentication? Google provides the necessary software to integrate Google Authenticator’s time-based one-time password (TOTP) system with your SSH server. You’ll have to enter the code from your phone when you connect.

Check the settings and add/adjust as follows:

Find the configuration file:

root@serv [~]# /usr/local/apache/bin/httpd -V
Server version: Apache/2.2.27 (Unix)
Server built:   Jun 12 2014 01:44:45
Cpanel::Easy::Apache v3.24.19 rev9999
Server's Module Magic Number: 20051115:33
Server loaded:  APR 1.5.0, APR-Util 1.5.3
Compiled using: APR 1.5.0, APR-Util 1.5.3
Architecture:   64-bit
Server MPM:     Prefork
  threaded:     no
    forked:     yes (variable process count)
Server compiled with....
 -D APACHE_MPM_DIR="server/mpm/prefork"
 -D APR_HAS_SENDFILE
 -D APR_HAS_MMAP
 -D APR_HAVE_IPV6 (IPv4-mapped addresses disabled)
 -D APR_USE_SYSVSEM_SERIALIZE
 -D APR_USE_PTHREAD_SERIALIZE
 -D SINGLE_LISTEN_UNSERIALIZED_ACCEPT
 -D APR_HAS_OTHER_CHILD
 -D AP_HAVE_RELIABLE_PIPED_LOGS
 -D DYNAMIC_MODULE_LIMIT=128
 -D HTTPD_ROOT="/usr/local/apache"
 -D SUEXEC_BIN="/usr/local/apache/bin/suexec"
 -D DEFAULT_PIDLOG="logs/httpd.pid"
 -D DEFAULT_SCOREBOARD="logs/apache_runtime_status"
 -D DEFAULT_LOCKFILE="logs/accept.lock"
 -D DEFAULT_ERRORLOG="logs/error_log"
 -D AP_TYPES_CONFIG_FILE="conf/mime.types"
 -D SERVER_CONFIG_FILE="conf/httpd.conf"

The config file is usually at:
/usr/local/apache/conf/httpd.conf

Add/Edit the config:

Start Servers 32
Minimum Spare Servers 32
Maximum Spare Servers 256
Server Limit 2000
Max Clients 1500
Keep-Alive On

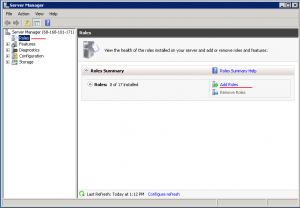
Open Server Manager, go to Roles and click “Add Roles”

1


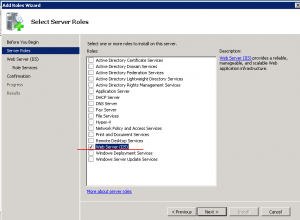
In the Add Role Wizard, select Web Server (IIS) role to install

2

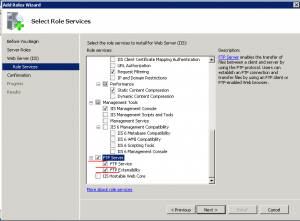
Click Next until you reach Select Role Services page, leave the default and check FTP Server, FTP Service and FTP Extensibility at the bottom. Click Next, follow the wizard and finish the role installation.

3

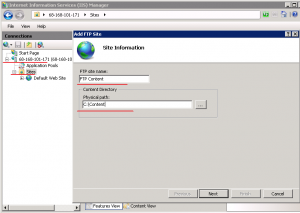
Now open IIS Manager from Start > Administrative Tools, expand the server, right click Sites, and click Add FTP Site, give it a site name and configure the physical path as needed.

4

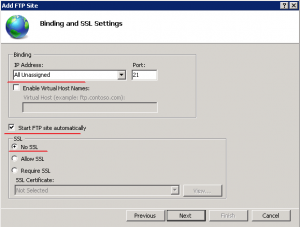
Configure Binding and SSL. In our case, we’d like to bind to all unassigned IP addresses and do not use SSL.

5

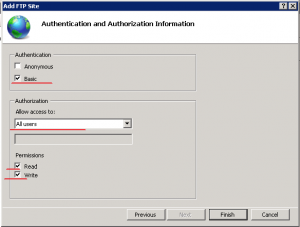
Enable Basic Authentication and configure authorization. In our case I’ll start with allowing All users both Read and Write permission as long as all users on the server are password protected.

6

Click Finish to finish the configuration.


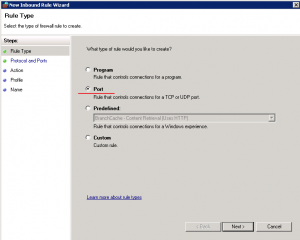
Open Windows Firewall with Advanced Security from Start > Administrative Tools, go to Inbound Rules in the left pane, and create a new rule by clicking New Rule in the Action Pane, select Port and click next.

7

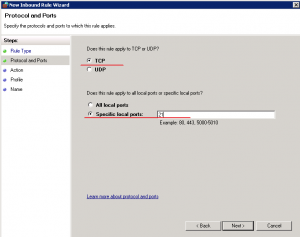
Apply this rule to TCP port 21, and click Next

8

  • Keep the default configure for the rest of steps to Allow the connection and apply it to all profiles, name the rule and finish the wizard.


  • Now the FTP should be up and running, please test the connection to confirm.

To add ftp users – see here: http://www.iis.net/learn/publish/using-the-ftp-service/configure-ftp-with-iis-manager-authentication-in-iis-7

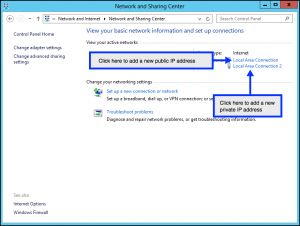
From the Windows desktop, move your mouse to the top right corner of the screen to bring up the Charms bar, and click on Start to bring up the Start screen. In the Start screen, click on the Control Panel tile, and then in the Control Panel screen click on View network status and tasks under the Network and Internet heading.

This opens the Network and Sharing Center screen. To add a new public IP address, click on Local Area Connection. To add a new private IP address, click on Local Area Connection 2.
network_sharing

(This example uses Local Area Connection and a public IP address – the steps for Local Area Connection 2 and a private IP address are identical)

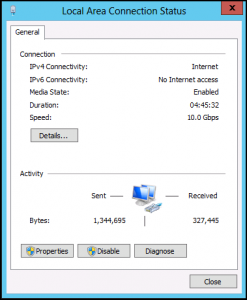
Clicking on Local Area Connection opens the Local Area Connection Status screen.
local_connection1

Click on Properties.

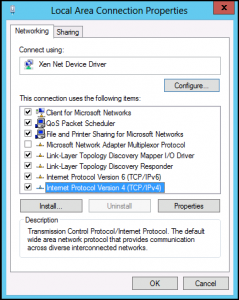
In the Local Area Connection Properties dialog, click on Internet Protocol Version 4 (TCP/IPv4)
local_connection_ipv4

Once you have clicked on Internet Protocol Version 4 (TCP/IPv4), click on Properties.

This takes you to the Internet Protocol Version 4 (TCP/IPv4) Properties screen, which shows the existing IP address, Subnet mask, and Default gateway. To add the new IP address, click on Advanced….

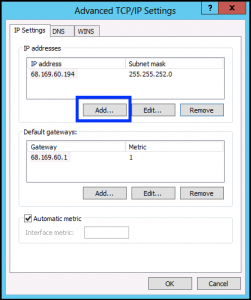
This takes you to the Advanced TCP/IP Settings page. Click on Add… to add the new IP address. Make sure to click the Add button under IP addresses (outlined in blue) and not the Add button under Default gateways.
local_connection_adv_add

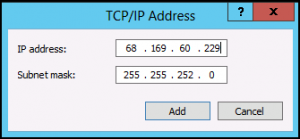
This opens the TCP/IP Address dialog. Add the new IP address, and also the Subnet mask, and click on Add.
add_tcpip

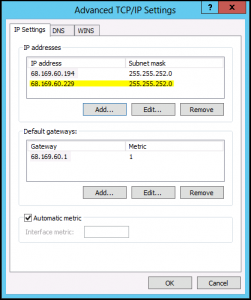
his takes you back to the Advanced TCP/IP Settings screen, which should show the new IP address and Subnet mask (highlighted in yellow here).
ip_added

Click OK or Close to get back to the Network and Sharing Center screen. You may get a warning similar to this:
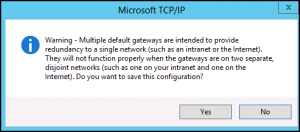
ip_warning

If so, just click on Yes to continue.

Once you get back to the Network and Sharing Center screen, close that screen. Your new IP address is now added to your Windows Server 2012 VS. You can verify this by opening Windows PowerShell and typing in the ipconfig /all command. Look for the new IP address under the Ethernet adapter Local Area Connection section (highlighted in yellow here). If you added a private IP address, it will be under Ethernet adapter Local Area Connection 2.
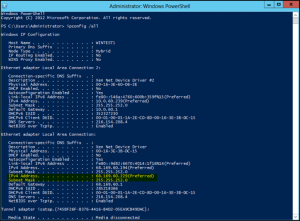
powershell

This shows that the new IP address has been successfully added to the Virtual Server and is ready for use.
Problem: Our security settings are stopping me from downloading DirectX.

Disable IE Enhanced Security on Windows Server 2012

Description

This article will detail disabling the ‘IE Enhanced Security Configuration’ setting within Windows Server 2012. Enchanced Security mode limits the exposure of the server to potentially malicious Web content. However, as a result, this option can cause Web sites to load inproperly. This option can be disabled to allow for a smoother Web experience.

Disabling this option on production server’s is not recommended.

Instructions

1. Open the Server Manager from the task bar.
2. Select Local Server.
3. On the properties tab look for the IE Enchanced Security Configuration setting and Click On.
4. Modify the Security Configuration settings from On to Off. Click Ok to save your changes.
5. Refresh the Local Server details by clicking the refresh button from the top of the Server Manager. The setting will move from ‘On’ to ‘Off’.
6. Close any current instances of Internet Explorer and relaunch to ensure the setting take effect.