Sometimes wordpress may have errors that you want to find out more about. Here are a few steps we can take to see more information on what’s happening.
To debug WordPress, you can follow these steps:
Enable WordPress Debugging:
Open the wp-config.php file in your WordPress root directory. Search for WP_DEBUG constant. Change its value to true. Also add a path to a log file.
define( 'WP_DEBUG', true );
define( 'WP_DEBUG_LOG', '/home/username/logs/wp-errors.log' );
When enabled by setting the WP_DEBUG_LOG constant to true, WordPress will write all issues to the following file:
wp-content/debug.log
However, you can also specify a custom file path to write the log to a different location on your server.
Create a debug log file in logs directory. In this example, we are creating it in a cPanel account log directory.
sudo touch /home/username/logs/wp-errors.log
Make sure the file is writable. To make a file writable in Linux, you can use the chmod command.
sudo chmod 644 /home/username/logs/wp-errors.log
Or
sudo chmod +w /home/username/logs/wp-errors.log
This command adds the “write” permission for the owner of the file (wp-errors.log in this case). Check the file for errors after reproducing the issue.
If you want to save problems to the log but not publicly display them within the HTML of your pages you can also use the WP_DEBUG_DISPLAY constant to keep debug mode enabled but not display messages on your site.
// Disable display of errors and warnings
define( 'WP_DEBUG_DISPLAY', false );
@ini_set( 'display_errors', 0 );
Use Debugging Plugins
Install and activate a WordPress debugging plugin like Query Monitor, Debug Bar, or WP Debugging.
Check the Browser Console
Open the browser console to check for JavaScript errors.
Check Server Logs
Check the server error log to see if there are any PHP errors.
By following these steps, you can effectively debug WordPress and troubleshoot any issues that you may be experiencing.
Enable PHP Error Logs
To enable PHP error logging in Linux, follow these steps.
Edit the php.ini file: Open the php.ini file using a text editor such as vi or nano. The php.ini file is usually located in the /etc/php directory. For example, to edit the php.ini file using nano editor, run the command:
sudo nano /etc/php/7.x/apache2/php.ini
Note: Replace “7.x” with the version of PHP installed on your system.
Enable error logging: Search for the following lines in the php.ini file:
;error_reporting = E_ALL
;display_errors = Off
Uncomment these lines by removing the semicolon (;) at the beginning of each line, and change the values as follows:
error_reporting = E_ALL
display_errors = On
Set the error log file path: Add the following line to the php.ini file to specify the path for the PHP error log file:
error_log = /var/log/php_errors.log
Note: You can change the file path to your desired location.
Create the error log file: Create the PHP error log file by running the command:
sudo touch /var/log/php_errors.log
Change the file permissions: Change the file permissions of the error log file so that it can be written to by the web server. Run the command:
sudo chmod 666 /var/log/php_errors.log
Restart Apache: Restart the Apache web server to apply the changes. Run the command:
sudo systemctl restart apache2
After these steps, PHP errors will be logged to the specified file.
Enable php error log cPanel
To enable the PHP error log in cPanel, you can follow these steps:
- Log in to cPanel and navigate to the “Software” section.
- Click on “MultiPHP INI Editor”
- Under Configure PHP INI basic settings, select the home directory or a domain’s document root to open the corresponding PHP configuration.
- Scroll down until you see the “display_errors” options.
- Set the slider “display_errors” option to “Enabled”.
- Click on the “Apply” button to save the changes.
Now set the error log path in the MultiPHP INI Editor in cPanel
While in MultiPHP INI Editor,
Click “Editor Mode”
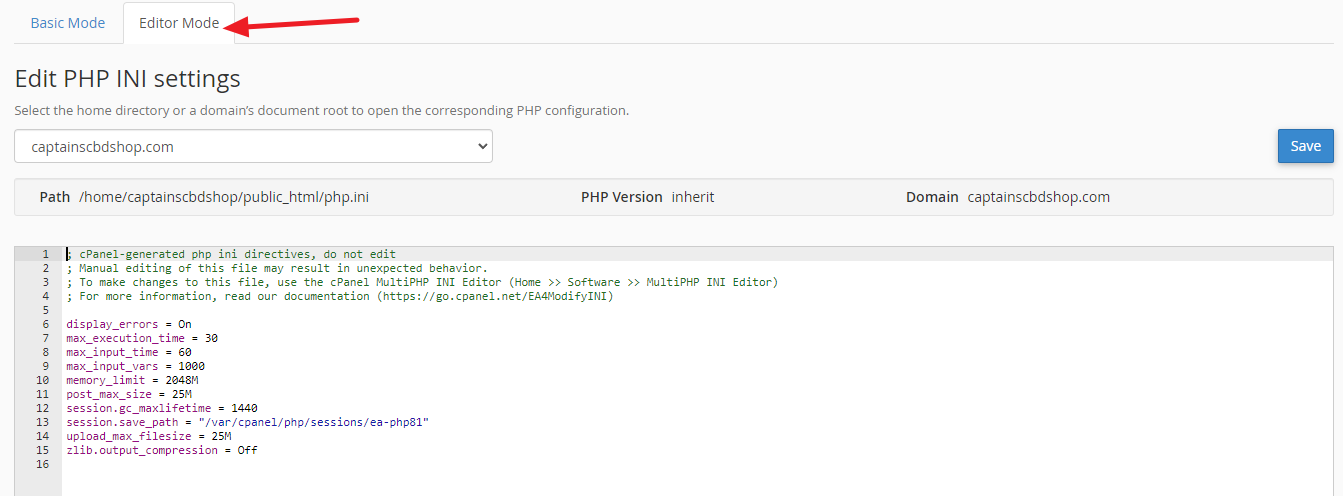
Add the line error_log = “/some/path”
error_log = "/logs/php_error.log"
This should either be a filename, with no leading path, or an exact path within your home directory
Save the changes.
Using PHP-FPM
The only way to adjust this setting is via WHM’s MultiPHP Manager
Log into WHM
Navigate to MultiPHP Manager
Find the domain you’d like to change the error log location for
Click the “Edit PHP-FPM” link
Change the log location in “The error log file (error_log)” relative to the folder “logs” within the user’s home directory
Save your changes
After following these steps, PHP errors will be logged to the file specified in the “error_log” option. You can view the contents of the error log file using a text editor or by running the “tail” command in the terminal.