domain.com will need to exist in the Apache configuration somewhere, effectively; in cPanel, they can created domain.com as a parked domain on edavan.presentica.com
Then set the A record to point to the domain
Linux, Windows, Software Tips, Articles and Hacks
domain.com will need to exist in the Apache configuration somewhere, effectively; in cPanel, they can created domain.com as a parked domain on edavan.presentica.com
Then set the A record to point to the domain
Starting the DNS server fails. restarting named shows the following error:
service named restart
Stopping named: [ OK ]
Starting named:
Error in named configuration:
zone 0.0.127.IN-ADDR.ARPA/IN: loaded serial 20010622
zone domain1.com/IN: loaded serial 1415397236
zone domain2.org/IN: loaded serial 1415411359
zone domain3.com/IN: loaded serial 1415556389
Thats the okay part
And then you see this:
zone domain4.com/IN: NS 'ns2.domain4.com' has no address records (A or AAAA)
zone domain4.com/IN: not loaded due to errors.
Resolution:
Add an A record for the nameserver ns2.domain4.com in the zone DNS manager in plesk. The restart named.
# service named restart
Sender Policy Framework (SPF) is a method of fighting spam. As more time passes, this protocol will be used as one of the standard methods of fighting spam on the Internet. An SPF record is a TXT record that is part of a domain’s DNS zone file. The TXT record specifies a list of authorized host names/IP addresses that mail can originate from for a given domain name. Once this entry is placed within the DNS zone, no further configuration is necessary to take advantage of servers that incorporate SPF checking into their anti-spam systems. This SPF record is added the same way as a regular A, MX, or CNAME record.
v=spf1 mx a ip4:192.55.182.34 ~all
* Make sure the IP above has an A record set in the DNS zone
Default:
"v=spf1 a mx ~all"
“v=spf1 a mx ip4:IP.ADD.RE.SS include:mail.domain.com ~all”
Example:
domain.com. IN TXT “v=spf1 a mx ip4:IP.ADD.RE.SS include:spf.messaging.microsoft.com include:mail.domain2.com ~all”
Description:
When should I use one?
An SPF record is generally used when your company is trying to avoid people using your domain for SPAM. The thing you need to know when working with SurveyGizmo is making sure that if you do have an SPF record, that we are whitelisted in it. Whitelisting us will allow you to use your domain as the FROM field when using the SurveyGizmo application to send out email campaigns or send email actions.
What should I avoid?
If you don’t have an SPF record already in place, then we don’t recommend setting one up mid-campaign. Adding one will most likely not increase your deliverability in any way.
If you already have an SPF record, or are setting one up for other purposes, you’ll want to make sure you don’t set it to only allow SurveyGizmo. If you do, then you won’t be able to send out emails from any other servers.
If I have an SPF record, and need to whitelist SurveyGizmo, what should I use?
If you already have an SPF record set up on the domain you want to send emails from, then we recommend adding the following IP addresses to your SPF.
ipv4:74.63.000.0/24
This will include our servers in your preferred server list. You can also use “include:sgizmo.com”, however, the IP addresses above are more practical. If you were to use “include:sgizmo.com” it would include all of our SPF records, which is excessive as we have internal SurveyGizmo IP addresses that the application doesn’t use.
How to make one
http://www.microsoft.com/mscorp/safety/content/technologies/senderid/wizard/
SPF – v=spf1 +a +mx +ip4:67.228.44.45 ?all
You can find more about SPF records here:
http://www.openspf.org/
http://en.wikipedia.org/wiki/Sender_Policy_FrameworkHome
Server Status
and you can generate an SPF record here:
http://www.microsoft.com/mscorp/safety/content/technologies/senderid/wizard/
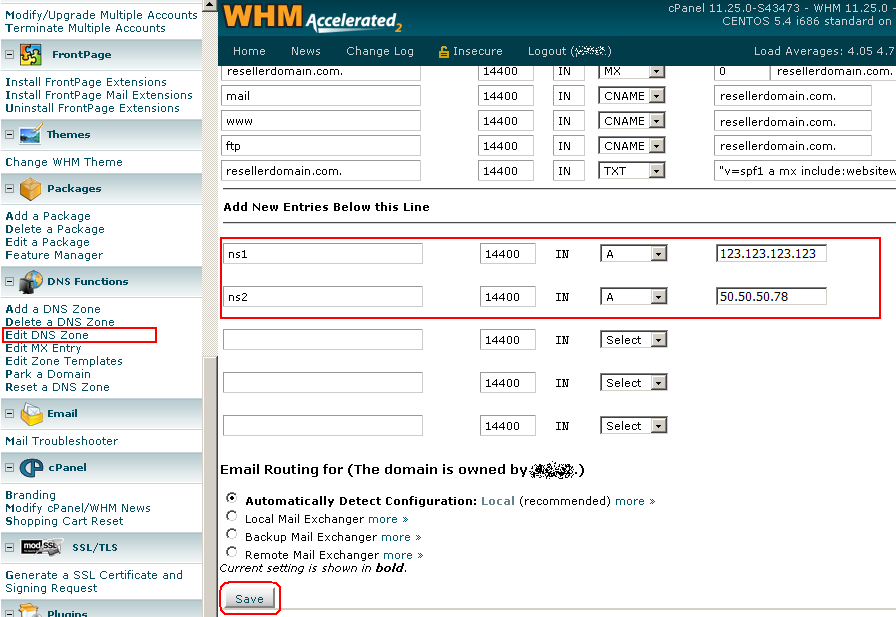
You must add this DNS glue record to use you nameservers.
When you get to the last step, your A record entries should look similar to the following:
There are three steps to setting up DNS for websites hosted on your Dedicated using Plesk 12:
Step 1 — Adding Your Domain Name to Parallels Plesk Panel
Before you can use DNS with a domain name, you have to add it to Parallels Plesk Panel.
[stextbox id=”info”]NOTE: If you have already set up a domain name in Parallels Plesk Panel, you can skip this step. To Add a Zone File for Your Domain Name in Parallels Plesk Panel[/stextbox]
Log in to Parallels Plesk Panel as an administrator at https://yourserverip:8443, where yourserverip is your server’s IP address.
Go to the Webspaces tab, and then click Add a webspace.
Complete the on-screen fields, and then click OK.
NOTE: The username and password you select here are your FTP credentials for this domain/webspace.
Step 2 — Adding/Editing the DNS Records in Plesk for a Domain
Creating and registering domain hosts let you use a custom domain name as your DNS server name. To Create and Register Your Domain Hosts in Parallels Plesk Panel:
Log in to Parallels Plesk Panel as an administrator.
Go to the Websites & Domains tab, and then click DNS Settings.
For the row with the Record Type of NS, click your domain name, change the following, and then click OK:
Record type — NS.
Domain Name — Leave this field.
Name server — Type ns1.coolexample.com, where coolexample.com is your domain name.

For the row with the Host of ns.coolexample.com, where coolexample.com is your domain, click it, change the following, and then click OK See above):
Record type — A.
Domain Name — Type ns1.
IP Address — Enter your server’s IP address.
After

Next, click Add Record, complete the following fields, and then click OK:
Record type — Select NS.
Domain Name — Leave this field blank.
Name server — Enter ns2.coolexample.com, where coolexample.com is your domain name.
Next, click Add Record, complete the following fields, and then click OK:
Record type — Select A.
Domain Name — Type ns2.
IP Address — Enter your server’s IP address
Click Update.
After

Go to the Server tab in Plesk, and then, from the Server Management section, click Services Management.
Next to DNS Server (BIND), click Restart. Allow a few minutes for the service to restart.
NOTE: DNS changes can take 24-48 hours to propagate.
Step 3. Registering your Nameservers
Once you set up a domain name and create a zone file in Parallels Plesk Panel, you need to create and register two domain hosts for your domain name. For more information, see Registering Your Own Nameservers/Hosts. If your domain name is registered with another company, you need to contact them for instructions regarding domain host registration.
NOTE: You can use the two domain hosts you just created for other domains hosted on the same server. You do not need to create new domain hosts for each of your domains.
To Create and Register Your Domain Hosts in Parallels Plesk Panel
Log in to Parallels Plesk Panel as an administrator.
Go to the Websites & Domains tab, and then click DNS Settings.
For the row with the Record Type of NS, click your domain name, change the following, and then click OK:
Record type — NS.
Domain Name — Leave this field.
Name server — Type ns1.coolexample.com, where coolexample.com is your domain name.
For the row with the Host of ns.coolexample.com, where coolexample.com is your domain, click it, change the following, and then click OK:
Record type — A.
Domain Name — Type ns1.
IP Address — Enter your server’s IP address.
Click Add Record, complete the following fields, and then click OK:
Record type — Select NS.
Domain Name — Leave this field blank.
Name server — Enter ns2.coolexample.com, where coolexample.com is your domain name.
Click Add Record, complete the following fields, and then click OK:
Record type — Select A.
Domain Name — Type ns2.
IP Address — Enter your server’s IP address
Click Update.
Go to the Server tab in Plesk, and then, from the Server Management section, click Services Management.
Next to DNS Server (BIND), click Refresh. Allow a few minutes for the service to restart.