Restoring ost-files

Restore Ost-files aren’t intended to be backed up and restored. However, under certain circumstances an ost-file can still be used directly to restore data.

You can restore an ost-file when;

When the IMAP account the ost-file belongs to is still configured in Outlook and you…
haven’t removed and re-added the IMAP account.
haven’t created a new Mail Profile
aren’t trying to use it for the IMAP account on another computer.
When the Exchange account the ost-file belongs to is still configured in Outlook. This can also be in a new Mail Profile or on another computer as long as you have connected to the Exchange server at least once.

To restore data from the ost-file;

Close Outlook.
Rename the current ost-file of the account to .old.
Restore the ost-file to the location of the current ost-file and rename it if needed.
Disconnect yourself from the network to make sure that no changes are being synched when the account reconnects. This could for instance empty the ost-file if the data was no longer on the server.
Start Outlook.
Export any data that you wish to keep to a pst-file.
Close Outlook.
Delete or rename your recovered ost-file. If your original cache was still working, you can rename it back from .old or otherwise make sure there is no longer an ost-file for your account.
Reconnect yourself to the network.
Start Outlook.
Once Outlook is done synching, you can import the data from the pst-file.

Source: https://www.howto-outlook.com/howto/backupandrestore.htm#restore-ost

If you emails are not arriving or you are getting delays or no receipt, here are ways to help improve email delivery.

Google

To keep important email messages out of your Gmail spam folder, you should do the following steps.

  1. Add the sender email address to your Google Contacts. When you add a sender’s email address to your contacts, it tells Google you want to receive email from that sender. This method does not guarantee messages from the desired sender won’t be sent to spam, but it’s an easy way to make it more likely the desired email will arrive in your inbox.
  2. Create a filter rule to prevent messages from specific senders going into the spam folder. This adding to the whitelist or safe sender list. Also, If an email message is already in your spam folder, you can use an option to train the Gmail spam filter to not send those messages to your spam folder.

Add a Gmail Contact on the Computer and on Android or IOS App.

On your computer, go to contacts.google.com, at the top left corner, select Create contact, enter the contact’s information, including the sender email address, select save in the bottom right corner.

On your Android phone or tablet, open the Contacts app, at the bottom right, tap add, enter the contact’s name and email address. Make sure you save the contact to the correct account. Next to your email account, tap the Down arrow and then select the account that will receive the email messages you’re whitelisting. When you’re finished, tap Save.

Create a filter rule to keep desired email out of spam

Gmail’s filters provide a lot of useful ways to manage your email and one of those ways is to set a rule to prevent email from a specific email address from going to your spam folder. Filters are the closest thing Gmail has to a “safe sender” or “whitelist”.

Filters can only be created and modified from the online web version of Gmail, so you’ll need to go to your computer to complete the following.

Open the Gmail website from your computer. In the search box at the top, select the Down arrow.

In the From field, enter the sender email address. At the bottom of the search window, click Create filter.

Select Never send it to Spam. Click Create filter.

Mark an email as Not Spam

On your computer, open the Gmail website and on the left, select More then find Spam.

Open the desired email message. At the top of the page, select “Not spam”. The message will be moved to your inbox.

If you’re an email sender having trouble sending email to Gmail recipients, visit the Gmail Postmaster Tools website. Source: https://www.whitelist.guide/gmail/

Outlook, Office365

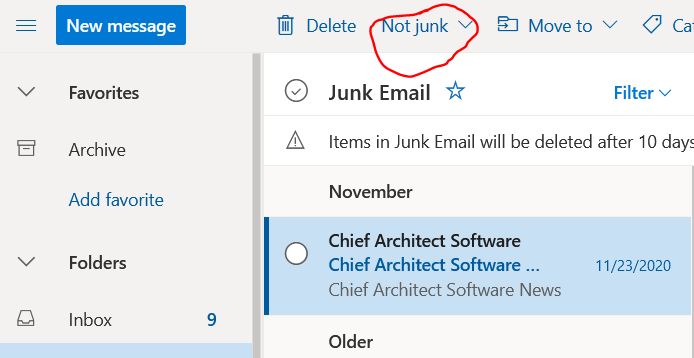
Add an address to your Contacts and the Safe Senders list to ensure you’ll always receive their messages. Email addresses in the Safe Senders List are never treated as junk email. If lands in your junk email folder, you can mark it as “not junk” to teach Outlook that you want to receive that type of email.

Safe Senders list

By default, email addresses in your Outlook contacts are considered safe senders by the Junk Email Filter, but you can change this setting. Email messages from safe senders are never moved to the Junk E-mail folder.

To add people to your Safe Senders List (web), do the following:

Select the Settings icon (gear icon), select View all Outlook settings,


Select Mail, Select Junk email, Enter the sender email address, Hit Enter on Keyboard > Save.
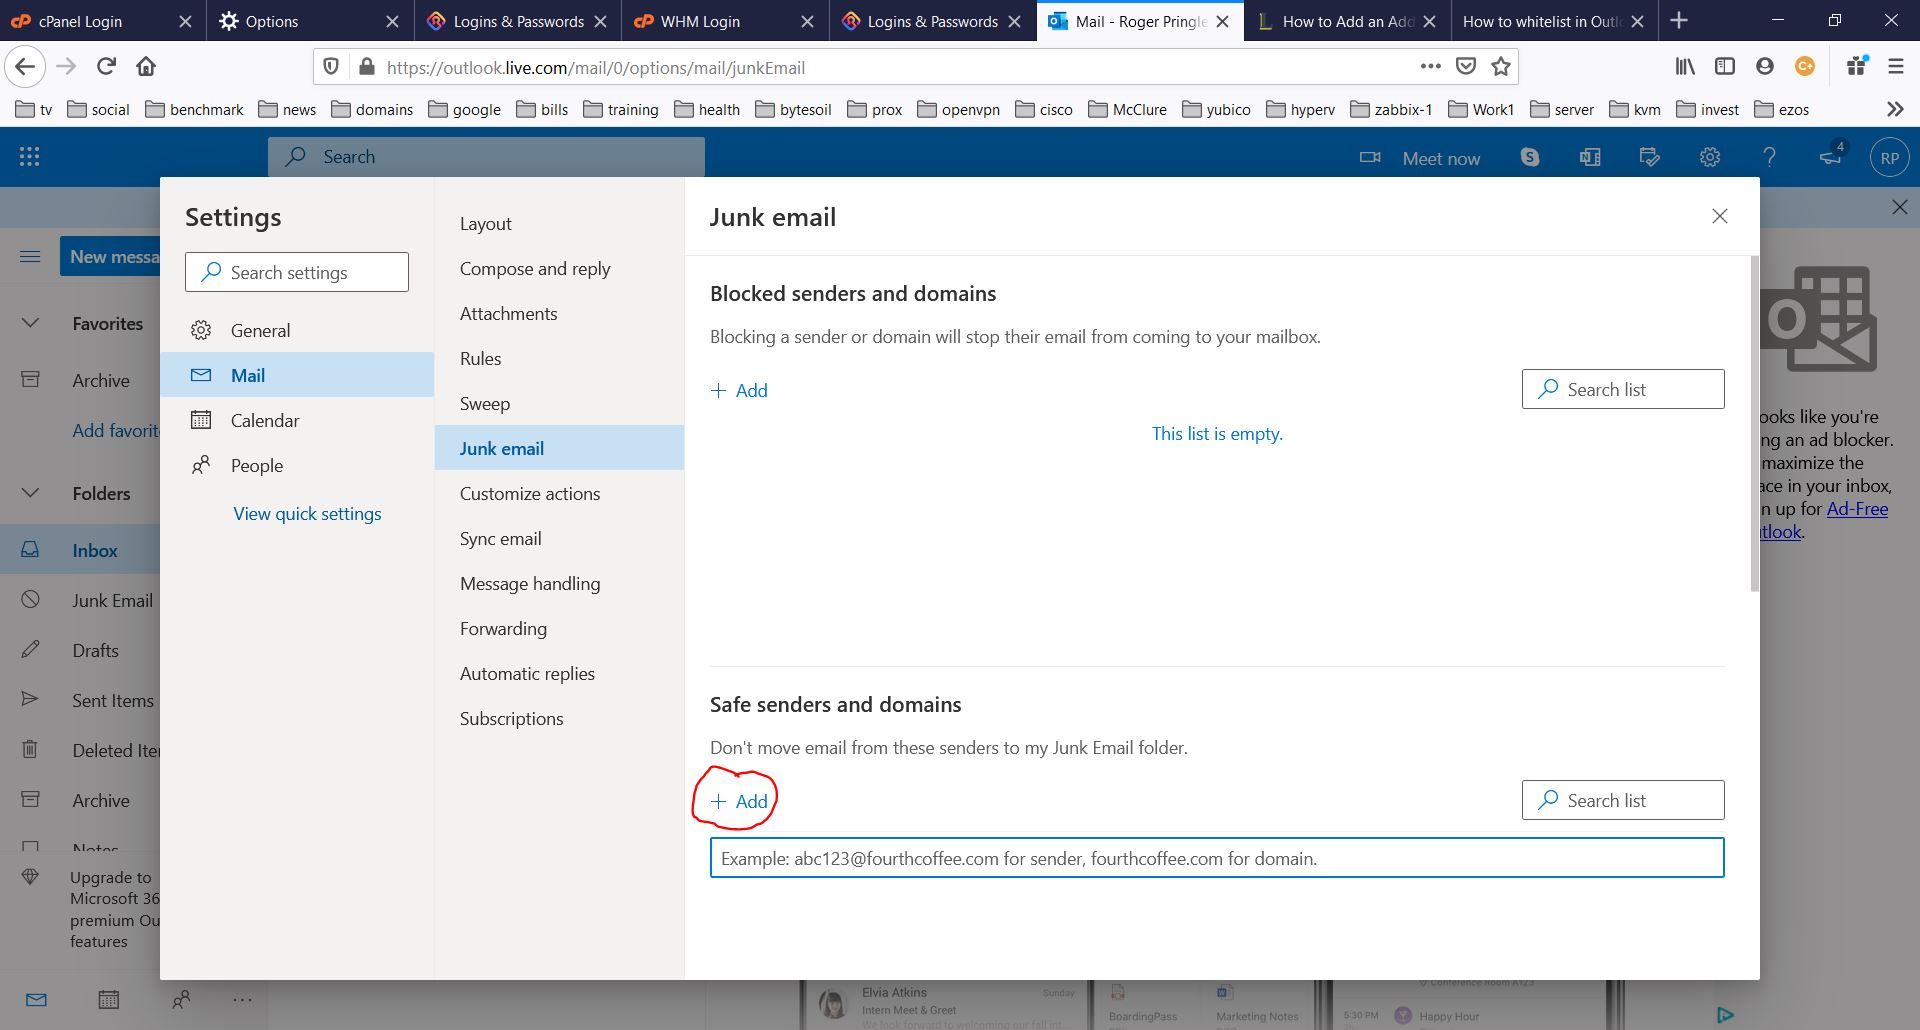
Check blocked senders and safe senders list

Select Settings > View all Outlook settings, Select Mail, and then select Junk email, If you see the sender’s address listed under “Blocked senders and domains”, select the address and then select Remove > Save.

Mark a message as “not junk”. In your Outlook.com folder list, select the Junk Email folder and look for the missing email. Right-click the desired email and then select Mark as not junk. The message will automatically be moved to your inbox.
 

Other resources:
https://www.lifewire.com/add-address-domain-safe-senders-outlook-1173760
whitelist.guide

If you’re trying to send mail to an Office 365 recipient and the mail has been rejected because of your sending IP address, follow these steps to submit a delisting request.

Error messages may be similar to the following:

ECDHE-RSA-AES256-SHA384:256 CV=yes: SMTP error from remote mail server after RCPT TO:: 550 5.7.606 Access denied, banned sending IP [xxx.xx.xxx.xxx]. To request removal from this list please visit https://sender.office.com/ and follow the directions. For more information please go to http://go.microsoft.com/fwlink/?LinkID=526655 (AS16012609) [HE1EUR01FT043.eop-EUR01.prod.protection.outlook.com]

A good way to check the connectons to mail ports is to use netstat:

# netstat -anp | grep :25
tcp        0      0 0.0.0.0:25              0.0.0.0:*               LISTEN      2170/master
tcp6       0      0 :::25                   :::*                    LISTEN      2170/master
# netstat -anp | grep :465
tcp        0      0 0.0.0.0:465             0.0.0.0:*               LISTEN      2170/master
tcp6       0      0 :::465                  :::*                    LISTEN      2170/master
# netstat -anp | grep :587
tcp        0      0 0.0.0.0:587             0.0.0.0:*               LISTEN      2170/master
tcp6       0      0 :::587                  :::*                    LISTEN      2170/master

DKIM on Postfix:

https://www.digitalocean.com/community/tutorials/how-to-install-and-configure-dkim-with-postfix-on-debian-wheezy

The configuration can be tested by sending an empty email to check-auth@verifier.port25.com and a reply will be received. If everything works correctly you should see DKIM check: pass under Summary of Results.

==========================================================
Summary of Results
==========================================================
SPF check: pass
DomainKeys check: neutral
DKIM check: pass
Sender-ID check: pass
SpamAssassin check: ham
Alternatively, you can send a message to a Gmail address that you control, view the received email’s headers in your Gmail inbox, dkim=pass should be present in the Authentication-Results header field.

Authentication-Results: mx.google.com;
spf=pass (google.com: domain of contact@example.com designates — as permitted sender) smtp.mail=contact@example.com;
dkim=pass header.i=@example.com;

Basics
rDNS (Reverse DNS)

The Reverse DNS for an IP should be set to the EHLO value that is sent in the outgoing mail header. This is generally the HostName of the computer.

This value should also match the outgoing IP address used to send the mail.

On a multi-IP server, if the sending IP does not match the EHLO domain, you may be sending from Postfix. Switching to Qmail may cause the sending IP to match the primary IP on the server, which should correct any mis-matched IP/EHLO issues.

Read More

Amazonon DMARC (http://sesblog.amazon.com/post/Tx22ZELXSSZRYZR/What-is-DMARC-and-should-you-use-it).

This Google article is also helpful: https://support.google.com/a/answer/2466563?hl=en

If you scroll down to the ‘Example records’ section, you’ll see a number of examples on how to write the TXT record. Here’s an example of that record:

_dmarc.advancedmediawebs.com. 3600 IN TXT “v=DMARC1; p=quarantine; pct=5; rua=mailto:mark@domain.com”

Add the clean IP to the server.

Edit the firewall to NAT all connections FROM port 25 to use the new IP.

# iptables -t nat -A POSTROUTING -p tcp --dport 25 -j SNAT --to-source NEW.IPA.DDR.ESS
# service iptables save

Ensure that the IP is on eth1
or…

# iptables -t nat -A POSTROUTING -o eth1 -p tcp -j SNAP --dport 25 --to-source 123.45.6.7

Normally, checking mail may produce an SSL error for plesk mail services. All clients Outlook, Mac mail, thunderbird, show a a message for ssl certificate. How to fix it.

You would need to purchase a SSL certificate for your servers hostname and set it up so it gets used for the mail service on the server. if you try and use mail.domain.com, it’ll still give an error.

Ref: http://kb.sp.parallels.com/en/1062