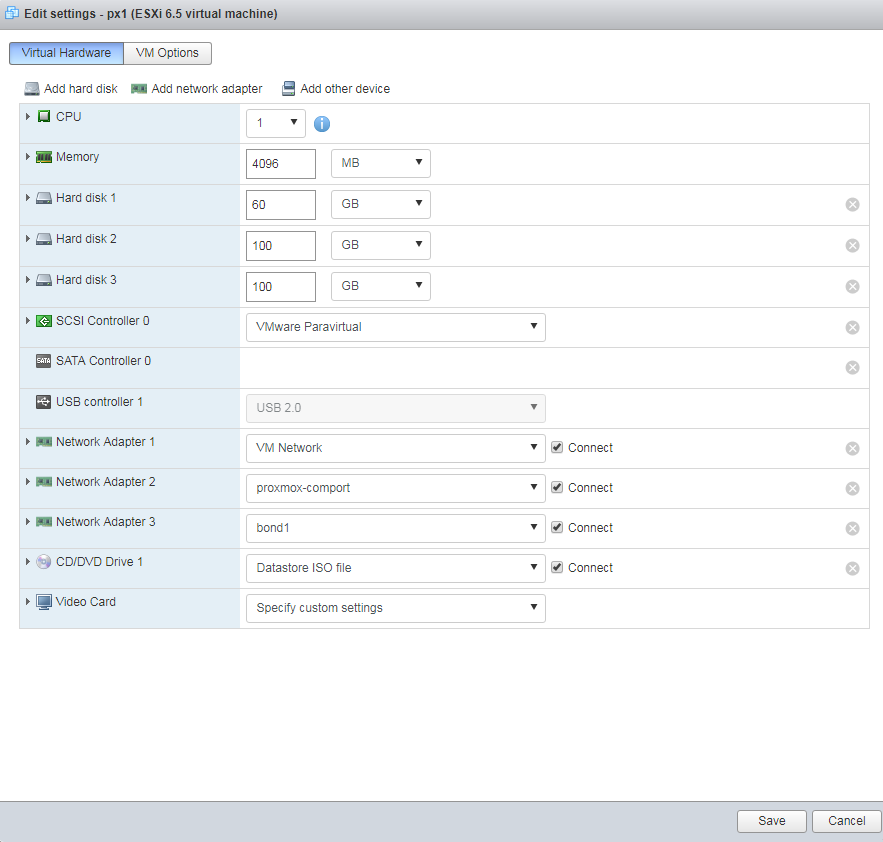
Install 3 nodes. Each node specs:
Since our host acts as a router we have to make sure it’s kernel has all IP packet forwarding features activated. Take a look at ‘/etc/sysctl.conf’ and make sure that the following two lines aren’t commented out:
net.ipv4.ip_forward=1
net.ipv6.conf.all.forwarding=1
Lastly make sure your host won’t send ICPM “redirect” messages to guests, telling them to find the gateway by themselves. This won’t work with our particular network setup. Add the following to ‘/etc/sysctl.conf’:
net.ipv4.conf.all.send_redirects=0
Reboot
Networking for nodes Incomplete – this is not currently working):
Set up 3 NIC’s
ens192 – primary for Public IP. This is the public IP for the installation.
ens224 – proxmox VE Cluster Network
ens256 – Ceph Install
Once installed, edit /etc/network/interfaces on all 3 nodes. Change the IP addresses accordingly. Remeber to backup the files before editing.
Example /etc/network/interfaces for px1 node 1.
auto lo
iface lo inet loopback

auto ens192
iface ens192 inet static
        address  216.55.xxx.xxx
        netmask  255.255.255.0
        gateway  216.xx.xxx.1
        post-up echo 1 > /proc/sys/net/ipv4/conf/ens192/proxy_arp
#Public IP

auto vmbr0
iface vmbr0 inet static
        address  192.168.1.151
        netmask  255.255.255.0
        bridge_ports none
        bridge_stp off
        bridge_fd 0
	post-up echo 1 > /proc/sys/net/ipv4/ip_forward
        post-up iptables -t nat -A POSTROUTING -s '192.168.1.0/24' -o ens192 -j MASQUERADE
        post-down iptables -t nat -D POSTROUTING -s '192.168.1.0/24' -o ens192 -j MASQUERADE
#Private Network for VM Creation

auto ens224
iface ens224 inet static
        address  10.0.0.151
        netmask  255.255.255.0
#Proxmox VE Cluster Network

auto ens256
iface ens256 inet static
  address  10.10.10.151
  netmask  255.255.255.0
#ceph network
Setting up the cluster
Hosts file edits. Backup hosts file and change to this on all nodes. This is not the hostname but an identifier.
# corosync network hosts
10.0.0.151 one-corosync.geekdecoder.com one-corosync
10.0.0.152 two-corosync.geekdecoder.com two-corosync
10.0.0.153 three-corosync.geekdecoder.com three-corosync
Adding Nodes With Separated Cluster Network
When adding a node to a cluster with a separated cluster network you need to use the ringX_addr parameters to set the nodes address on those networks:
pvecm add IP-ADDRESS-CLUSTER -ring0_addr IP-ADDRESS-RING0
If you want to use the Redundant Ring Protocol you will also want to pass the ring1_addr parameter.
Creating the cluster after network and host file setup. Log into node 1.
node1# pvecm create clustername -bindnet0_addr 10.0.0.151 -ring0_addr one-corosync
Output
Corosync Cluster Engine Authentication key generator.
Gathering 1024 bits for key from /dev/urandom.
Writing corosync key to /etc/corosync/authkey.
Writing corosync config to /etc/pve/corosync.conf
Restart corosync and cluster filesystem
Reboot
# reboot
Adding nodes.
From man corosync.conf
ringnumber – This specifies the ring number for the interface. When using the redundant ring protocol, each interface should specify separate ring numbers to uniquely identify to the membership protocol which interface to use for which redundant ring. The ringnumber must start at 0.
Adding nodes. Login to a node you want to add, node2, node3, node4, etc. In this example, login to node 2 (10.0.0.152)and the IP for node1 is 10.0.0.151.
Run the following where”
node2# pvecm add 10.0.0.151 -ring0_addr 10.0.0.152
Status
 pvecm status
Quorum information
------------------
Date:             Tue Jun 12 15:17:10 2018
Quorum provider:  corosync_votequorum
Nodes:            2
Node ID:          0x00000001
Ring ID:          1/12
Quorate:          Yes

Votequorum information
----------------------
Expected votes:   2
Highest expected: 2
Total votes:      2
Quorum:           2
Flags:            Quorate

Membership information
----------------------
    Nodeid      Votes Name
0x00000001          1 10.0.0.151 (local)
0x00000002          1 10.0.0.152
Nodes
 pvecm nodes

Membership information
----------------------
    Nodeid      Votes Name
         1          1 one-corosync (local)
         2          1 10.0.0.152
         3          1 10.0.0.153
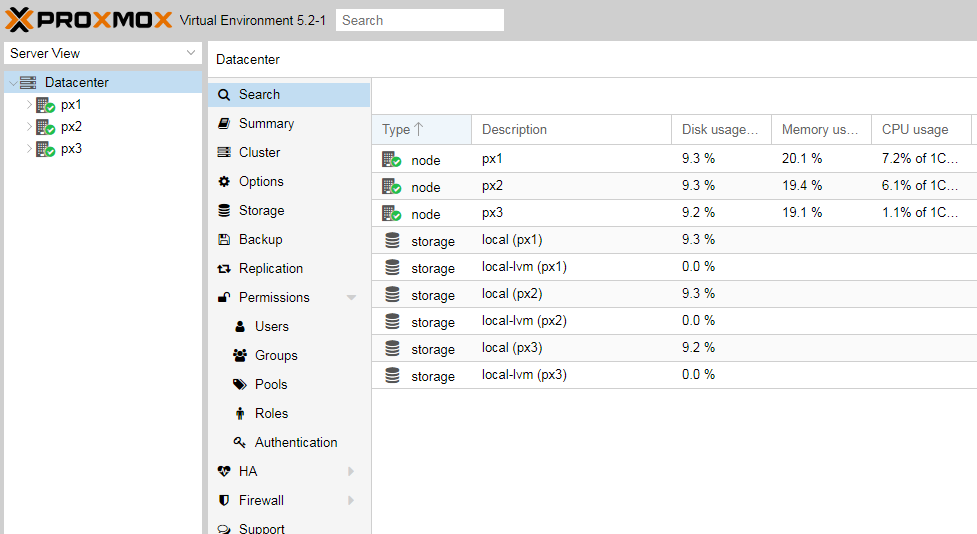
log into the node 1 web GUI.
Installation of Ceph packages
Login to each node and run:
~# pveceph install --version luminous
update available package list
Reading package lists... Done
Building dependency tree
Reading state information... Done
gdisk is already the newest version (1.0.1-1).
The following additional packages will be installed:
  binutils ceph-base ceph-mgr ceph-mon ceph-osd cryptsetup-bin libcephfs2 libcurl3 libgoogle-perftools4 libjs-jquery
  libjs-sphinxdoc libjs-underscore libleveldb1v5 liblttng-ust-ctl2 liblttng-ust0 libparted2 librados2 libradosstriper1
  librbd1 librgw2 libtcmalloc-minimal4 libunwind8 parted python-bs4 python-cephfs python-cffi-backend python-cherrypy3
  python-click python-colorama python-cryptography python-dnspython python-enum34 python-flask python-formencode
  python-idna python-ipaddress python-itsdangerous python-jinja2 python-logutils python-mako python-markupsafe
  python-openssl python-paste python-pastedeploy python-pastedeploy-tpl python-pecan python-prettytable python-pyasn1
  python-rados python-rbd python-repoze.lru python-rgw python-routes python-setuptools python-simplegeneric
  python-singledispatch python-tempita python-waitress python-webob python-webtest python-werkzeug
Suggested packages:
  binutils-doc ceph-mds libparted-dev libparted-i18n parted-doc python-cryptography-doc python-cryptography-vectors
  python-enum34-doc python-flask-doc python-egenix-mxdatetime python-jinja2-doc python-beaker python-mako-doc
  python-openssl-doc python-openssl-dbg httpd-wsgi libapache2-mod-python libapache2-mod-scgi python-pastescript
  python-pastewebkit doc-base python-setuptools-doc python-waitress-doc python-webob-doc python-webtest-doc ipython
  python-genshi python-lxml python-greenlet python-redis python-pylibmc | python-memcache python-werkzeug-doc
Recommended packages:
  ceph-mds ntp | time-daemon javascript-common python-lxml | python-html5lib python-blinker python-simplejson
  libjs-mochikit python-openid python-scgi python-pastescript python-lxml python-pyquery python-pyinotify
The following NEW packages will be installed:
  binutils ceph ceph-base ceph-mgr ceph-mon ceph-osd cryptsetup-bin libcephfs2 libcurl3 libgoogle-perftools4 libjs-jquery
  libjs-sphinxdoc libjs-underscore libleveldb1v5 liblttng-ust-ctl2 liblttng-ust0 libparted2 libtcmalloc-minimal4
  libunwind8 parted python-bs4 python-cffi-backend python-cherrypy3 python-click python-colorama python-cryptography
  python-dnspython python-enum34 python-flask python-formencode python-idna python-ipaddress python-itsdangerous
  python-jinja2 python-logutils python-mako python-markupsafe python-openssl python-paste python-pastedeploy
  python-pastedeploy-tpl python-pecan python-prettytable python-pyasn1 python-repoze.lru python-rgw python-routes
  python-setuptools python-simplegeneric python-singledispatch python-tempita python-waitress python-webob python-webtest
  python-werkzeug
The following packages will be upgraded:
  ceph-common librados2 libradosstriper1 librbd1 librgw2 python-cephfs python-rados python-rbd
8 upgraded, 55 newly installed, 0 to remove and 27 not upgraded.
Need to get 54.5 MB of archives.
After this operation, 179 MB of additional disk space will be used.
Create initial Ceph configuration
node1# pveceph init --network 10.10.10.0/24
After that you can create the first Ceph monitor service using:
node1# pveceph createmon
Go to video or site to create other items.
Keyring
cd /etc/pve/priv
mkdir ceph
root@px1:/etc/pve/priv# cp /etc/ceph/ceph.client.admin.keyring ceph/ceph-vm.keyring
root@px1:/etc/pve/priv# cp /etc/ceph/ceph.client.admin.keyring ceph/ceph-lxc.keyring
Now visable.
Do some benchmark testing.
write performance
rados -p test3 bench 10 write --no-cleanup
read
rados -p test3 bench 10 seq
Add virtualization
Login to ESXi ssh.
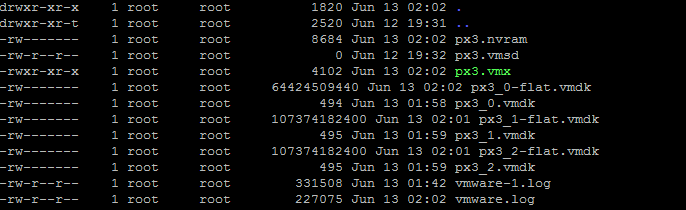
go to your node vm directory with the .vmx file. In this case
/vmfs/volumes/5a70c7aa-560fd204-49b1-6805ca0a3085/px3
Add the following to the bottom of the file
# vhv.enable = "TRUE"
Restart the VM.
Log into the node 1 and run the following
#egrep -c '(vmx|svm)' /proc/cpuinfo
1
1= ok
0 = no change
How To Install Proxmox Nested on VMware ESXi (Full Support OpenVZ & KVM)
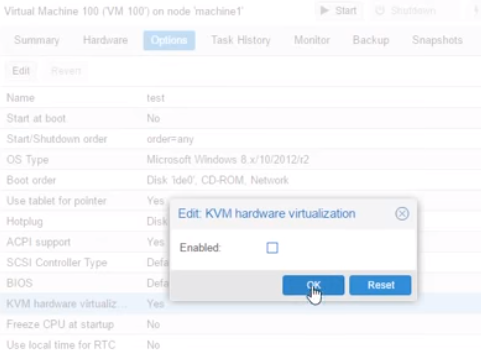
Another option is to disable KVM virtualization on the VM
upload iso to local storage
scp to /var/lib/vz/template/iso
HA video – https://www.youtube.com/watch?v=JfLJO-IF0Eo