Set up VM
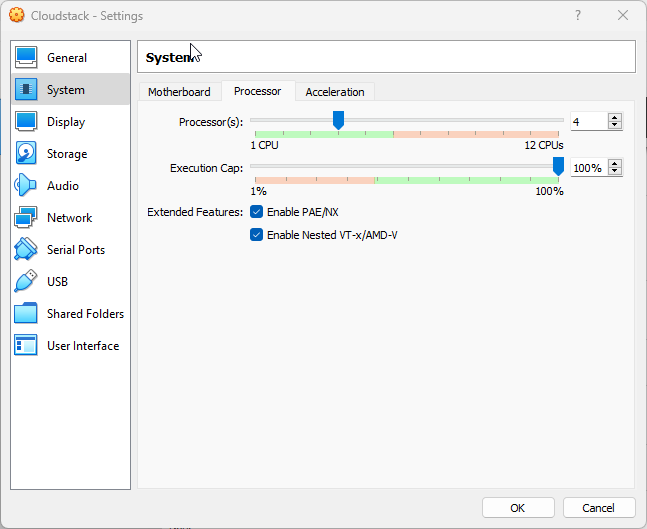
You will want to create a VM of “Red Hat (64-bit)” type and 40+GB disk space. The OS will be CentOS 7.9 minimal x86_64 install ISO. Make sure you have allowed enough ram (6G+) and enough CPU cores (3+) for demo purposes.
Networking
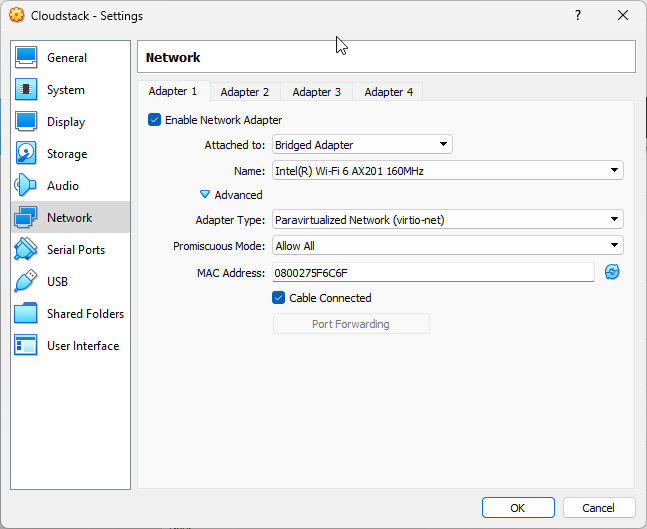
You will need to have 1 NIC in your VM, bridged to the NIC of your laptop/desktop (wifi or wired NIC, doesn’t matter), and optimally to set Adapter Type=”Paravirtualized Network (virtio-net)” for somewhat better network performance (Settings of VM, Network section, Adapter1, expand “Advanced”).
Make sure the NIC on your VM is configured as promiscuous (in VirtualBox, choose “Allow All” or just “Allow VMs” as the Promiscuous Mode), so that it can pass traffic from CloudStack’s system VMs to the gateway. Also, make sure you have allowed enough ram (6G+) and enough CPU cores (3+) for demo purposes.
In case you don’t have physical server to “play with”, you can use e.g. Oracle VirtualBox 6.1+. The requirement is that you enable “Enable Nested VT-x/AMD-V” as the Extended Feature on the System page of the Settings of the VM.
In Windows, open a command prompt. Go to VirtualBox installation folders:
cd "C:\Program Files\Oracle\VirtualBox"
Type:
C:\Program Files\Oracle\VirtualBox>VBoxManage list vms
"cloud" {232688ac-39be-4fc0-bb63-9fc9e618b7c1}
Run the follow for the VM:
VBoxManage modifyvm <YourVirtualMachineName> --nested-hw-virt on
Now the option should be checked.
Download and Connect a CentOS 7 ISO File.
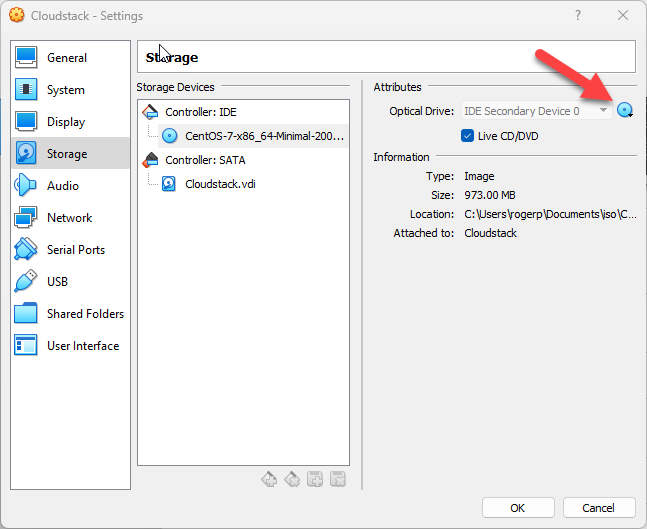
Click OK. Now Start the VM and Install CentOS.
Once this installation is complete, you’ll want to gain access to your server – through SSH. Verify If Nested Virtualization Is Enabled For VMs.
Run the following command to check if nested feature is enabled or not:
egrep --color -i "svm|vmx" /proc/cpuinfo

If you see “vmx” (Intel-VT technology) or “svm” (AMD-V support) in the output, the virtualbox guest machine can work as a hypervisor and host VMs.
It is always wise to update the system before starting:
yum -y upgrade
Configuring the network
Before going any further, make sure that “bridge-utils” and “net-tools” are installed and available:
yum install bridge-utils net-tools -y
Connecting via the console or SSH, you should login as root. We will start by creating the bridge that Cloudstack will use for networking. Create and open /etc/sysconfig/network-scripts/ifcfg-cloudbr0 and add the following settings:
nano /etc/sysconfig/network-scripts/ifcfg-cloudbr0
Note
IP Addressing – Throughout this document we are assuming that you will have a /24 network for your CloudStack implementation. This can be any RFC 1918 network. However, we are assuming that you will match the machine address for your local system. An example would be if you are using i.e. VirtualBox on your local home network on 192.168.0.0/24 network – in this case you can use a single free IP address from your home range (VirtualBox NIC for this VM should be in bridged mode for correct functioning)
Example:
DEVICE=cloudbr0
TYPE=Bridge
ONBOOT=yes
BOOTPROTO=static
IPV6INIT=no
IPV6_AUTOCONF=no
DELAY=5
IPADDR=192.168.0.11
GATEWAY=192.168.0.1 #( - this would be your physical/home router)
NETMASK=255.255.255.0
DNS1=8.8.8.8
DNS2=8.8.4.4
STP=yes
USERCTL=no
NM_CONTROLLED=no
Save the configuration and exit. We will then edit the NIC so that it makes use of this bridge.
Open the configuration file of your NIC (e.g. /etc/sysconfig/network-scripts/ifcfg-eth0) and edit it as follows:
Note:Interface name (eth0) used as example only. Replace eth0 with your default ethernet interface name.
TYPE=Ethernet
BOOTPROTO=none
DEFROUTE=yes
NAME=eth0
DEVICE=eth0
ONBOOT=yes
BRIDGE=cloudbr0
Now that we have the configuration files properly set up, we need to run a few commands to start up the network:
systemctl disable NetworkManager
systemctl stop NetworkManager
systemctl enable network
reboot
Hostname
CloudStack requires that the hostname is properly set. If you used the default options in the installation, then your hostname is currently set to localhost.localdomain. To test this we will run:
hostname --fqdn
At this point it will likely return:
localhost
To rectify this situation – we’ll set the hostname by editing the /etc/hosts file so that it follows a similar format to this example (remember to replace the IP with your IP which might be e.g. 192.168.0.11):
127.0.0.1 localhost localhost.localdomain localhost4 localhost4.localdomain4
::1 localhost localhost.localdomain localhost6 localhost6.localdomain6
192.168.0.11 srvr1.cloud.priv
After you’ve modified that file, go ahead and restart the network using:
systemctl restart network
Ensure that it returns a FQDN response.
SELinux
At the moment, for CloudStack to work properly SELinux must be set to permissive or disabled. We want to both configure this for future boots and modify it in the current running system.
To configure SELinux to be permissive in the running system we need to run the following command:
setenforce 0
To ensure that it remains in that state we need to configure the file /etc/selinux/config to reflect the permissive state, as shown in this example:
# This file controls the state of SELinux on the system.
# SELINUX= can take one of these three values:
# enforcing - SELinux security policy is enforced.
# permissive - SELinux prints warnings instead of enforcing.
# disabled - No SELinux policy is loaded.
SELINUX=permissive
# SELINUXTYPE= can take one of these two values:
# targeted - Targeted processes are protected,
# mls - Multi Level Security protection.
SELINUXTYPE=targeted
NTP
NTP configuration is a necessity for keeping all of the clocks in your cloud servers in sync. However, NTP is not installed by default. So we’ll install and and configure NTP at this stage. Installation is accomplished as follows:
yum -y install ntp
The actual default configuration is fine for our purposes, so we merely need to enable it and set it to start on boot as follows:
systemctl enable ntpd
systemctl start ntpd
To add the CloudStack repository, create /etc/yum.repos.d/cloudstack.repo and insert the following information.
[cloudstack]
name=cloudstack
baseurl=http://download.cloudstack.org/centos/$releasever/4.17/
enabled=1
gpgcheck=0
NFS
Our configuration is going to use NFS for both primary and secondary storage. We are going to go ahead and setup two NFS shares for those purposes. We’ll start out by installing nfs-utils.
yum -y install nfs-utils
We now need to configure NFS to serve up two different shares. This is handled in the /etc/exports file. You should ensure that it has the following content:
/export/secondary *(rw,async,no_root_squash,no_subtree_check)
/export/primary *(rw,async,no_root_squash,no_subtree_check)
You will note that we specified two directories that don’t exist (yet) on the system. We’ll go ahead and create those directories and set permissions appropriately on them with the following commands:
mkdir -p /export/primary
mkdir /export/secondary
CentOS 7.x releases use NFSv4 by default. NFSv4 requires that domain setting matches on all clients. In our case, the domain is cloud.priv, so ensure that the domain setting in /etc/idmapd.conf is uncommented and set as follows:
Domain = cloud.priv
Now you’ll need to add the configuration values at the bottom in the file /etc/sysconfig/nfs (or merely uncomment and set them)
LOCKD_TCPPORT=32803
LOCKD_UDPPORT=32769
MOUNTD_PORT=892
RQUOTAD_PORT=875
STATD_PORT=662
STATD_OUTGOING_PORT=2020
For simplicity, we need to disable the firewall, so that it will not block connections. To do so, simply use the following two commands:
systemctl stop firewalld
systemctl disable firewalld
We now need to configure the nfs service to start on boot and actually start it on the host by executing the following commands:
systemctl enable rpcbind
systemctl enable nfs
systemctl start rpcbind
systemctl start nfs
Management Server Installation
We’re going to install the CloudStack management server and surrounding tools.
Database Installation and Configuration
We’ll start with installing MySQL and configuring some options to ensure it runs well with CloudStack.
First, as CentOS 7 no longer provides the MySQL binaries, we need to add a MySQL community repository, that will provide MySQL Server (and the Python MySQL connector later) :
yum -y install wget
wget http://repo.mysql.com/mysql-community-release-el7-5.noarch.rpm
rpm -ivh mysql-community-release-el7-5.noarch.rpm
Install by running the following command:
yum -y install mysql-server
This should install MySQL 5.x, as of the time of writing this guide. With MySQL now installed we need to make a few configuration changes to /etc/my.cnf. Specifically we need to add the following options to the [mysqld] section:
innodb_rollback_on_timeout=1
innodb_lock_wait_timeout=600
max_connections=350
log-bin=mysql-bin
binlog-format = 'ROW'
Now that MySQL is properly configured we can start it and configure it to start on boot as follows:
systemctl enable mysqld
systemctl start mysqld
MySQL Connector Installation
Install Python MySQL connector from the MySQL community repository (which we’ve added previously):
yum -y install mysql-connector-python
Installation
We are now going to install the management server. We do that by executing the following command:
yum -y install cloudstack-management
CloudStack 4.17 requires Java 11 JRE. Installing the management server will automatically install Java 11, but it’s good to explicitly confirm that the Java 11 is the selected/active one (in case you had a previous Java version already installed):
$ alternatives --config java
Make sure that Java 11 is the chosen one.
With the application itself installed we can now setup the database, we’ll do that with the following command and options:
cloudstack-setup-databases cloud:password@localhost --deploy-as=root
When this process is finished, you should see a message like “CloudStack has successfully initialized the database.”
Now that the database has been created, we can take the final step in setting up the management server by issuing the following command:
cloudstack-setup-management
System Template Setup
CloudStack uses a number of system VMs to provide functionality for accessing the console of virtual machines, providing various networking services, and managing various aspects of storage.
We need to download the systemVM template and deploy that to the secondary storage. We will use the local path (/export/secondary) since we are already on the NFS server itself, but otherwise you would need to mount your Secondary Storage to a temporary mount point, and use that mount point instead of the /export/secondary path.
Execute:
/usr/share/cloudstack-common/scripts/storage/secondary/cloud-install-sys-tmplt -m /export/secondary -u http://download.cloudstack.org/systemvm/4.17/systemvmtemplate-4.17.2-kvm.qcow2.bz2 -h kvm -F
That concludes our setup of the management server. We still need to configure CloudStack, but we will do that after we get our hypervisor set up.
KVM Installation
Installation of the KVM agent is trivial with just a single command, but afterwards we’ll need to configure a few things. We need to install the EPEL repository also.
yum -y install epel-release
yum -y install cloudstack-agent
KVM Configuration
We have two different parts of KVM to configure, libvirt, and QEMU.
QEMU Configuration
We need to edit the QEMU VNC configuration. This is done by editing /etc/libvirt/qemu.conf and ensuring the following line is present and uncommented.
vnc_listen=0.0.0.0
Libvirt Configuration
CloudStack uses libvirt for managing virtual machines. Therefore it is vital that libvirt is configured correctly. Libvirt is a dependency of cloud-agent and should already be installed.
Even though we are using a single host, the following steps are recommended to get faimilar with the general requirements. In order to have live migration working libvirt has to listen for unsecured TCP connections. We also need to turn off libvirts attempt to use Multicast DNS advertising. Both of these settings are in /etc/libvirt/libvirtd.conf
Set the following parameter’s:
listen_tls = 0
listen_tcp = 1
tcp_port = "16509"
auth_tcp = "none"
mdns_adv = 0
Turning on “listen_tcp” in libvirtd.conf is not enough, we have to change the parameters as well we also need to modify /etc/sysconfig/libvirtd:
Uncomment the following line:
LIBVIRTD_ARGS="--listen"
Restart libvirt
systemctl restart libvirtd
KVM configuration complete
For the sake of completeness, you should check if KVM is running OK on your machine (you should see kvm_intel or kvm_amd modules shown as loaded):
lsmod | grep kvm
kvm_intel 55496 0
kvm 337772 1 kvm_intel
kvm_amd # if you are in AMD cpu
That concludes our installation and configuration of KVM, and we’ll now move to using the CloudStack UI for the actual configuration of our cloud.
Configuration
UI Access
To get access to CloudStack’s web interface, merely point your browser to the IP address of your machine e.g. http://192.168.0.11:8080/client The default username is ‘admin’, and the default password is ‘password’.
Setting up a Zone
Zone Type
A zone is the largest organization entity in CloudStack – and we’ll be creating one.
Warning:
We will be configuring an Advanced Zone in a way that will allow us to access both the “Management” network of the cloud as well as the “Public” network – we will do so by using the same CIDR (but different part of it, i.e. different IP ranges) for both “Management” (Pod) and “Public” networks – which is something your would NEVER do in a production – this is done strictly for testing purposes only in this guide!
Click “Continue with Installation” to continue – you will be offered to change your root admin password – please do so, and click on OK.
A new Zone wizard will pop-up. Please chose Advanced (don’t tick the “Security Groups”) and click on Next.
Zone Details
On this page, we enter where our DNS servers are located. CloudStack distinguishes between internal and public DNS. Internal DNS is assumed to be capable of resolving internal-only hostnames, such as your NFS server’s DNS name. Public DNS is provided to the guest VMs to resolve public IP addresses. You can enter the same DNS server for both types, but if you do so, you must make sure that both internal and public IP addresses can route to the DNS server. In our specific case we will not use any names for resources internally, and we will indeed set them to look to the same external resource so as to not add a namerserver setup to our list of requirements.
Name – we will set this to the ever-descriptive “Zone1” for our cloud.
IPv4 DNS 1 – we will set this to 8.8.8.8 for our cloud.
IPV4 DNS 2 – we will set this to 8.8.4.4 for our cloud.
Internal DNS1 – we will also set this to 8.8.8.8 for our cloud.
Internal DNS2 – we will also set this to 8.8.4.4 for our cloud.
Hypervisor – this will be the primary hypervisor used in this zone. In our case, we will select KVM.
Click “Next” to continue.
Physical Network
There are various network isolation methods supported by Cloudstack. The default VLAN option will be sufficient for our purposes. For improved performance and/or security, Cloudstack allows different traffic types to run over specifically dedicated network interface cards attached to hypervisors. We will not be making any changes here, the default settings are fine for this demo installation of Cloudstack.
Click “Next” to continue.
Public Traffic
Publicly-accessible IPs must be allocated for this purpose in normal/public cloud installations, but since we are deploying merely a demo/test env, we will use a PART of our local network (e.g. from .11 to .20 or other free range)
Gateway – We’ll use 192.168.0.1 #or whatever is your physical gateway
Netmask – We’ll use 255.255.255.0
VLAN/VNI – We’ll leave this one empty
Start IP – We’ll use 192.168.0.11
End IP – We’ll use 192.168.0.20
Click “Add” to add the range.
Click “Next” to continue.
Pod Configuration
Here we will configure a range for Cloudstack’s internal management traffic – CloudStack will assign IPs from this range to system VMs. This will also be part of our local network (i.e. different part of your local home network, from .21 to .30), with the rest of the IP parameters (netmaks/gateway) being the same as used for the Public Traffic.
Pod Name – We’ll use Pod1 for our cloud.
Reserved system gateway – we’ll use 192.168.0.1
Reserved system netmask – we’ll use 255.255.255.0
Start reserved system IPs – we will use 192.168.0.21
End Reserved system IP – we will use 192.168.0.30
Click “Next” to continue.
Guest Traffic
Next we will configure a range of VLAN IDs for our guest VMs.
A range of 100 – 200 would suffice.
Click “Next” to continue.
Cluster
Multiple clusters can belong to a pod and multiple hosts can belong to a cluster. We will have one cluster and we have to give our cluster a name.
Enter Cluster1
Click “Next” to continue.
Host
This is where we specify the details of our hypervisor host. In our case, we are running the management server on the same machine that we will be using as a hypervisor.
Hostname – we’ll use the IP address 192.168.0.11 since we didn’t set up a DNS server for name resolution. (this is your local server, so swap with the correct IP)
Username – we’ll use root
Password – enter the operating system password for the root user
Click “Next” to continue.
Primary Storage
With your cluster now setup – you should be prompted for primary storage information. Enter the following values in the fields:
Name – We’ll use Primary1
Scope – We’ll use Cluster even though either is fine in this case. With “Zone” scope, all hosts in all clusters would have access to this storage pool.
Protocol – We’ll use NFS
Server – We’ll be using the IP address 192.168.0.11 (this is your local server, so swap with the correct IP)
Path – Well define /export/primary as the path we are using
Click “Next” to continue.
Secondary Storage
You’ll be prompted for secondary storage information – populate it as follows:
Provider – Choose NFS
Name – Secondary1
NFS server – We’ll use the IP address 192.168.0.11 (this is your local server, so swap with the correct IP)
Path – We’ll use /export/secondary
Click “Next” to continue.
Now, click “Launch Zone” and your cloud should begin setup – it may take several minutes for setup to finalize.
When done, click on “Enable Zone” and your zone will be ready.
That’s it, you are done with installation of your Apache CloudStack demo cloud.
To check the health of your CloudStack installation, go to Infrastructure –> System VMs and refresh the UI from time to time – you should see “S-1-VM” and “V-2-VM” system VMs (SSVM and CPVM) in State=Running and Agent State=Up.
After that you can go to Images –> Templates, click on the built-in template named “CentOS 5.5(64-bit) no GUI (KVM)”, then click on “Zones” tab – and observe how the Status is moving from a few percent’s downloaded up to fully downloaded, after which the Status will show as “Download Complete” and “Ready” column will say “Yes”.
After this is done, you will be able to deploy a VM from this template.