When running the Security Advisor in cPanel at Home / Security Center / Security Advisor, I received this error:

Apache vhosts are not segmented or chroot()ed. Enable “mod_ruid2” in the “EasyApache 4” area, enable “Jail Apache” in the “Tweak Settings” area, and change users to jailshell in the “Manage Shell Access” area. Consider a more robust solution by using “CageFS on CloudLinux”. Note that this may break the ability to access mailman via Apache.

Read More

You may follow the steps below to enable PHP-FPM for one domain or multiple domains.

Procedure

Enable PHP-FPM for one domain:

  1. Log into WHM.
  2. Navigate to MultiPHP Manager.
  3. In the bottom section, under User Domain Settings, use the search bar to search for your domain.
  4. To the far right of your domain, click the toggle icon to enable PHP-FPM.

Enable PHP-FPM for multiple domains:

  1. Log into WHM.
  2. Navigate to MultiPHP Manager.
  3. In the bottom section, under System settings, select “Enable on All Domains”.

Further information on PHP-FPM configuration in MultiPHP Manager can be found in our documentation here.

Redis is an open source, in-memory, key-value data store most commonly used as a primary database, cache, message broker, and queue. Redis delivers sub-millisecond response times, enabling fast and powerful real-time applications

Redis Object Cache is a persistent object cache backend powered by Redis. Supports Predis, PhpRedis, Relay, replication, sentinels, clustering and WP-CLI.For a faster cache plugin.

What this means is that we can increase performance for your cPanel WordPress Site.

Read More

Run a backup

/usr/local/cpanel/bin/backup

Run a single account backup
To back up a single cPanel account, you can use The pkgacct Script instead.

/usr/local/cpanel/scripts/pkgacct [options] USERNAME DIRECTORY

Options

The /usr/local/cpanel/scripts/pkgacct script accepts the following options:

OptionDescriptionExample
USERNAMERequired
The cPanel account username for which to create a cpmove archive. You must pass this option after any options, but before the DIRECTORY option.
example
DIRECTORYThe directory path in which to store the archive. By default, the script uses the /home directory. You must pass this option after the USERNAME option./usr/local/cpanel/backups
--allow-overrideUse the /var/cpanel/lib/Whostmgr/Pkgacct/pkgacct file to package the account, if it exists.Note:You must pass this option before any other options.--allow-override
--mysql=VERSIONThe archive’s required minimum version of MySQL®.--mysql=5.1.1
--roundcube=VERSIONThe archive’s required minimum version of Roundcube.--roundcube=3.0
--dbbackup=TYPEThe type of database backup to perform:all — The script backs up all of the database information. This is the default option.schema — The script only backs up the database schemas. Only use this option to track a database’s users if you back up your databases through a different method.name — The script only backs up the database names. MySQL databases transfer as placeholders containing a CREATE TABLE statement. PostgreSQL® databases transfer as empty .tar placeholder files.--dbbackup=all
--dbbackup_mysql=TYPEAn override of the --dbbackup option for MySQL only. This option accepts the same values as the --dbbackup option.Note:If you pass both this option and the --dbbackup option, the system applies the --dbbackup_mysql option to MySQL and the --dbbackup option to PostgreSQL.This option has no effect on PostgreSQL backups.--dbbackup_mysql=all
--get_versionDisplay the version of the pkgacct script.--get_version
--use_backupsUse the account’s last known successful backup as a template when the script creates the archive. Use this option to speed up the backup process.--use_backups
--incrementalUpdate the destination file with any new content since the previous backup. This option also removes any content that no longer exists on the account. If the destination file does not exist, the script creates a new file in that location.Note:This option will pass the --nocompress option to create an uncompressed archive.--incremental
--splitCreate the archive in smaller data files. This option reduces the overall load on the system and makes it easier to transfer the files. The system creates these files in the cpmove-USERNAME.tar.gz.part00001 format, where USERNAME is the user’s account and part00001 is the file’s incremental ID.--split
--nocompressDo not compress the archive.--nocompress
--userbackupAllow the user to use the archive as a backup file for the account (for example, backup-3.18.2020_09-16-55_USERNAME). The system creates the file in the /home/USERNAME directory, where USERNAME is the user’s account name. This file is compatible with WHM’s Restore a Full Backup/cpmove File interface (WHM >> Home >> Backup >> Restore a Full Backup/cpmove File).--userbackup
--backup=FILEPATHUse the archive as a backup for the account at the given file path. This option creates the username.tar.gz file, where username represents the account’s username.--backup=/usr/local/cpanel/backups
--skipacctdbExclude the account’s MySQL and PostgreSQL databases from the archive.--skipacctdb
--skipapitokensExclude the account’s API tokens from the archive.--skipapitokens
--skipauthlinksExclude the account’s external authentication credentials from the archive.--skipauthlinks
--skipbwdataExclude the account’s bandwidth data from the archive.--skipbwdata
--skipdnszonesExclude the account’s DNS zone file information from the archive.--skipdnszones
--skipdomainsExclude the account’s subdomains, parked domains (aliases), and addon domains from the archive.--skipdomains
--skipftpusersExclude the account’s FTP user accounts from the archive.--skipftpusers
--skiphomedirExclude the account’s /home directory from the archive. Use this option if you will save or transfer the /home directory with another method, such as the rsync command.--skiphomedir
--skipintegrationlinksExclude the account’s integration links from the archive.--skipintegrationlinks
--skiplinkednodesExclude the account’s server node linkages from the archive.--skiplinkednodes
--skiplocaleExclude the account’s locale information or customized locale from the archive.--skiplocale
--skiplogsExclude the account’s log files from the archive.--skiplogs
--skipmailExclude the account’s mail directory from the archive.--skipmail
--skipmailconfigExclude the account’s mail configuration information from the archive.--skipmailconfig
--skipmailmanExclude the account’s Mailman mailing lists from the archive.--skipmailman
--skipmysqlExclude the account’s MySQL databases, database users, and database grants from the archive.--skipmysql
--skippasswdExclude the account’s password from the archive.--skippasswd
--skippgsqlExclude the account’s PostgreSQL databases, database users, and database grants from the archive.--skippgsql
--skippublichtmlExclude the account’s /public_html directory.--skippublichtml
--skipquotaExclude the account’s disk quota limits from the archive.--skipquota
--skipresellerconfigExclude the account’s reseller privileges from the archive.--skipresellerconfig
--skipshellExclude the account’s shell information and privileges from the archive.--skipshell
--skipsslExclude the server’s SSL certificates and files in the Apache® configuration. This option does not exclude the SSL files in the account’s /home directory.--skipssl
--skipuserdataExclude the account’s subaccount information. You create these accounts in cPanel’s User Manager interface (cPanel >> Home >> Preferences >> User Manager).--skipuserdata
--helpDisplay a brief help message.--help
--manDisplay the script’s full documentation.--man

Installation
Execute the below commands from the SSH root command prompt. Select RPM for servers that support the RPM packaging standard, Debian for servers that support the Debian packaging standard, or select Standard for any type of server.

wget https://data.installatron.com/installatron-plugin.sh
chmod +x installatron-plugin.sh
./installatron-plugin.sh -f

Installatron Plugin is now ready to use in cPanel and WHM.

The main WHM account will see an Installatron Admin button in the Addons portion of the side menu.
Resellers will see an Installatron Admin button in WHM and an Installatron button in cPanel.
Website owners will see an Installatron Applications Installer button in cPanel.

A vulnerability in Apache Log4j, a widely used logging package for Java has been found. The vulnerability, which can allow an attacker to execute arbitrary code by sending crafted log messages, has been identified as CVE-2021-44228 and given the name Log4Shell. It was first reported privately to Apache on November 24 and was patched with version 2.15.0 of Log4j on December 9. It affects Apache Struts, Apache Solr, Apache Druid, Elasticsearch, Apache Dubbo, and VMware vCenter. Since then, it has been disclosed that in certain non-default conditions, the original patch was incomplete; this was designated as CVE-2021-45046 and a new version of Log4j, 2.16.0, has been released.

Read More

To install and use WP-CLI, you will need access to your server’s command line. Administrators with root access can log in with SSH. cPanel users can log in with SSH if it’s available or cPanel’s built-in Terminal.

Download WP-CLI

curl -O https://raw.githubusercontent.com/wp-cli/builds/gh-pages/phar/wp-cli.phar

Change Permissions

chmod +x wp-cli.phar

To allow every user to run WP-CLI, we have to move it to a directory in the system’s PATH.

mv wp-cli.phar /usr/local/bin/wp

This moves the file to “/usr/local/bin,” Renames it to “wp”. Now, all users should be able to run WP-CLI from as “wp.”

To test as a cPanel user, lo into the terminal.

Run the following:

# wp

Output:

NAME

  wp

DESCRIPTION

  Manage WordPress through the command-line.

SYNOPSIS

  wp <command>

SUBCOMMANDS

  akismet               Filter spam comments.
  cache                 Adds, removes, fetches, and flushes the WP Object Cache object.
  cap                   Adds, removes, and lists capabilities of a user role.
  cli                   Reviews current WP-CLI info, checks for updates, or views defined aliases.
  comment               Creates, updates, deletes, and moderates comments.
  config                Generates and reads the wp-config.php file.
  core                  Downloads, installs, updates, and manages a WordPress installation.
  cron                  Tests, runs, and deletes WP-Cron events; manages WP-Cron schedules.
  db                    Performs basic database operations using credentials stored in wp-config.php.
  embed                 Inspects oEmbed providers, clears embed cache, and more.
  eval                  Executes arbitrary PHP code.
  eval-file             Loads and executes a PHP file.
  export                Exports WordPress content to a WXR file.
  help                  Gets help on WP-CLI, or on a specific command.
  i18n                  Provides internationalization tools for WordPress projects.
  import                Imports content from a given WXR file.
  language              Installs, activates, and manages language packs.
  maintenance-mode      Activates, deactivates or checks the status of the maintenance mode of a site.
  media                 Imports files as attachments, regenerates thumbnails, or lists registered image sizes.
  menu                  Lists, creates, assigns, and deletes the active theme's navigation menus.
  network               Perform network-wide operations.
  option                Retrieves and sets site options, including plugin and WordPress settings.
  package               Lists, installs, and removes WP-CLI packages.
  plugin                Manages plugins, including installs, activations, and updates.
  post                  Manages posts, content, and meta.
  post-type             Retrieves details on the site's registered post types.
  redis                 Enables, disabled, flushes, and checks the status of the object cache.
  rewrite               Lists or flushes the site's rewrite rules, updates the permalink structure.
  role                  Manages user roles, including creating new roles and resetting to defaults.
  scaffold              Generates code for post types, taxonomies, plugins, child themes, etc.
  search-replace        Searches/replaces strings in the database.
  server                Launches PHP's built-in web server for a specific WordPress installation.
  shell                 Opens an interactive PHP console for running and testing PHP code.
  sidebar               Lists registered sidebars.
  site                  Creates, deletes, empties, moderates, and lists one or more sites on a multisite installation.
  super-admin           Lists, adds, or removes super admin users on a multisite installation.
  taxonomy              Retrieves information about registered taxonomies.
  term                  Manages taxonomy terms and term meta, with create, delete, and list commands.
  theme                 Manages themes, including installs, activations, and updates.
  transient             Adds, gets, and deletes entries in the WordPress Transient Cache.
  user                  Manages users, along with their roles, capabilities, and meta.
  widget                Manages widgets, including adding and moving them within sidebars.

GLOBAL PARAMETERS

  --path=<path>
      Path to the WordPress files.

  --url=<url>
      Pretend request came from given URL. In multisite, this argument is how the target site is specified.

  --ssh=[<scheme>:][<user>@]<host|container>[:<port>][<path>]
      Perform operation against a remote server over SSH (or a container using scheme of "docker", "docker-compose", "docker-compose-run", "vagrant").

  --http=<http>
      Perform operation against a remote WordPress installation over HTTP.

  --user=<id|login|email>
      Set the WordPress user.

  --skip-plugins[=<plugins>]
      Skip loading all plugins, or a comma-separated list of plugins. Note: mu-plugins are still loaded.

  --skip-themes[=<themes>]
      Skip loading all themes, or a comma-separated list of themes.

  --skip-packages
      Skip loading all installed packages.

  --require=<path>
      Load PHP file before running the command (may be used more than once).

  --exec=<php-code>
      Execute PHP code before running the command (may be used more than once).

  --context=<context>
      Load WordPress in a given context.

  --[no-]color
      Whether to colorize the output.

  --debug[=<group>]
      Show all PHP errors and add verbosity to WP-CLI output. Built-in groups include: bootstrap, commandfactory, and help.

  --prompt[=<assoc>]
      Prompt the user to enter values for all command arguments, or a subset specified as comma-separated values.

  --quiet
      Suppress informational messages.

  Run 'wp help <command>' to get more information on a specific command.

Good Info:
https://www.interserver.net/tips/kb/install-lets-encrypt-cpanel-whm-server/
https://lowendtalk.com/discussion/106071/installing-free-ssl-for-server-hostname-using-letsencrypt

Login to the server via ssh andlLet’s run the following command to install Let’s Encrypt provider:

/scripts/install_lets_encrypt_autossl_provider

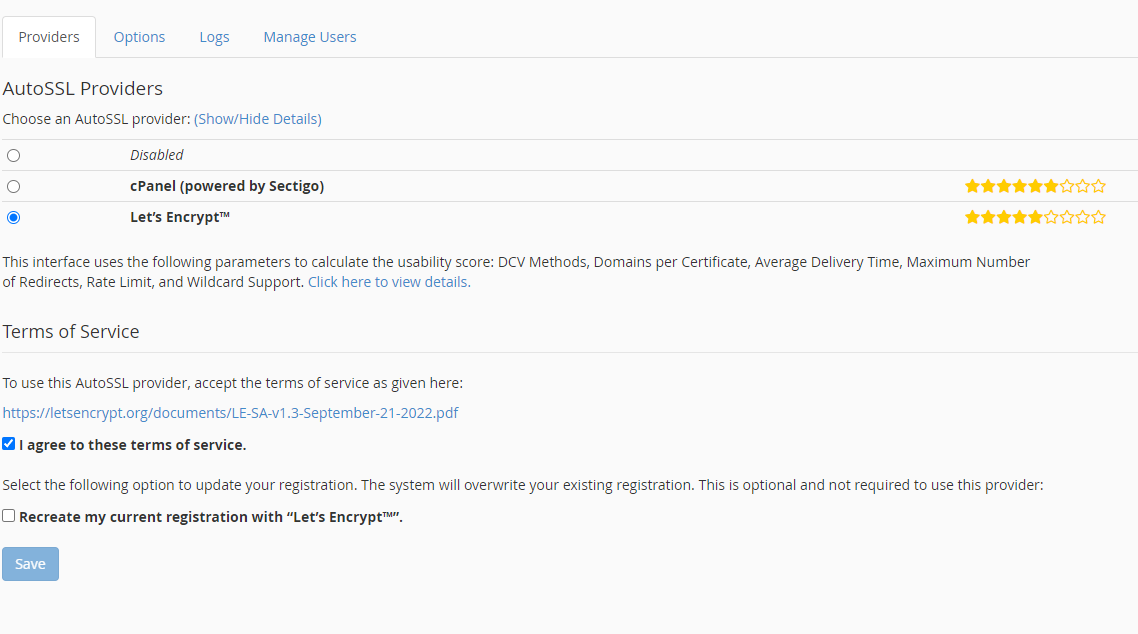
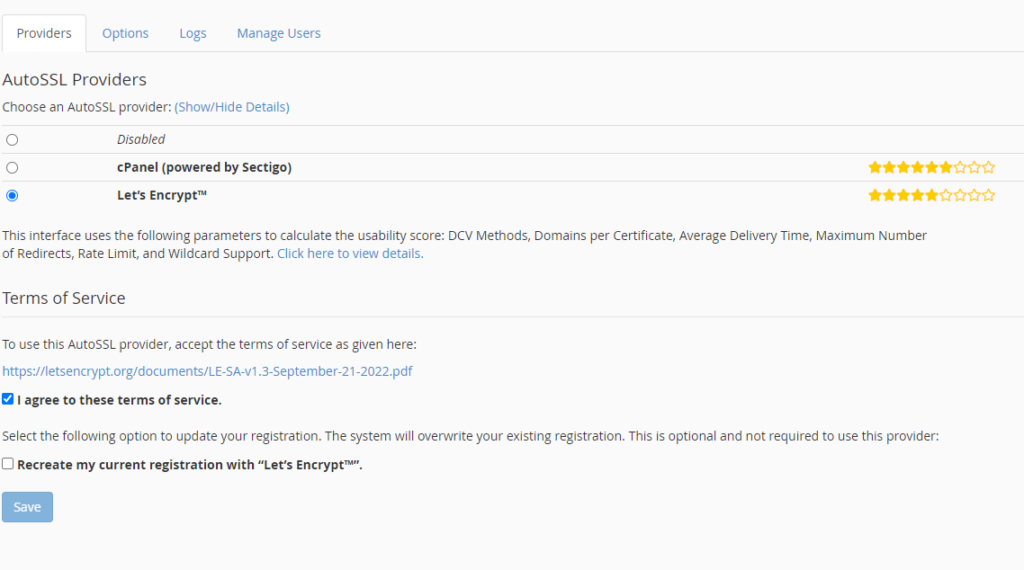
Once you have installed Let’s Encrypt provider, change auto SSL provider to Let’s Encrypt from cPanel (powered by Sectigo).

Login to WHM >> Manage AutoSSL.

Select Let’s Encrypt from cPanel (powered by Sectigo). Check the “I agree to these terms of service.”, and the “Recreate my current registration with “Let’s Encrypt”.

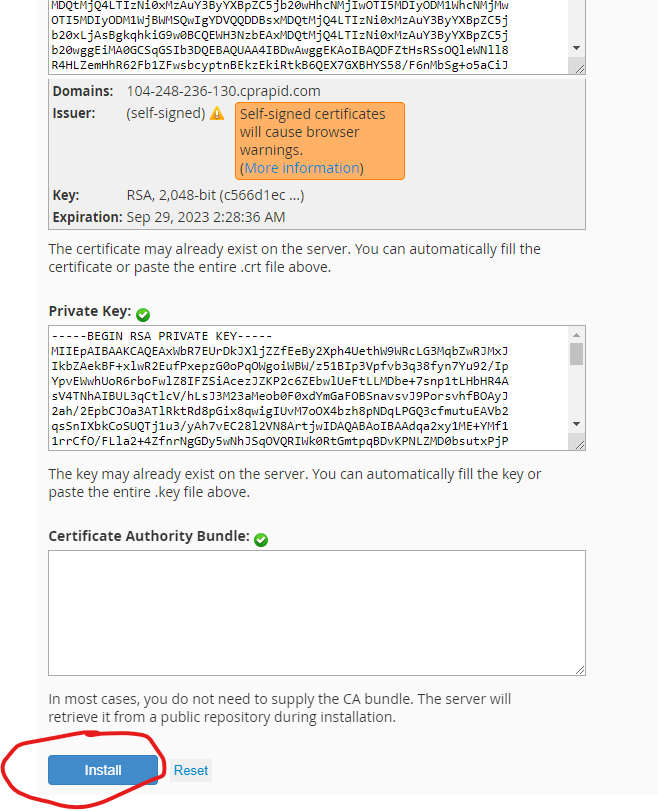
Install Self-Signed Certificate to Hostname.

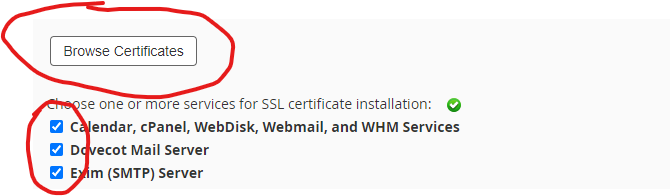
Login to WHM as a root user. Go to “Service Configuration”.

Then select the following services and click on “Browse Certificate”. Calendar, cPanel, WebDisk, Webmail, and WHM Services, Dovecot Mail Server, Exim (SMTP) Server, FTP Server.

Select hostname and click on “Use Certificate”.

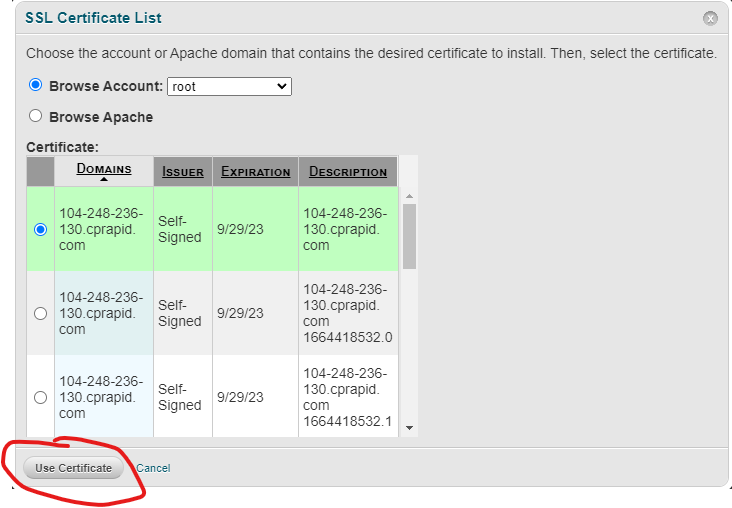
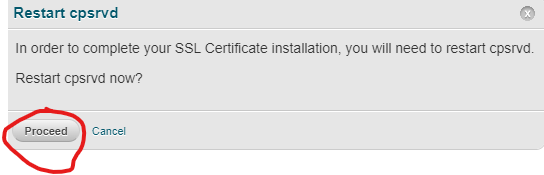
Then click on “Install”.

Restart cpsrvd

Replace Self Signed Certificates with Valid Let’s Encrypt Certificates.

Once you have installed the self-signed certificate, run the following command to check SSL certificates

/usr/local/cpanel/bin/checkallsslcerts --verbose

We can see the SSL CRT’s have been requested for your services. The hostname for the SSL CRT will be with one that is currently defined in cPanel:

# whmapi1 gethostname|grep hostname:
hostname: server1.hostname.com

While the process is not always this fast, after a few moments, we can see the SSL CRT’s are ready for install.
Then re-ran the ‘/usr/local/cpanel/bin/checkallsslcerts –verbose’ command which would have been ran at maintenance time. You may verify at WHM > Service Configuration > Manage Service SSL Certificates.

You can verify SSL installation by running https://server1.hostname.com:2087