From the Windows desktop, move your mouse to the top right corner of the screen to bring up the Charms bar, and click on Start to bring up the Start screen. In the Start screen, click on the Control Panel tile, and then in the Control Panel screen click on View network status and tasks under the Network and Internet heading.

This opens the Network and Sharing Center screen. To add a new public IP address, click on Local Area Connection. To add a new private IP address, click on Local Area Connection 2.

network_sharing

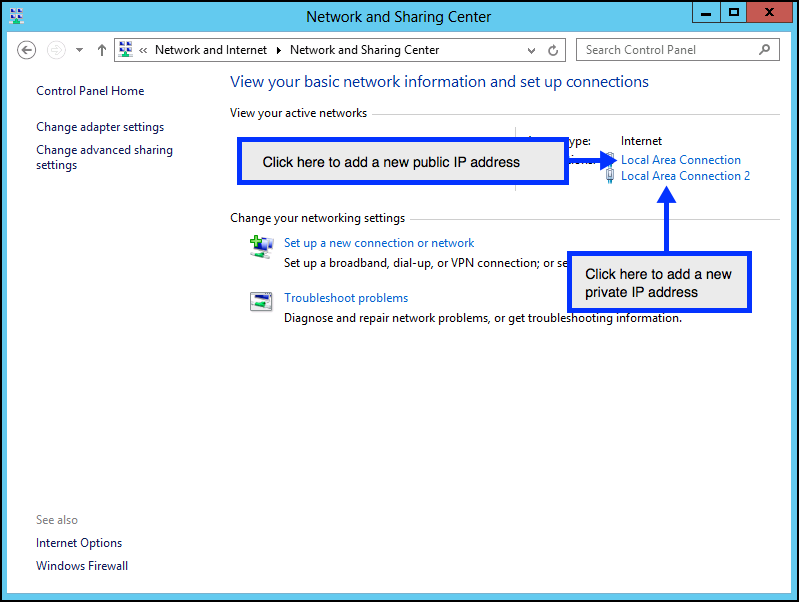
(This example uses Local Area Connection and a public IP address – the steps for Local Area Connection 2 and a private IP address are identical)

Clicking on Local Area Connection opens the Local Area Connection Status screen.

local_connection1

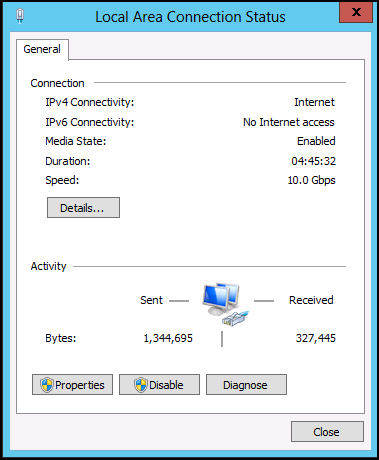
Click on Properties.

In the Local Area Connection Properties dialog, click on Internet Protocol Version 4 (TCP/IPv4)

local_connection_ipv4

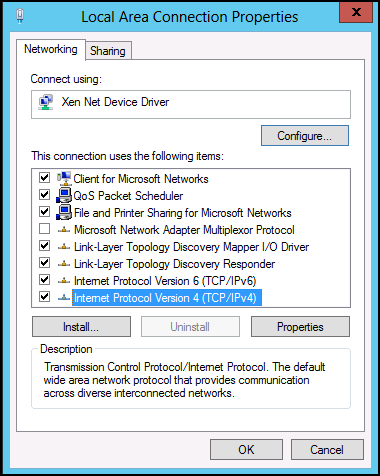
Once you have clicked on Internet Protocol Version 4 (TCP/IPv4), click on Properties.

This takes you to the Internet Protocol Version 4 (TCP/IPv4) Properties screen, which shows the existing IP address, Subnet mask, and Default gateway. To add the new IP address, click on Advanced….

This takes you to the Advanced TCP/IP Settings page. Click on Add… to add the new IP address. Make sure to click the Add button under IP addresses (outlined in blue) and not the Add button under Default gateways.

local_connection_adv_add

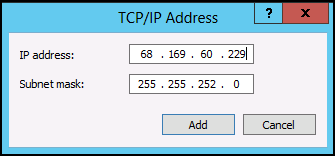
This opens the TCP/IP Address dialog. Add the new IP address, and also the Subnet mask, and click on Add.

add_tcpip

his takes you back to the Advanced TCP/IP Settings screen, which should show the new IP address and Subnet mask (highlighted in yellow here).

ip_added

Click OK or Close to get back to the Network and Sharing Center screen. You may get a warning similar to this:

ip_warning

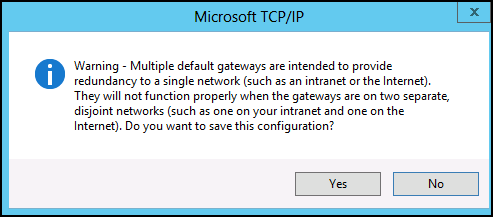
If so, just click on Yes to continue.

Once you get back to the Network and Sharing Center screen, close that screen. Your new IP address is now added to your Windows Server 2012 VS. You can verify this by opening Windows PowerShell and typing in the ipconfig /all command. Look for the new IP address under the Ethernet adapter Local Area Connection section (highlighted in yellow here). If you added a private IP address, it will be under Ethernet adapter Local Area Connection 2.

powershell

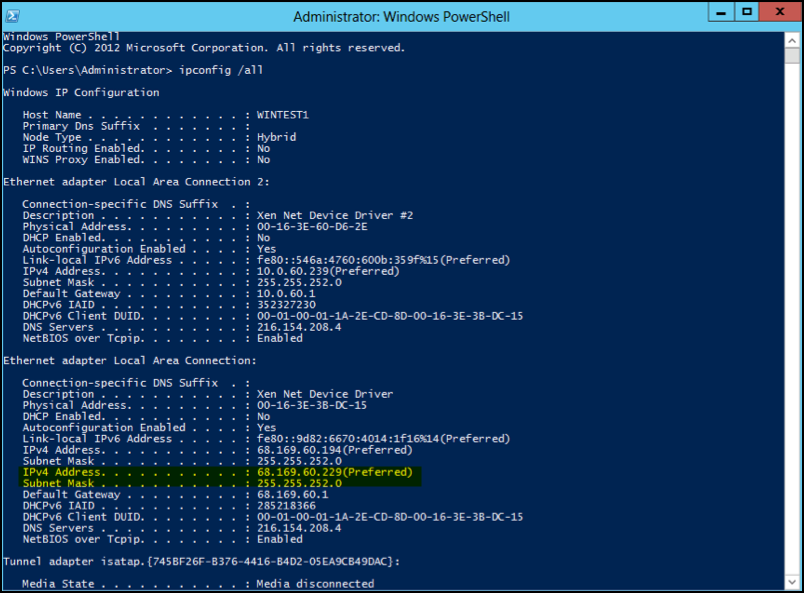
This shows that the new IP address has been successfully added to the Virtual Server and is ready for use.

ssh to the server

# cd /etc/sysconfig/network-scripts
# ls -l | grep ifcfg-eth
-rw-r--r-- 1 root root   119 Jan 11 19:16 ifcfg-eth0
-rw-r--r-- 1 root root   119 Jan  3 08:45 ifcfg-eth0.bak
-rw-r--r-- 1 root root   119 Feb 24 04:34 ifcfg-eth1
-rw-r--r-- 1 root root   128 Jan 19 18:20 ifcfg-eth1.bak

If the main adapter is called “eth0” you have to call the next (virtual) adapter in a sequential order like so:

ifcfg-eth0 (primary adapter, physical)
ifcfg-eth0:1 (first virtual adapter to the physical primary adapter)
ifcfg-eth0:2 (second virtual adapter to the physical primary adapter)

Copy our primary adapter configuration file and name it to be the first virtual adapter:


# cp ifcfg-eth0 ifcfg-eth0:1
# ls -l | grep ifcfg-eth
-rw-r--r-- 1 root root   119 Jan 11 19:16 ifcfg-eth0
-rw-r--r-- 1 root root   119 Feb 24 08:53 ifcfg-eth0:1
-rw-r--r-- 1 root root   119 Jan  3 08:45 ifcfg-eth0.bak
-rw-r--r-- 1 root root   119 Feb 24 04:34 ifcfg-eth1
-rw-r--r-- 1 root root   128 Jan 19 18:20 ifcfg-eth1.bak

Configure this virtual adapter to be a static IP, no hardware address (MAC), configure netmask and of course rename the device.


# vim ifcfg-eth0:1
DEVICE=eth0:1
BOOTPROTO=static
ONBOOT=yes
IPADDR=10.1.1.2
NETMASK=255.255.255.0

There is no need to specify a MAC address – it is a virtual adapter and there is also no need to specify a default gateway as it is already routed through the primary adapter. Basically there are only four things that you will need to change:

File name for the adapter itself
DEVICE= (should correspond with the file name)
IPADDR=
NETMASK=

Restart the networking service:


# service network restart

That’s it; lets check ifconfig to make sure the virtual adapter is there and working:


# ifconfig eth0:1
eth0:1    Link encap:Ethernet  HWaddr 08:00:27:ED:05:B7
inet addr:10.1.1.2  Bcast:10.1.1.255  Mask:255.255.255.0
UP BROADCAST RUNNING MULTICAST  MTU:1500  Metric:1


# ping 10.1.1.2
PING 10.1.1.2 (10.1.1.2) 56(84) bytes of data.
64 bytes from 10.1.1.2: icmp_seq=1 ttl=64 time=0.073 ms
64 bytes from 10.1.1.2: icmp_seq=2 ttl=64 time=0.042 ms
64 bytes from 10.1.1.2: icmp_seq=3 ttl=64 time=0.029 ms
64 bytes from 10.1.1.2: icmp_seq=4 ttl=64 time=0.029 ms
--- 10.1.1.2 ping statistics ---
4 packets transmitted, 4 received, 0% packet loss, time 2999ms
rtt min/avg/max/mdev = 0.029/0.043/0.073/0.018 ms

You need to configure following files for IPv6 configuration:

— /etc/sysconfig/network : Turn on networking in this file.
— /etc/sysconfig/network-scripts/ifcfg-eth0 : Set default IPv6 router IP and server IP address in this file.

Open /etc/sysconfig/network file:

[root@austin log]# nano /etc/sysconfig/network

Add to the following line:


NETWORKING_IPV6=yes

Open /etc/sysconfig/network-scripts/ifcfg-eth0 (1st network config file)


[root@austin log]# nano /etc/sysconfig/network-scripts/ifcfg-eth0

# =============================================================
# Network Interface Script generated by BareMetal
# =============================================================
DEVICE=eth0
BOOTPROTO=STATIC
ONBOOT=yes
IPADDR=216.55.162.31
NETMASK=255.255.255.0
HWADDR=6C:62:6D:47:A4:C3
IPV6INIT=yes
IPV6ADDR=3607:f0d0:1102:0011:0000:0001:0000:0002
IPV6_DEFAULTGW=5607:f0d0:1002:0011:0000:0000:0000:0002

Save and close the file. Restart networking:


[root@austin log]# service network restart

Verify your configuration by pinging ipv6 enabled site such as ipv6.google.com:


[root@austin log]# ping6 ipv6.google.com

[/bash]

What is uplink port speed on a dedicated server with 100MBPS port?

Put another way, there are 8 bits to a byte, 1024 bytes to a kilobyte and 1024 kilobytes to a megabyte. 100 Mbits = 100/8 MBytes = 12.4 MBytes/sec; 10 Mb = 1.24 MB/sec.

1Gbps uplink (would max out at around 125MB/sec).

In terms of dedicated servers, the uplink port speed is most likely the speed of the connection between the server and the router to the backbone. If the host company’s connection to the ‘net in general is faster than your uplink speed (most likely the case), then the uplink port speed will be a bottleneck.

Measure of file size: KBps
File size i.e. how big the file or how much space a file occupies in the hard disk measured in terms of KiloBytes (KB upper case “K” and upper case “B”). In computing terms the upper case “K” stands for 1024. 1024 is computed from 210. (2 power 10). 2 denote the number of characters in the binary system which is used to store data in the disc (ones and zeroes).
Other abbreviations like mega, giga and terra also use the base as 1024,

1KB (KiloByte) = 1024 Bytes (approximately 1000 Bytes)
1MB (MegaByte) = 1024 KB (approximately 1000 KiloBytes or 1 million Bytes)
1GB (GigaByte) = 1024 MB (approximately 1000 MegaBytes or 1 billion Bytes)
1TB (TerraByte) = 1024 GB (approximately 1000 GigaBytes or 1 trillion Bytes)

Measure of data transfer speeds: kbps
Data transfer speed over the networks (including the internet) is calculated in terms of bits per second: kilobits (kb small case “k” and small case “b”). The higher the kbps i.e. more the bits transferred per second, more the speed, faster the network/connection. Here k stands for 1000 (103 )

1 kbps (kilo bits per second) = 1000 bits per second
1 Mbps (mega bits per second) = 1000 kilo bits per second.
1 Gbps (giga bits per second) = 1,000 mega bits per second.

ISP bandwidth and download speeds
The most common confusion caused by the similarity of KBps and kbps is when it comes to internet bandwidth and download speeds. People often complain that their ISP promised 512kbps connectivity but they are seldom able to download any file at 512 KBps. They fail to notice the difference in cases of the units and hence think their ISP is cheating them or offering them poor quality service. As mentioned earlier data transfer speeds are always calculated in terms of kilo bits per second (kbps) so an ISP connectivity of 512 kbps promises of transfer of at the max 512 kilo bits per second.

On the other hand, file size measure is always in Kilo Bytes and thus download speeds are always calculated based on how many Bytes per second are downloaded and hence Kilo Bytes per second (KBps). KBps and kbps are not interchangeable.

So an internet connectivity of say 512kbps can never achieve a download speed of 512 KBps. To calculate the maximum download speed of a “X kbps” connection, we need to use a simple formula as below.

Download KBPS speed = (Kbps value*1000) /8)) / 1024.

I.e. For a connectivity of 512 kbps

kbps value * 1000 = 512 * 1000 = 512000

512000 / 8 = 64000

64000 / 1024 = 62.5 KBps

Therefore theoretically an internet connection of 512kbps bandwidth can download at a speed of 62.5 KBps

If you don’t want to go through all the hassles of the above formula, just multiply the kbps value with 0.1220703125 to get the KBps value.

512 kbps * 0.1220703125 = 62.5 KBps. Simple!

Internet connectivity Download speed (approx)
256 kbps 31.3 KBps
384 kbps 46.9 KBps
512 kbps 62.5 KBps
768 kbps 93.8 KBps
1 mbps ~ 1000kbps 122.1 KBps

Telnet is most likely to be used by system administrators, program developers and anyone who has a need to use specific applications or data located at a particular host computer. It’s a network protocol used on the Internet or local area networks to provide a bidirectional interactive text-oriented communication facility using a virtual terminal connection. Telnet does not installed automatically on CentOS 6.3. You can issue the following command to confirm that telnet is working :

telnet localhost 80

If telnet client does not installed, it should return something like :

[root@centos63 ~]# telnet localhost 80
-bash: telnet: command not found

Issue the following command to install telnet client :

[root@centos63 ~]# yum install telnet -y
Loaded plugins: fastestmirror, presto
Determining fastest mirrors
 * base: mirrors.hostemo.com
 * extras: mirrors.hostemo.com
 * updates: mirrors.hostemo.com
CentOS6.3-Repository                                                         | 4.0 kB     00:00 ...
base                                                                         | 3.7 kB     00:00
extras                                                                       | 3.0 kB     00:00
updates                                                                      | 3.5 kB     00:00
updates/primary_db                                                           | 2.2 MB     00:19
Setting up Install Process
Resolving Dependencies
--> Running transaction check
---> Package telnet.i686 1:0.17-47.el6 will be installed
--> Finished Dependency Resolution

Dependencies Resolved

====================================================================================================
 Package           Arch            Version                    Repository                       Size
====================================================================================================
Installing:
 telnet            i686            1:0.17-47.el6              CentOS6.3-Repository             56 k

Transaction Summary
====================================================================================================
Install       1 Package(s)

Total download size: 56 k
Installed size: 102 k
Downloading Packages:
Setting up and reading Presto delta metadata
Processing delta metadata
Package(s) data still to download: 56 k
Running rpm_check_debug
Running Transaction Test
Transaction Test Succeeded
Running Transaction
  Installing : 1:telnet-0.17-47.el6.i686                                                        1/1
  Verifying  : 1:telnet-0.17-47.el6.i686                                                        1/1

Installed:
  telnet.i686 1:0.17-47.el6

Complete!

If telnet client installed, it should return something like :

[root@centos63 ~]# telnet localhost 80
Trying ::1...
Connected to localhost.
Escape character is '^]'.