Restoring ost-files

Restore Ost-files aren’t intended to be backed up and restored. However, under certain circumstances an ost-file can still be used directly to restore data.

You can restore an ost-file when;

When the IMAP account the ost-file belongs to is still configured in Outlook and you…
haven’t removed and re-added the IMAP account.
haven’t created a new Mail Profile
aren’t trying to use it for the IMAP account on another computer.
When the Exchange account the ost-file belongs to is still configured in Outlook. This can also be in a new Mail Profile or on another computer as long as you have connected to the Exchange server at least once.

To restore data from the ost-file;

Close Outlook.
Rename the current ost-file of the account to .old.
Restore the ost-file to the location of the current ost-file and rename it if needed.
Disconnect yourself from the network to make sure that no changes are being synched when the account reconnects. This could for instance empty the ost-file if the data was no longer on the server.
Start Outlook.
Export any data that you wish to keep to a pst-file.
Close Outlook.
Delete or rename your recovered ost-file. If your original cache was still working, you can rename it back from .old or otherwise make sure there is no longer an ost-file for your account.
Reconnect yourself to the network.
Start Outlook.
Once Outlook is done synching, you can import the data from the pst-file.

Source: https://www.howto-outlook.com/howto/backupandrestore.htm#restore-ost

If you emails are not arriving or you are getting delays or no receipt, here are ways to help improve email delivery.

Google

To keep important email messages out of your Gmail spam folder, you should do the following steps.

  1. Add the sender email address to your Google Contacts. When you add a sender’s email address to your contacts, it tells Google you want to receive email from that sender. This method does not guarantee messages from the desired sender won’t be sent to spam, but it’s an easy way to make it more likely the desired email will arrive in your inbox.
  2. Create a filter rule to prevent messages from specific senders going into the spam folder. This adding to the whitelist or safe sender list. Also, If an email message is already in your spam folder, you can use an option to train the Gmail spam filter to not send those messages to your spam folder.

Add a Gmail Contact on the Computer and on Android or IOS App.

On your computer, go to contacts.google.com, at the top left corner, select Create contact, enter the contact’s information, including the sender email address, select save in the bottom right corner.

On your Android phone or tablet, open the Contacts app, at the bottom right, tap add, enter the contact’s name and email address. Make sure you save the contact to the correct account. Next to your email account, tap the Down arrow and then select the account that will receive the email messages you’re whitelisting. When you’re finished, tap Save.

Create a filter rule to keep desired email out of spam

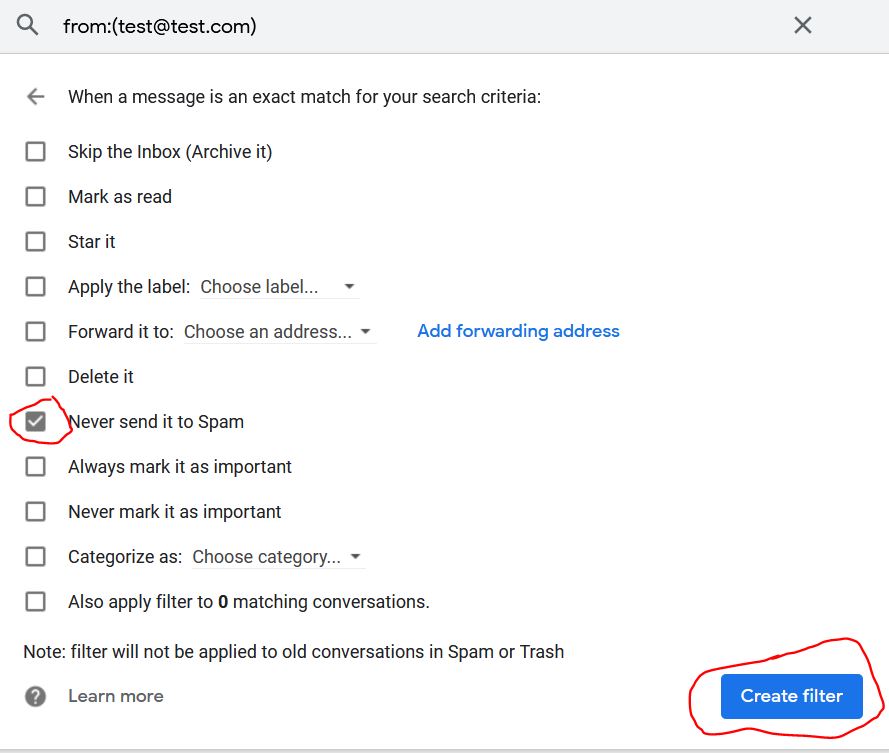
Gmail’s filters provide a lot of useful ways to manage your email and one of those ways is to set a rule to prevent email from a specific email address from going to your spam folder. Filters are the closest thing Gmail has to a “safe sender” or “whitelist”.

Filters can only be created and modified from the online web version of Gmail, so you’ll need to go to your computer to complete the following.

Open the Gmail website from your computer. In the search box at the top, select the Down arrow.

In the From field, enter the sender email address. At the bottom of the search window, click Create filter.

Select Never send it to Spam. Click Create filter.

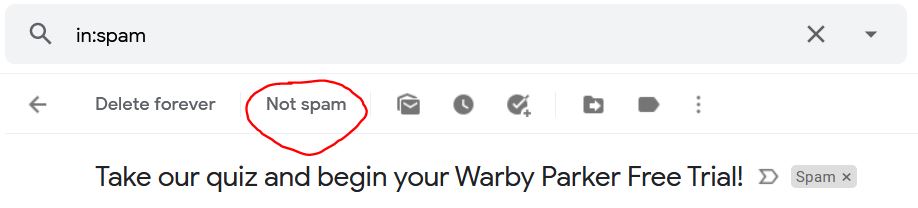
Mark an email as Not Spam

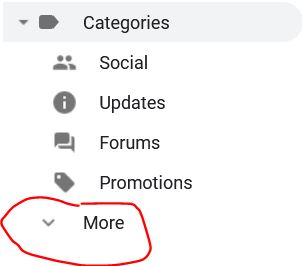
On your computer, open the Gmail website and on the left, select More then find Spam.

Open the desired email message. At the top of the page, select “Not spam”. The message will be moved to your inbox.

If you’re an email sender having trouble sending email to Gmail recipients, visit the Gmail Postmaster Tools website. Source: https://www.whitelist.guide/gmail/

Outlook, Office365

Add an address to your Contacts and the Safe Senders list to ensure you’ll always receive their messages. Email addresses in the Safe Senders List are never treated as junk email. If lands in your junk email folder, you can mark it as “not junk” to teach Outlook that you want to receive that type of email.

Safe Senders list

By default, email addresses in your Outlook contacts are considered safe senders by the Junk Email Filter, but you can change this setting. Email messages from safe senders are never moved to the Junk E-mail folder.

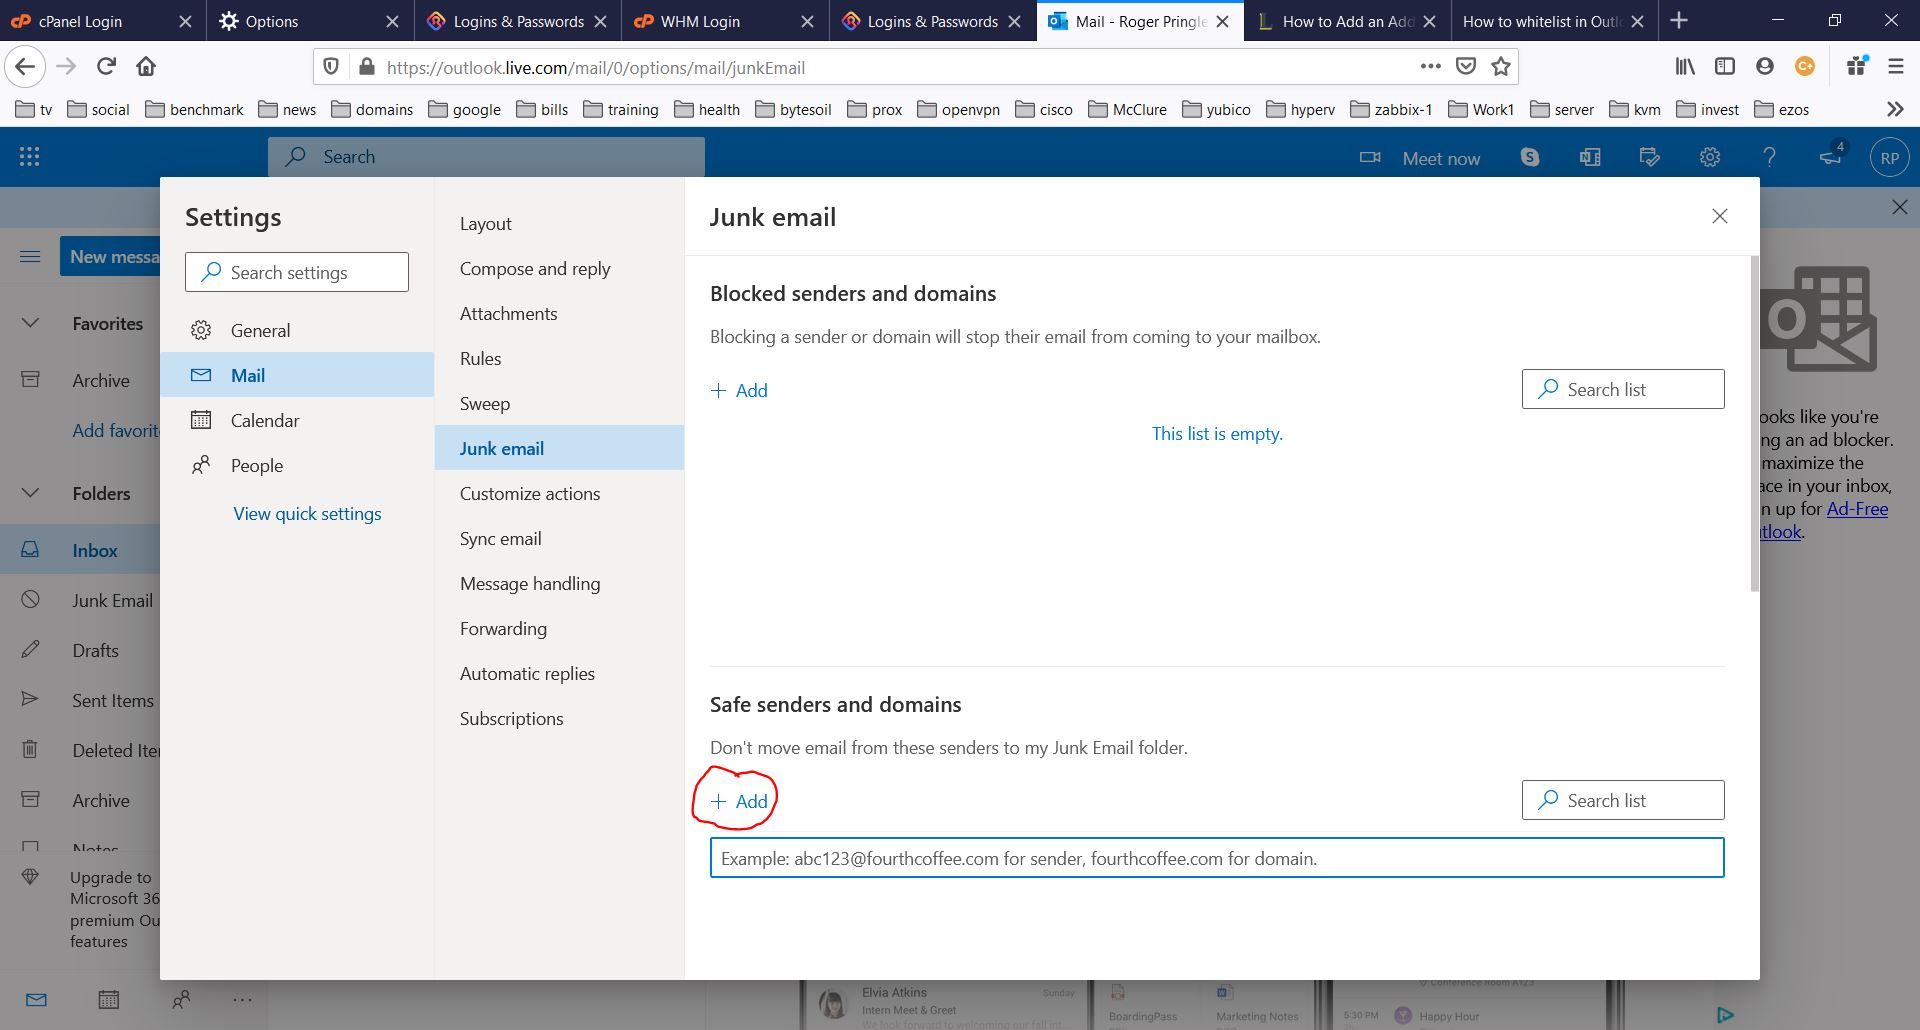
To add people to your Safe Senders List (web), do the following:

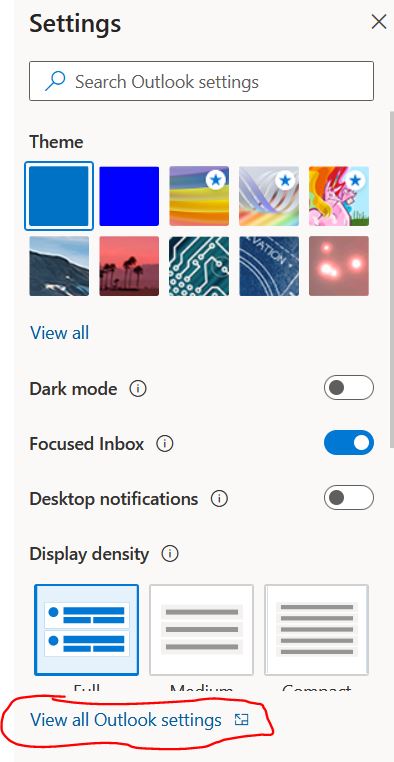
Select the Settings icon (gear icon), select View all Outlook settings,


Select Mail, Select Junk email, Enter the sender email address, Hit Enter on Keyboard > Save.

Check blocked senders and safe senders list

Select Settings > View all Outlook settings, Select Mail, and then select Junk email, If you see the sender’s address listed under “Blocked senders and domains”, select the address and then select Remove > Save.

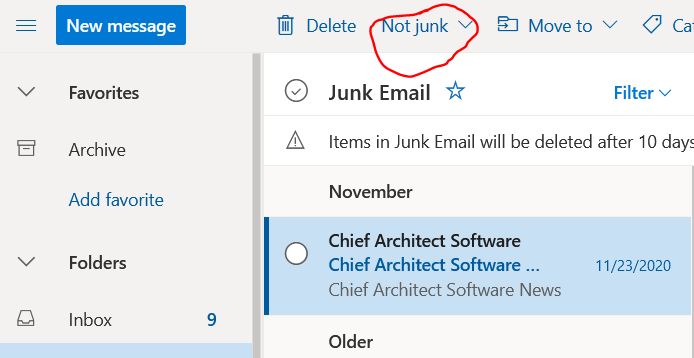
Mark a message as “not junk”. In your Outlook.com folder list, select the Junk Email folder and look for the missing email. Right-click the desired email and then select Mark as not junk. The message will automatically be moved to your inbox.


Other resources:
https://www.lifewire.com/add-address-domain-safe-senders-outlook-1173760
whitelist.guide

Recently, I had the task of importing emails form a cPanel email account to Outlook. This was after the DNS had changed to the office365 servers (mail.protection.outlook.com). There is no export from Horde to PST format – only MBOX. So, there are 3rd party programs to take the MBOX and Convert to PST, but I wanted a solution that was free.

So here are the requirements:

  1. Have Outlook installed and the DNS changed to the new office 365 MX Records.
  2. Have the email set up on Office365 (In this example – user1@testdomain.com).
  3. IP Address of the cPanel Server

So, our test domain changes are set up as follows:

Old DNS Settings:

# dig mx ptestdomain.com +short
0 mail.testdomain.com.

New DNS Setting:

# dig mx testdomain.com +short
0 testdomain-com.mail.protection.outlook.com.

Now, we need to add the old email to outlook.

For this example, the email is: user1@testdomain.com
Since user1@testdomain.com is already set up in outlook, we need to add this email from the old server, but we change the name a bit – use a name – such as “old-user1@testdomain.com”. This is due to Outlook not allowing 2 emails the same. It’s OK, we can change it later.

Here are the steps.

You will need the IP of the cPanel account where the email is stored.
Add the email “old-user1@testdomain.com” to outlook.

Change the name a bit so we can add it.

Choose POP3

Now use the IP address for the old cPanel server for the Incoming and Outgoing mail servers. Ports 110 and 25. You can use port 587 for outgoing if needed.:

Enter password and complete.

Now a Popup appears for the username and password. Enter in the original cPanel username which is the old email name and password.

Now, go to Outlook and let’s change the settings.

Click the drop down and click “Account Settings”. A popup appears. Select the new account and click “Change”. Keep the names as you can separate this from the new outlook email. Make sure the Mail Settings are set to Leave a copy on server. Click “Next” and “Done”.

Now, send and receive. The email should populate in the new folders. Once completed, you can create a new folder (ex., cpanel-mail) under the outlook email and drag the emails to there and drop them to move them to the new outlook folder. Once moved, they will reside on the outlook server.

Before you begin installing the signature, you will need to see the hidden files and file extensions.

Go to your File Explorer (Windows key + E)
Select your hard drive (C:/ for most users)
Click on the Organize drop-down box
Click on the Folder and Search options tab
In the folder options, select the View tab, and make sure Show hidden files is selected, and uncheck Hid extensions for known file types
Now that this is done, we can get working on installing your signature.

Open File Explorer (Windows Key + E)
Go to Your Username/AppData/Roaming/Microsoft/Signatures/<.li>
Paste your .HTML signature in the Signatures file.
Rename the file by changing the extension from .HTML to .HTM
Open Outlook 2013 and go to FILE
Go to Options
Click on the Mail Tab and then on the Signatures button
You should see your signature in the list of Select signatures to edit box. The name of your signature will be your file’s name. Also, in the Edit signature box, your signature may not display properly. Do not worry, this is perfectly normal. Do not make any alterations. Make sure that you choose your signature in the New Message and Replies/Forwards
CONGRATULATIONS! Your signature is now installed!
– See more at: http://myhtmlsignature.com/installing-your-email-signature-in-outlook-2013/#sthash.Qj5eXA4I.dpuf