Log into the Linux server as the user you are going to use to connect with ssh. Generate the key.
ssh-keygen -t rsa -b 4096 -C "email@domain.com"
Generating public/private rsa key pair.
Enter file in which to save the key (/home/user/.ssh/id_rsa):
Enter passphrase (empty for no passphrase):
Enter same passphrase again:
Your identification has been saved in /home/user/.ssh/id_rsa.
Your public key has been saved in /home/user/.ssh/id_rsa.pub.
The key fingerprint is:
SHA256:3/dDa9R+zzDpGNt/EU9Jusj/snbKt3+B8F+ULnxXtWk email@domain.com
The key's randomart image is:
+---[RSA 4096]----+
|                 |
|               ..|
|              o *|
|           . . E+|
|        S . = =o=|
|         . + * O=|
|          . + @.*|
|            .@ %=|
|            ++@+#|
+----[SHA256]-----+
Now copy the id_rsa key to your Windows desktop. This can be done by copying and pasting the contents of the file or using an SCP client such as PSCP which is supplied with the PuTTY install or FileZilla.
Next launch PuTTYgen from the Windows Programs list.
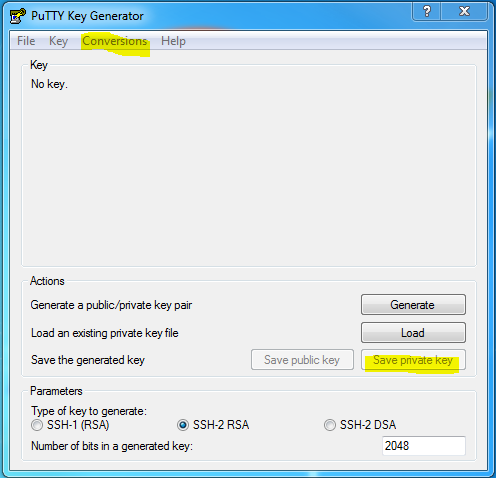
Click Conversions from the PuTTY Key Generator menu and select Import key.
Navigate to the OpenSSH private key (id_rsa)and click Open.
Under Actions / Save the generated key, select Save private key.
Choose an optional passphrase to protect the private key.
Save the private key to the desktop as id_rsa.ppk.
If the public key is already appended to the authorized_keys file on the remote SSH server, then proceed to Connect to Server with Private Key.
Otherwise, proceed to Copy Public Key to Server.
Copy Public Key to Server
The OpenSSH public key is located in the box under Key / Public key for pasting info OpenSSH authorized_keys file:. The public key begins with ssh-rsa followed by a string of characters.
Highlight entire public key within the PuTTY Key Generator and copy the text.
Launch PuTTY and log into the remote server with your existing user credentials.
Use your preferred text editor to create and/or open the authorized_keys file:
# nano ~/.ssh/authorized_keys
Paste the public key into the authorized_keys file.
ssh-rsa AAAAB3NzaC1yc2EAAAABJQAAAQBp2eUlwvehXTD3xc7jek3y41n9fO0A+TyLqfd5ZAvuqrwNcR2K7UXPVVkFmTZBes3PNnab4UkbFCki23tP6jLzJx/MufHypXprSYF3x4RFh0ZoGtRkr/J8DBKE8UiZIPUeud0bQOXztvP+pVXT+HfSnLdN62lXTxLUp9EBZhe3Eb/5nwFaKNpFg1r5NLIpREU2H6fIepi9z28rbEjDj71Z+GOKDXqYWacpbzyIzcYVrsFq8uqOIEh7QAkR9H0k4lRhKNlIANyGADCMisGWwmIiPJUIRtWkrQjUOvQgrQjtPcofuxKaWaF5NqwKCc5FDVzsysaL5IM9/gij8837QN7z rsa-key-20141103
Save the file and close the text editor.
Adjust the permissions of the authorized_keys file so that the file does not allow group writable permissions.
# chmod 600 ~/.ssh/authorized_keys
Logout of the remote server.