Migration check in plesk shows this error:

The ‘max_allowed_packet’ parameter on the source database server is 16777216, which is bigger than on the destination server, where it is 1048576

RDP the the server. The file is at C:Program Files (x86)ParallelsPleskDatabasesMySQLDatamy.ini

Add this to it:

[mysqld]
# max_allowed_packet=16M

On Tuesday, October 14, 2014, iSIGHT Partners and Microsoft announced a Zero-Day vulnerability named “Sandworm” found in all versions of Microsoft Windows and Windows Server 2008 and 2012.

The vulnerability has been exploited in a small number of cyberespionage attacks against NATO, energy companies, a US academic organization and many others. Microsoft has since created a patch and released it as one of their security updates (CVE-2014-4114.).

If you have enabled automatic updating, the Microsoft security update will be downloaded and installed automatically. If you have not, it is critical that you run the security update from Microsoft, as well as all other important security updates through the Windows Updater immediately.

If you would like to learn more about the Sandworm vulnerability, in-depth information can be found on iSIGHT Partners blog and Microsoft’s Security TechCenter.

Source: http://blog.hyperfive.com/2013/07/how-to-setup-internal-smtp-service-for.html

Also
Configuring the server so you can send mail using mail.domain.com instead of ‘localhost’ or the server’s IP address.

If you add the following line to the server’s hosts file it will map mail.domain.com to 127.0.0.1 which is localhost. Please note this would need to be done on each server as reverse NAT translation is not supported.

127.0.0.1 mail.domain.com
How to edit the server’s hosts file:
http://www.howtogeek.com/howto/27350/beginner-geek-how-to-edit-your-hosts-file/

Migrating MySQL database from one Windows Plesk Server to other Windows Plesk Server

The only condition is that the database Engine should be an INNODB. Create the database , database user and password on the plesk server to which you want to migrate the database. Assume that the database name is demodb . Now login to the server from which you want to move the database . Go to the path of the backup E:Program Files (x86)ParallelsPleskDatabasesMySQLdata. Copy the folder “demodb” and paste it on the other server where you want to move at the path C:Program Files (x86)ParallelsPleskDatabasesMySQLdata.

Login to plesk as admin, go to Database Servers, Local Mysql Server, click on the database name and delete the database user and recreate it .

The Path of MySQL Databases on windows plesk server is C:Program Files (x86)ParallelsPleskDatabasesMySQLdata

Source: http://technet.microsoft.com/en-us/library/cc754203%28v=ws.10%29.aspx

Windows Server 2008

Membership in Administrators, or equivalent, is the minimum required to perform these procedures.
To configure a static IP address on a computer running Windows Server 2008

  1. Click Start, and then click Control Panel.
  2. In Control Panel, verify that Classic View is selected, and then double-click Network and Sharing Center.
  3. In Network and Sharing Center, in Tasks, click Manage Network Connections.
  4. In Network Connections, right-click the network connection that you want to configure, and then click Properties.
  5. In Local Area Connection Properties, in This connection uses the following items, select Internet Protocol Version 4 (TCP/IPv4), and then click Properties. The Internet Protocol Version 4 (TCP/IPv4) Properties dialog box opens.
  6. In Internet Protocol Version 4 (TCP/IPv4) Properties, on the General tab, click Use the following IP address. In IP address, type the IP address that you want to use.
  7. Press tab to place the cursor in Subnet mask. A default value for subnet mask is entered automatically. Either accept the default subnet mask, or type the subnet mask that you want to use.
  8. In Default gateway, type the IP address of your default gateway.
  9. In Preferred DNS server, type the IP address of your DNS server. If you plan to use the local computer as the preferred DNS server, type the IP address of the local computer.
  10. In Alternate DNS Server, type the IP address of your alternate DNS server, if any. If you plan to use the local computer as an alternate DNS server, type the IP address of the local computer.

Click OK, and then click Close.

Windows Server 2003

Membership in Administrators, or equivalent, is the minimum required to perform these procedures.
To configure a static IP address on a computer running Windows Server 2003

  1. Click Start, click Control Panel, right-click Network Connections, and then click Open.
  2. In Network Connections, right-click the network connection that you want to configure, and then click Properties.
  3. In Local Area Connection Properties, in This Connection uses the following Items, select Internet Protocol (TCP/IP), and then click Properties. The Internet Protocol (TCP) Properties dialog box opens.
  4. In Internet Protocol Version 4 (TCP/IPv4) Properties, on the General tab, click Use the following IP address. In IP address, type the IP address that you want to use.
  5. In Subnet mask, either accept the default subnet mask, or type the subnet mask that you want to use.
  6. In Default gateway, type the IP address of your default gateway.
  7. In Preferred DNS server, type the IP address of your DNS server.
  8. In Alternate DNS Server, type the IP address of your alternate DNS server, if any.

Click OK, and then click Close.

If your server is sending spam or compromised, here are a few tip.

First thing is to do a password audit, you can view these passwords in plain text in this file:

C:Program FilesParallelsPleskMail ServersMail EnableConfigAUTH.TAB

If some passwords in use are very weak they will eventually become compromised. Pay extra attention to common business type addresses like info@ sales@ contact@ as they are almost always the first to be brute forced. Also make sure that no password contains any words from the domain name.

Disable options that wallow spam to be relayed through your server in the form of backscatter: http://en.wikipedia.org/wiki/Backscatter_%28email%29

Specifically NDR’s – so your server is no longer sending bounces to spoofed email addresses. Also disable the notification that tells the remote sender when an inbox is full which can also be used to relay spam.

For the brute force you have a few options – one is to consider disabling the administrator account and setting up a brute policy to lock users after a set number of failed attempts. You could also change the port that RDP is using (http://support.microsoft.com/kb/306759) to something more obscure.

There are also software based utilities that can help however I’m not personally familiar with them I have seen them in use before on client machines.

RdpGuard: http://rdpguard.com/
Syspeace: http://www.syspeace.com/start/
EvlWatcher: http://nerderies.blogspot.com/
IPban: https://github.com/jjxtra/Windows-IP-Ban-Service/downloads

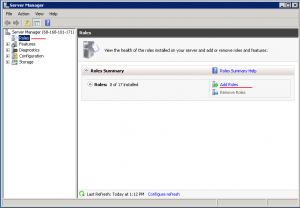
Open Server Manager, go to Roles and click “Add Roles”
1


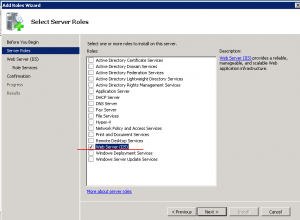
In the Add Role Wizard, select Web Server (IIS) role to install
2

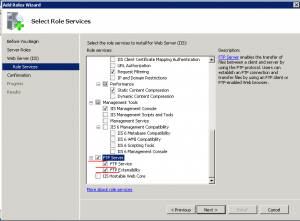
Click Next until you reach Select Role Services page, leave the default and check FTP Server, FTP Service and FTP Extensibility at the bottom. Click Next, follow the wizard and finish the role installation.
3

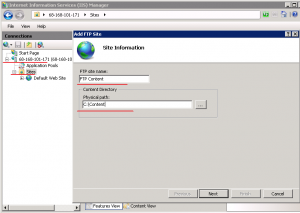
Now open IIS Manager from Start > Administrative Tools, expand the server, right click Sites, and click Add FTP Site, give it a site name and configure the physical path as needed.
4

Configure Binding and SSL. In our case, we’d like to bind to all unassigned IP addresses and do not use SSL.
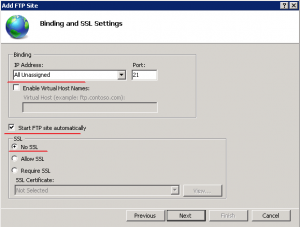
5

Enable Basic Authentication and configure authorization. In our case I’ll start with allowing All users both Read and Write permission as long as all users on the server are password protected.
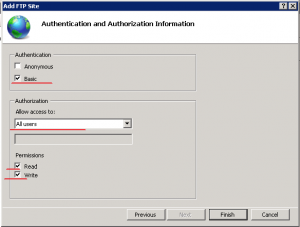
6

Click Finish to finish the configuration.


Open Windows Firewall with Advanced Security from Start > Administrative Tools, go to Inbound Rules in the left pane, and create a new rule by clicking New Rule in the Action Pane, select Port and click next.
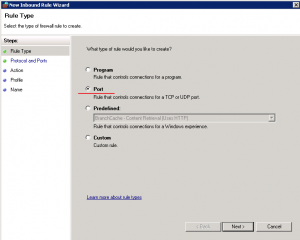
7

Apply this rule to TCP port 21, and click Next
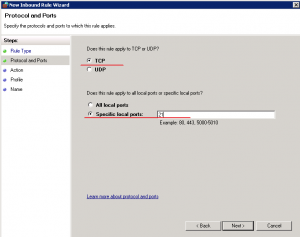
8

  • Keep the default configure for the rest of steps to Allow the connection and apply it to all profiles, name the rule and finish the wizard.


  • Now the FTP should be up and running, please test the connection to confirm.

To add ftp users – see here: http://www.iis.net/learn/publish/using-the-ftp-service/configure-ftp-with-iis-manager-authentication-in-iis-7