If you ever set up a new domain hosting or migrate a domain to a new server, you will want to check to make sure that the changes are good before changing the DNS to the new server.
We often get asked this question a lot as in many cases, clients change the DNS before checking to see if there site actually works. This can lead to frustration, downtime and lost revenue and customers.
With the information in this article, we will outline how to map a domain name to the local hosts file, thus overriding temporarily the DNS record for a domain.
How The hosts File Works
All operation systems come with a hosts file. The default hosts file is quite simple. It’s comprised of two things:
IP Address – this is the IP address of the server or computer that you want to map a domain to.
Hostname – usually, this is the domain name that you want to map to the associated IP address.
Whys does changing the hosts file work?
Let’s take a look.
Imagine a long time ago in the networking world. There are no DNS servers. So hosts files were used on early computer networks for name resolution before DNS was developed.
So when you ping or load a website, you computer does something interesting:
It checks to see if the name queried is its own.
It then searches a local Hosts file, a list of IP address and names stored on the local computer.
It then checks the Domain Name System (DNS) servers which are queried.
How to Edit the Hosts File
Windows
On a Windows System, the Hosts file is located at the following location:
C:\Windows\System32\drivers\etc\hosts
To edit the file, you will need to open it as Administrator. Find Notepad, and then right click to open as administrator. You will get a message to allow notepad to make changes to your system. Then click File > Open > C:\Windows\System32\drivers\etc\hosts (you can paste it into the navigation bar to go directly there).
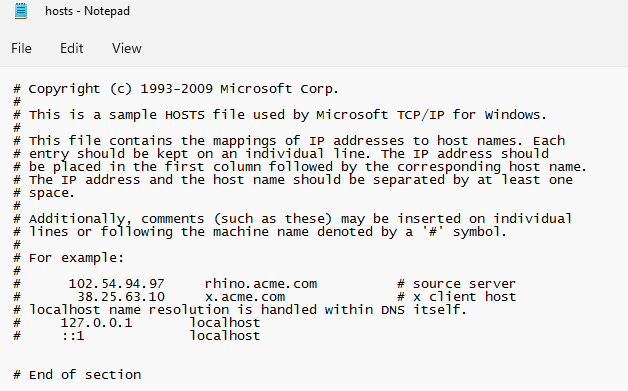
Here is the default File:
To add a domain, use the following format:
IP Address – this is the IP address of the server that you want to map a domain to.
Domain – usually, this is the domain name that you want to map to the associated IP address.
Comments – Notes or a descriptor of the entry.
Here is the Hosts file with a new entry.
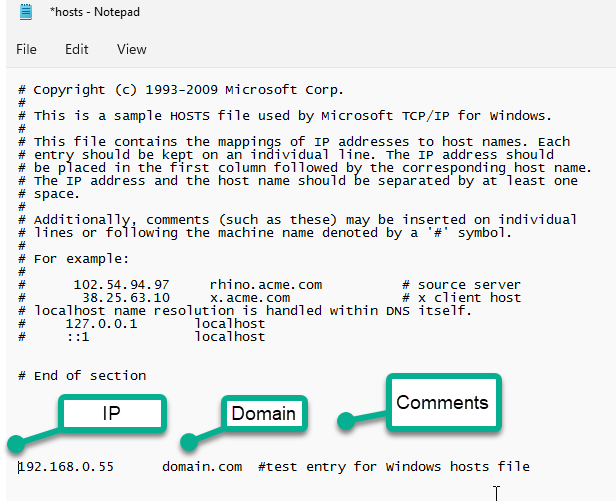
Note: when adding the entry’s, just hit tab between the entry’s to give them space.
After the change, save the changes.
You can test with a ping. Open your Command Prompt > Start > Type in cmd . Click on Command Prompt.
Type in ping domain.com ( replace your domain name here…)
Results.
c:\>ping domain.com
Pinging domain.com [192.168.0.55] with 32 bytes of data:
Reply from 192.168.0.55: bytes=32 time=66ms TTL=50
Reply from 192.168.0.55: bytes=32 time=73ms TTL=50
Reply from 192.168.0.55: bytes=32 time=68ms TTL=50
Reply from 192.168.0.55: bytes=32 time=71ms TTL=50

Ping statistics for 192.168.0.55:
    Packets: Sent = 4, Received = 4, Lost = 0 (0% loss),
Approximate round trip times in milli-seconds:
    Minimum = 66ms, Maximum = 73ms, Average = 69ms
Now you can load the website in a browser to pint to the new IP Address.
Note: Be sure to clear your browser cache so that the old domain location is not cached.
NOTE:
Firefox now uses DNS over HTTPS (or DOH) by default. That means instead of checking your local hosts file or even your DNS resolver. Firefox simply makes the DNS request over HTTPS from within the browser. This behavior guarantees that the website displayed points to the IP address that the Internet sees as authoritative for that domain. There are two primary ways to avoid this behavior while testing your new site. First, use a different browser. Chrome, Edge, Safari, and many others do not have this setting enabled by default and will continue to work as expected with a modified hosts file. The second method is to disable DOH in your Firefox browser. Follow the directions below to disable this setting. 1. Open your Firefox browser. 2. Click the menu button and select Options. 3. In the General panel, scroll down to Network Settings and click the Settings button. 4. In the dialog box that opens, scroll down to Enable DNS over HTTPS. 5. Uncheck the box beside Enable DNS over HTTPS. 6. Click OK to save your changes and close the window. You can now edit your Hosts File and proceed with testing your new site like you normally would. We do recommend re-enabling this feature as it keeps you safer while browsing.