This install in on Ubuntu 18.04. There is an excellent article for CentOS at – https://www.tecmint.com/install-asterisk-on-centos-7/
Please review aslo:
– https://wiki.asterisk.org/wiki/display/AST/Installing+Asterisk+From+Source
– https://community.asterisk.org/
– https://www.sangoma.com/articles/how-to-install-asterisk-11-on-ubuntu-12-4-lts/
– http://asteriskdocs.org/en/3rd_Edition/asterisk-book-html-chunk/asterisk-Install.html
Install Requirements:
Firewalld. See the Article here to set up asterisk on firewalld – https://www.geekdecoder.com/firewalld-on-centos-8/-
The command installs a bunch of new packages including gcc, g++ and make
# apt install build-essential
Libraries:
Help Finding the Right Libraries
Asterisk comes with a shell script called install_prereq.sh in the contrib/scripts sub-directory. If you run install_prereq test, it will give you the exact commands to install the necessary system libraries on your operating system. If you run install_prereq install, it will attempt to download and install the prerequisites automatically.
cd /usr/local/src/asterisk-17.3.0/contrib/scripts/
./install_prereq test
./install_prereq install
The script calls for calling code (https://en.wikipedia.org/wiki/List_of_country_calling_codes)

Download Files:
Go to the following to see the current asterisk release:
https://downloads.asterisk.org/pub/telephony/asterisk/
Here is what I am using:
Asterisk – https://downloads.asterisk.org/pub/telephony/asterisk/asterisk-17-current.tar.gz
dahdi-complete – https://downloads.asterisk.org/pub/telephony/dahdi-linux-complete/dahdi-linux-complete-current.tar.gz
dahdi-linux – https://downloads.asterisk.org/pub/telephony/dahdi-linux/dahdi-linux-current.tar.gz
dahdi-tools – https://downloads.asterisk.org/pub/telephony/dahdi-tools/dahdi-tools-current.tar.gz
libpri – https://downloads.asterisk.org/pub/telephony/libpri/libpri-current.tar.gz
Change directory:
# cd /usr/local/src
Get the files:
wget https://downloads.asterisk.org/pub/telephony/asterisk/asterisk-17-current.tar.gz
# wget https://downloads.asterisk.org/pub/telephony/dahdi-linux-complete/dahdi-linux-complete-current.tar.gz
# wget https://downloads.asterisk.org/pub/telephony/dahdi-linux/dahdi-linux-current.tar.gz
# wget https://downloads.asterisk.org/pub/telephony/dahdi-tools/dahdi-tools-current.tar.gz
# wget https://downloads.asterisk.org/pub/telephony/libpri/libpri-current.tar.gz
Lets extract
tar -zxvf asterisk-17-current.tar.gz
# tar -zxvf dahdi-linux-complete-current.tar.gz
# tar -zxvf dahdi-linux-current.tar.gz
# tar -zxvf dahdi-tools-current.tar.gz
# tar -zxvf libpri-current.tar.gz
You should now notice that a new sub-directory was created for each of the tarballs, each containing the extracted files from the corresponding tarball. We can now compile and install each of the components.
Building and Installing DAHDI
Let’s install DAHDI!
On Linux, we will use the DAHDI-linux-complete tarball, which contains the DAHDI Linux drivers, DAHDI tools, and board firmware files.
# cd dahdi-linux-complete-3.1.0+3.1.0/
# make
# make install
# make config
Next, building and Installing LibPRI
Have you installed DAHDI? – Before you can build libpri, you’ll need to Build and Install DAHDI.
# cd libpri-1.6.0/
# make
# make install
Using Menuselect to Select Asterisk Options
The next step in the build process is to tell Asterisk which modules to compile and install, as well as set various compiler options. These settings are all controlled via a menu-driven system called Menuselect. To access the Menuselect system, type:
# make menuselect
When you’re first learning your way around Asterisk on a test system, you’ll probably want to stick with the default settings in Menuselect. If you’re building a production system, however, you may not wish to build all of the various modules, and instead only build the modules that your system is using. When you are finished selecting the modules and options you’d like in Menuselect, press F12 to save and exit, or highlight the Save and Exit button and press enter.
See More here: https://wiki.asterisk.org/wiki/display/AST/Using+Menuselect+to+Select+Asterisk+Options
Install asterisk with pre-bundled PJSIP-pjproject
# cd /usr/local/src/asterisk-17.3.0
# ./configure
# make && make install
You should see:
 +---- Asterisk Installation Complete -------+
 +                                           +
 +    YOU MUST READ THE SECURITY DOCUMENT    +
 +                                           +
 + Asterisk has successfully been installed. +
 + If you would like to install the sample   +
 + configuration files (overwriting any      +
 + existing config files), run:              +
 +                                           +
 + For generic reference documentation:      +
 +    make samples                           +
 +                                           +
 + For a sample basic PBX:                   +
 +    make basic-pbx                         +
 +                                           +
 +                                           +
 +-----------------  or ---------------------+
 +                                           +
 + You can go ahead and install the asterisk +
 + program documentation now or later run:   +
 +                                           +
 +               make progdocs               +
 +                                           +
 + **Note** This requires that you have      +
 + doxygen installed on your local system    +
 +-------------------------------------------+
Installing Sample Files
Asterisk Sample Configs: not a sample PBX configuration
For many of the sample configuration files that make samples installs, the configuration contains more than just an example configuration. The sample configuration files historically were used predominately for documentation of available options. As such, they contain many examples of configuring Asterisk that may not be ideal for standard deployments.
While installing the sample configuration files may be a good starting point for some people, they should not be viewed as recommended configuration for an Asterisk system.
To install a set of sample configuration files for Asterisk, type:
# make samples
Any existing sample files which have been modified will be given a .old file extension. For example, if you had an existing file named extensions.conf, it would be renamed to extensions.conf.old and the sample dialplan would be installed as extensions.conf.
Installing Initialization Scripts
Now that you have Asterisk compiled and installed, the last step is to install the initialization script, or initscript. This script starts Asterisk when your server starts, will monitor the Asterisk process in case anything bad happens to it, and can be used to stop or restart Asterisk as well. To install the initscript, use the make config command.
# make config
As your Asterisk system runs, it will generate logfiles. It is recommended to install the logrotation script in order to compress and rotate those files, to save disk space and to make searching them or cataloguing them easier. To do this, use the make install-logrotate command.
# make install-logrotate
Validating Your Installation
Before continuing on, let’s check a few things to make sure your system is in good working order. First, let’s make sure the DAHDI drivers are loaded. You can use the lsmod under Linux to list all of the loaded kernel modules, and the grep command to filter the input and only show the modules that have dahdi in their name.
# lsmod | grep dahdi
If the command returns nothing, then DAHDI has not been started. Start DAHDI by running:
# /etc/init.d/dadhi start
Asterisk can now be started as a service:
# service asterisk start
 * Starting Asterisk PBX: asterisk                                                                               [ OK ]
And stopped:
# service asterisk stop
 * Stopping Asterisk PBX: asterisk                                                                               [ OK ]
And restarted:
# service asterisk restart
 * Stopping Asterisk PBX: asterisk                                                                               [ OK ]
 * Starting Asterisk PBX: asterisk                                                                               [ OK ]
Asterisk Console
# asterisk -rvvvvv
Let set up a SIP client and Make a test call. Configure extensions.conf. Backup the sample extensions.conf and create a new one
# mv extensions.conf extensions.sample
# vim extensions.conf
We are going to use a very simple dialplan. A dialplan is simply instructions telling Asterisk what to do with a call. Edit your blank extensions.conf to reflect the following:
[from-internal] exten = 100,1,Answer() same = n,Wait(1) same = n,Playback(hello-world) same = n,Hangup() [/bash] When a phone dials extension 100, we are telling Asterisk to Answer the call, Wait one second, then Play (Playback) a sound file (hello-world) to the channel and Hangup. Configure a SIP channel driver. Depending on the version of Asterisk in use, you may have the option of more than one SIP channel driver. You'll have to pick one to use for the example.Asterisk 11 and previous: chan_sip is the primary option. Asterisk 12 and beyond: You'll probably want to use chan_pjsip (the newest driver), but you still have the option of using chan_sip as wellFollow the instructions below for the channel driver you chose. Configure chan_sip Backup and edit a new blank sip.conf. Then add the following to your sip.conf file:[general] context=default [6001] type=friend context=from-internal host=dynamic secret=unsecurepassword disallow=all allow=ulawConfigure chan_pjsip
Backup and edit a new blank pjsip.conf. Then add the following to your pjsip.conf file:
[transport-udp] type=transport protocol=udp bind=0.0.0.0 [6001] type=endpoint context=from-internal disallow=all allow=ulaw auth=6001 aors=6001 [6001] type=auth auth_type=userpass password=unsecurepassword username=6001 [6001] type=aor max_contacts=1Configure your SIP phone
Use Jitsi.
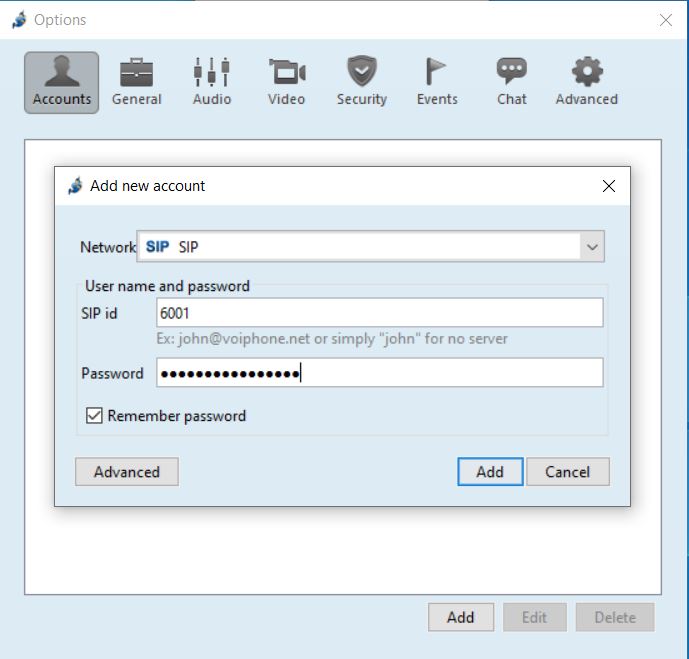
Once Jitsi is opened, click Tools > Options > Add.
Select the "SIP" Network".
For "SIP id", Enter 6001.
Enter your SIP peer's password(see above - unsecurepassword) in the Password field.
Click Advanced. Add your Display Name. Click the Connection Tab.
Put in the IP for the asterisk server in the "Registrar" Field.
Review and Click Sign in.
You should see the registration in asterisk:
Start Asterisk. Back at the Linux shell go ahead and start Asterisk. We'll start Asterisk with a control console (-c) and level 5 verbosity (vvvvv).
# asterisk -cvvvvvOr if Asterisk is already running, restart Asterisk from the shell and connect to it.
# asterisk -rx "core restart now" # asterisk -rvvvvvMake the call. Once registered, enter extension 100 and click the Dial button. The call should be made and you should hear the sound file hello-world!
On the Asterisk CLI, you should see something like: