For this article, we will install NodeJS19 on a Debian 11 (bullseye) system. Here are the installation instructions:
Want to have your own Slack like online chat hostedon your own server? Here is the process. First spin up a VM with Debian 11. Enable snaps on Debian and install Rocket.Chat Server
Snaps are applications packaged with all their dependencies to run on all popular Linux distributions from a single build. They update automatically and roll back gracefully.
This article covers how to install MongoDB (Community Edition Tutorial) on Debian 11. MongoDB is a popular open source NoSQL database. It is a document oriented database that supports structured and unstructured data, including JSON, XML, and organic data.
Check Debian Version on Debian website:
https://www.debian.org/releases/
Check version on system:
$ sudo lsb_release -a
No LSB modules are available.
Distributor ID: Debian
Description:    Debian GNU/Linux 11 (bullseye)
Release:        11
Codename:       bullseye
Or
$ sudo cat /etc/os-release
USERS SHOULD BACKUP ALL DATA before attempting a release upgrade – SEE https://wiki.debian.org/DebianStability
Only after the back – do the following:
Ensure your system is up-to-date in it’s current release.
$ sudo apt update
$ sudo apt upgrade
If you haven’t already, ensure all backups are up-to-date.
Make a backup of the /etc/apt/sources.list file:
$ sudo cp /etc/apt/sources.list /etc/apt/sources.list.bak
In a text editor, replace the codename of your release with that of the next release in APT’s package sources
For instance, the line:
deb https://deb.debian.org/debian/ buster main
should be replaced with
deb https://deb.debian.org/debian/ bullseye main
$ sudo nano /etc/apt/sources.list
# Clean and update package lists
$ sudo apt clean
$ sudo apt update
Perform the major release upgrade, removing packages if required
$ sudo apt full-upgrade
Remove packages that are not required anymore. Be sure to review this list: you may want to keep some of them
$ sudo apt autoremove
Reboot to make changes effective (optional, but recommended)
$ sudo shutdown -r now
This article show how to locate file easily in Linux. To install and update mlocate so as to use immediately.
Locate mariadb config files:
# cd /etc/mysql/mariadb.conf.d
# ls -la
total 28
drwxr-xr-x 2 root root 4096 Sep 23 22:52 .
drwxr-xr-x 4 root root 4096 Sep 30 18:20 ..
-rw-r--r-- 1 root root  575 Feb 17  2022 50-client.cnf
-rw-r--r-- 1 root root  231 Feb 17  2022 50-mysql-clients.cnf
-rw-r--r-- 1 root root  927 Feb 17  2022 50-mysqld_safe.cnf
-rw-r--r-- 1 root root 3666 Feb 19  2022 50-server.cnf
-rw-r--r-- 1 root root  570 Feb 17  2022 60-galera.cnf
Tweaking mariadb
To optimize the server, edit 50-server.cnf
root@webserver:/etc/mysql/mariadb.conf.d# nano 50-server.cnf
my.cnf Files
MariaDB is normally configured by editing the my.cnf file.

The following my.cnf example files were included with MariaDB until MariaDB 10.3.0. If present, you can examine them to see more complete examples of some of the many ways to configure MariaDB and use the one that fits you best as a base. Note that these files are now quite outdated, so what was huge a few years ago may no longer be seen as such.

my-small.cnf
my-medium.cnf
my-large.cnf
my-huge.cnf
Run the tuner
wget http://mysqltuner.pl/ -O mysqltuner.pl
Then execute it:
perl mysqltuner.pl
Create a simple bash script to check if MySQL is running and if not to restart it.
#!/bin/bash

# Check if MySQL is running
sudo service mysql status > /dev/null 2>&1

# Restart the MySQL service if it's not running.
if [ $? != 0 ]; then
    sudo service mysql restart
fi
Run this script every 5 minutes using a cron job like this one:
*/5 * * * * /home/user/scripts/monitor.sh > /dev/null 2>&1
Dnsmasq is a lightweight, easy to configure, DNS forwarder and DHCP server. It is designed to provide DNS and optionally, DHCP, to a small network. It can serve the names of local machines which are not in the global DNS.
Source: https://wiki.debian.org/dnsmasq
Basic DNS Setup
First things first, let’s install the package:
apt-get update
apt-get install dnsmasq
If your goal was to set up a simple DNS server, you just succeeded. To test it, use your favorite DNS lookup tool pointed at localhost:
dig debian.org @localhost
; <<>> DiG 9.16.33-Debian <<>> debian.org @localhost
;; global options: +cmd
;; Got answer:
;; ->>HEADER<<- opcode: QUERY, status: NOERROR, id: 23056
;; flags: qr rd ra; QUERY: 1, ANSWER: 3, AUTHORITY: 0, ADDITIONAL: 1

;; OPT PSEUDOSECTION:
; EDNS: version: 0, flags:; udp: 4096
;; QUESTION SECTION:
;debian.org.                    IN      A

;; ANSWER SECTION:
debian.org.             300     IN      A       149.20.4.15
debian.org.             300     IN      A       130.89.148.77
debian.org.             300     IN      A       128.31.0.62

;; Query time: 44 msec
;; SERVER: ::1#53(::1)
;; WHEN: Thu Sep 29 16:26:24 CDT 2022
;; MSG SIZE  rcvd: 87
or
nslookup debian.org localhost
Server:         localhost
Address:        ::1#53

Non-authoritative answer:
Name:   debian.org
Address: 128.31.0.62
Name:   debian.org
Address: 130.89.148.77
Name:   debian.org
Address: 149.20.4.15
Name:   debian.org
Address: 2001:67c:2564:a119::77
Name:   debian.org
Address: 2603:400a:ffff:bb8::801f:3e
Name:   debian.org
Address: 2001:4f8:1:c::15
By default, DNS is configured to forward all requests to your system’s default DNS settings. In case you didn’t know, these are stored in the /etc/resolv.conf
To add names, simply add them to your /etc/hosts file.
nano /etc/hosts
192.168.0.155   ipgw.io
dig ipgw.io @localhost

; <<>> DiG 9.16.33-Debian <<>> ipgw.io @localhost
;; global options: +cmd
;; Got answer:
;; ->>HEADER<<- opcode: QUERY, status: NOERROR, id: 53022
;; flags: qr aa rd ra; QUERY: 1, ANSWER: 1, AUTHORITY: 0, ADDITIONAL: 1

;; OPT PSEUDOSECTION:
; EDNS: version: 0, flags:; udp: 4096
;; QUESTION SECTION:
;ipgw.io.                       IN      A

;; ANSWER SECTION:
ipgw.io.                0       IN      A       192.168.0.155

;; Query time: 0 msec
;; SERVER: ::1#53(::1)
;; WHEN: Thu Sep 29 16:31:02 CDT 2022
;; MSG SIZE  rcvd: 52
Choosing Your Interfaces
One you will probably want to do is tell dnsmasq which ethernet interface it can and cannot listen on, as we really don’t want it listening on the internet. Around line 69 of the /etc/dnsmasq.conf file, you will see:
#interface=
By default, DHCP is turned off.
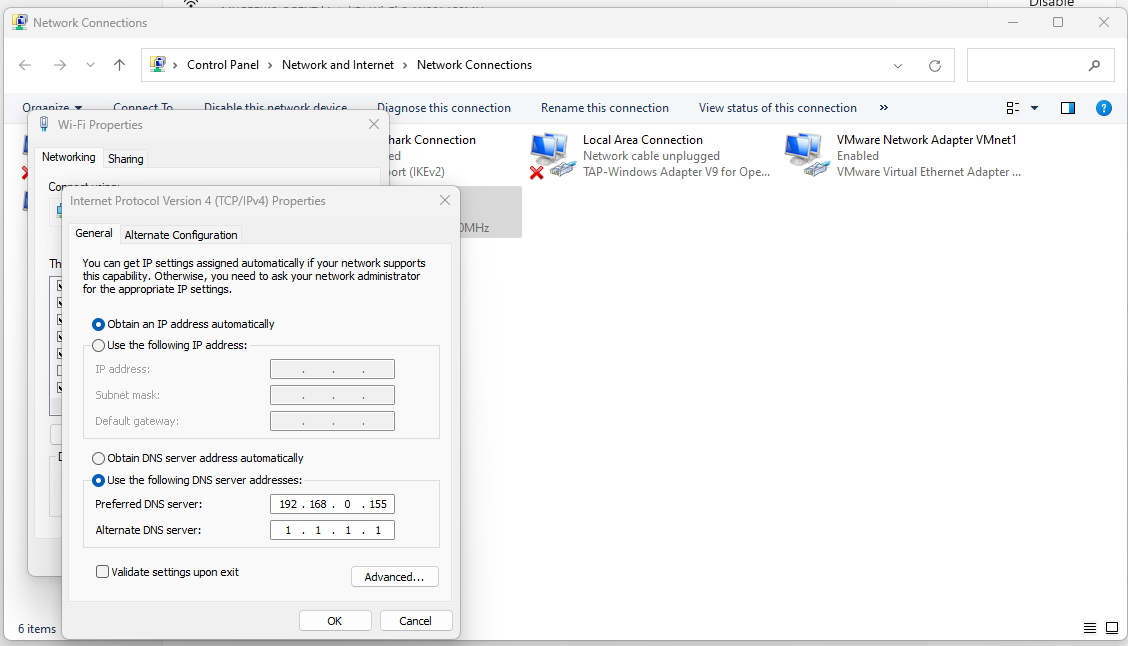
Now change your dns on the IPv4 to your dnsmasq address server and your DNS server like Cloudflare.
So, the following we run the commands to set up apache for wordpress.
Download and unzip the WordPress package from:
# wget https://wordpress.org/latest.tar.gz
Then extract the package to the apache root directory:
# tar -xzvf latest.tar.gz --directory /var/www/kdoozle
Activate Mod Rewrite.
# sudo a2enmod rewrite
Create vhosts.
<VirtualHost *:80>
    ServerName ipgw.io
    ServerAlias www.ipgw.io
    ServerAdmin webmaster@ipgw.io
    DocumentRoot /var/www/ipgw

    <Directory /var/www/ipgw>
        Options -Indexes +FollowSymLinks
        AllowOverride All
    </Directory>

    ErrorLog ${APACHE_LOG_DIR}/ipgw.io-error.log
    CustomLog ${APACHE_LOG_DIR}/ipgw.io-access.log combined
</VirtualHost>

<VirtualHost *:443>
    ServerAdmin rogerp@local
    ServerName www.ipgw.io
    ServerAlias ipgw.io
    DocumentRoot /var/www/ipgw
    SSLEngine on
    SSLCertificateFile /etc/pki/tls/certs/ipgw.io.crt
    SSLCertificateKeyFile /etc/pki/tls/certs/ipgw.io.key
</VirtualHost>

<VirtualHost *:443>
    ServerAdmin rogerp@local
    ServerName www.ipgw,io
    ServerAlias ipgw.io

    DocumentRoot /var/www/ipgw

    SSLEngine on
    SSLCertificateFile /etc/pki/tls/certs/ipgw.io.crt
    SSLCertificateKeyFile /etc/pki/tls/certs/ipgw.io.key
</VirtualHost>
After installing it, you will need to restart Apache services with the command:
service apache2 restart
If needed, you will need to edit the config file and find the directive:
AllowOverride None
Change it to:
AllowOverride All
Order allow,deny
Allow from all
Create the Database
MariaDB [(none)]> CREATE database kdoozle;
Query OK, 1 row affected (0.001 sec)
Add user and set up permissions.
MariaDB [(none)]> CREATE USER 'kdoozle'@'localhost' IDENTIFIED BY 'sdsrg54yhs';
Query OK, 0 rows affected (0.032 sec)
MariaDB [(none)]> GRANT ALL PRIVILEGES ON kdoozle.* to 'kdoozle'@'localhost' IDENTIFIED BY 'sdsrg54yhs';
Query OK, 0 rows affected (0.017 sec)
Next, run the installer by loading the website in the browser.
This how-to guide will help you to step by step create and install Self Signed Certificate in Apache server on Linux systems.
Read more: How to Create and Install Self Signed Certificate in Apachesudo apt-get install openssl # Debian based systems
sudo yum install mod_ssl openssl # Redhat / CentOS systems
sudo dnf install mod_ssl openssl # Fedora 22+ systemsStep 2 – Create Self Signed Certificate (please change to your domain name 🙂
Now create SSL certificate. Change the name “apache” to your site name if you plan on multiple sites. Openssl will ask you for some info about your organization. You can leave most of this blank, but the one important thing you’ll need to fill out is the “Common Name,” which you’ll want to set to your server’s IP address or domain name.
sudo openssl req -x509 -nodes -days 365 -newkey rsa:2048 -keyout /etc/ssl/private/apache.key -out /etc/ssl/certs/apache.crtOutput:
Generating a RSA private key
.............................+++++
......+++++
writing new private key to 'apache.key'
-----
You are about to be asked to enter information that will be incorporated
into your certificate request.
What you are about to enter is what is called a Distinguished Name or a DN.
There are quite a few fields but you can leave some blank
For some fields there will be a default value,
If you enter '.', the field will be left blank.
-----
Country Name (2 letter code) [AU]:US
State or Province Name (full name) [Some-State]:TX
Locality Name (eg, city) []:Austin
Organization Name (eg, company) [Internet Widgits Pty Ltd]:Apache
Organizational Unit Name (eg, section) []:IT
Common Name (e.g. server FQDN or YOUR name) []:apache.com
Email Address []:user@localhost
We’ll also want to generate a Diffie-Hellman group. This is used for perfect forward secrecy, which generates ephemeral session keys to ensure that past communications cannot be decrypted if the session key is compromised.
sudo openssl dhparam -out /etc/ssl/certs/dhparam.pem 4096Step 3 – Configure Apache to Use Your Self-Signed Certificate
Edit Apache SSL configuration file and edit/update as per following directives.
Add a snipit file.
sudo touch /etc/apache2/conf-available/ssl-params.confAdd the following:
SSLCipherSuite EECDH+AESGCM:EDH+AESGCM:AES256+EECDH:AES256+EDH
SSLProtocol All -SSLv2 -SSLv3 -TLSv1 -TLSv1.1
SSLHonorCipherOrder On
Header always set X-Frame-Options DENY
Header always set X-Content-Type-Options nosniff
SSLCompression off
SSLUseStapling on
SSLStaplingCache "shmcb:logs/stapling-cache(150000)"
SSLSessionTickets Off

SSLOpenSSLConfCmd DHParameters "/etc/ssl/certs/dhparam.pem"
Apache VirtualHost Configuration
<VirtualHost *:80>;
    ServerName ipgw.io
    ServerAlias www.ipgw.io
    ServerAdmin webmaster@ipgw.io
    DocumentRoot /var/www/ipgw

    <Directory /var/www/ipgw>
        Options -Indexes +FollowSymLinks
        AllowOverride All
    </Directory>

    ErrorLog ${APACHE_LOG_DIR}/ipgw.io-error.log
    CustomLog ${APACHE_LOG_DIR}/ipgw.io-access.log combined
</VirtualHost>

<VirtualHost *:443>
    ServerAdmin rogerp@local
    ServerName www.ipgw.io
    ServerAlias ipgw.io
    DocumentRoot /var/www/ipgw
    SSLEngine on
    SSLCertificateFile /etc/pki/tls/certs/ipgw.io.crt
    SSLCertificateKeyFile /etc/pki/tls/certs/ipgw.io.key
</VirtualHost>
Step 4 – Test config, Enable SSL and Restart Apache
sudo a2enmod ssl
sudo apachectl configtest
sudo systemctl restart apache2       # Debian based systems
Step 5 – Test Website with HTTPS
Finally, open your site in your favorite web browser using https.
https://www.example.com
As we are using a self-signed certificate, you will get a warning message in your browser. You can simply ignore this message.
If you find this helpful, please donate.
The following error shows up when checking a zpool group. This article describes the issue.