If you get a notice that there is a new version of PowerShell, you can update it easily. Sometimes you see an update notice when you open PowerShell.
Category: Windows 2012 Server
This article guides you how to assign Home Folder to Active Directory users.
Install the File Server Resource Manager
- Open Server Manager
- Go to “Add roles and features”
- In “Server Roles” expand “File and Storage Services“, again expand “File and iSCI Services“, then tick “File Server Resource Manager” and click “next” to install.

Configure a Shared Folder
- Create a shared folder ex:- D:\HOME
- Open “HOME” folder properties by right clicking on it and go to properties > sharing.
- Click on “Share” button and activate folder sharing. Add users. Find shared folder path ex:- “\\YOUR-SERVER\home\”
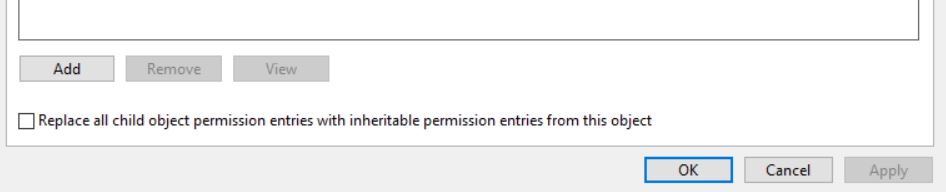
- select “security” tab and then open “Advance Security”. Please make sure inheritance is disabled like below.
Configure Disk Quota
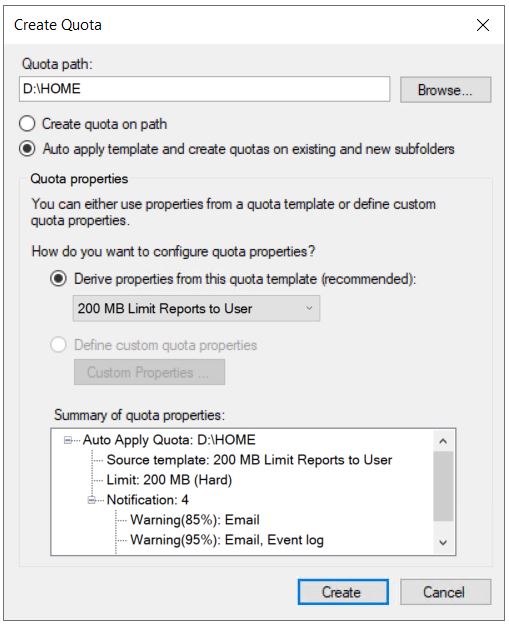
- Open “File Server Resource Manager”
- Expand “Quota Management” , you can configure “Quota Templates” if you wish or you can use existing template like here I did.
- Click on “Quotas” –> “Create Quotas” from right hand side.
- On then “Create Quota” window, browse and set Quota Path, select “Auto apply template and create quotas on existing and new sub folders” radio button, and make sure to select previously configured template from the drop down menu (200 MB Limit Reports to User – existing template).
Attach Network folder to Active directory user
Open “Active Directory Users and Computers”
Right click on user and open “properties” , then browse “profile” and set following Network path there.
“\\YOUR-SERVER\home\%username%”
If you get the following error message the first time that you access Windows after installation,
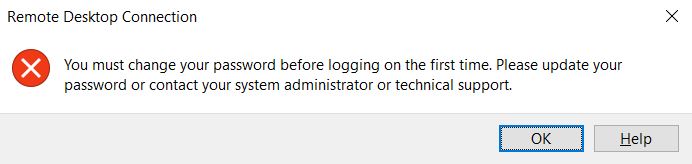
then your client has been negotiating with the server for network level authentication.
However, network level authentication is executed before a remote desktop session has even been created.
That means that you cannot perform the forced password change during the first login.
Temporarily disabling network level authentication
To make the password change take place despite this, you must first temporarily disable network level authentication.
To do this, first, create a RDP file:
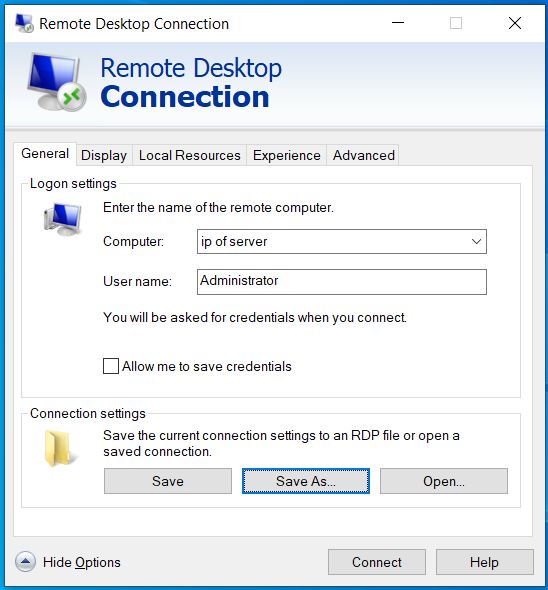
The save the file as Newconnection.rdp
Now, open the file with notepad and add the following line at the bottom:
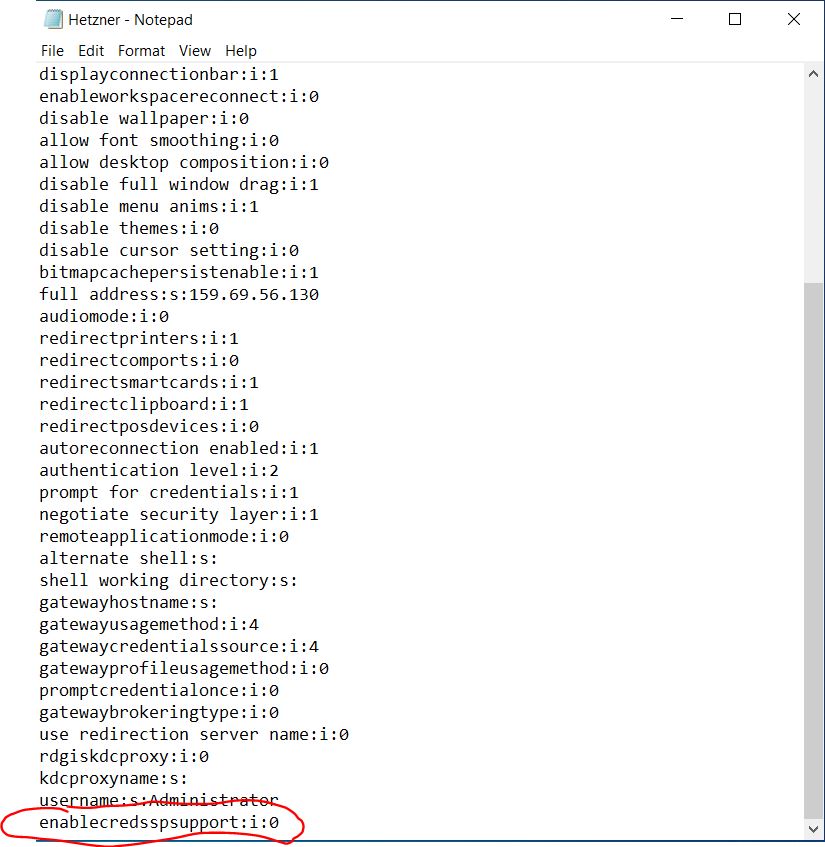
Save it. Now click on it to open and login.
Ever wondered which program has a particular file or directory open? Now you can find out. Process Explorer shows you information about which handles and DLLs processes have opened or loaded.
Ever wondered which program has a particular file or directory open? Now you can find out. Process Explorer shows you information about which handles and DLLs processes have opened or loaded.
The Process Explorer display consists of two sub-windows. The top window always shows a list of the currently active processes, including the names of their owning accounts, whereas the information displayed in the bottom window depends on the mode that Process Explorer is in: if it is in handle mode you’ll see the handles that the process selected in the top window has opened; if Process Explorer is in DLL mode you’ll see the DLLs and memory-mapped files that the process has loaded. Process Explorer also has a powerful search capability that will quickly show you which processes have particular handles opened or DLLs loaded.
The unique capabilities of Process Explorer make it useful for tracking down DLL-version problems or handle leaks, and provide insight into the way Windows and applications work.
https://docs.microsoft.com/en-us/sysinternals/downloads/process-explorer
This information shows you how to Configure the Windows firewall to allow pings ICMP Ping.
- Open Windows Firewall
- Click Advanced Settings on the left.
- From the left pane of the resulting window, click Inbound Rules.
- In the right pane, find the rules titled File and Printer Sharing (Echo Request – ICMPv4-In).
- Right-click each rule and choose Enable Rule.
Error when using Remote Desktop to connect to a Windows Server:
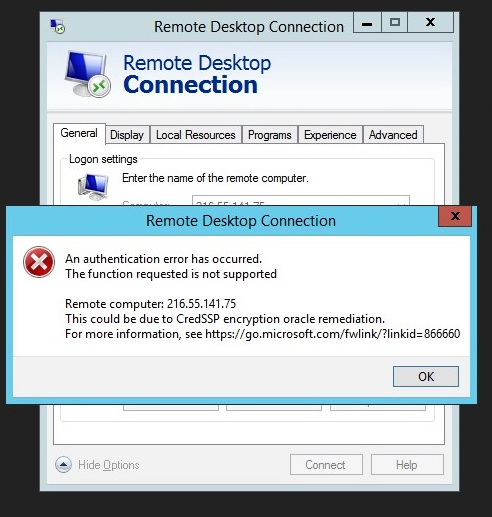
Microsoft Article: https://support.microsoft.com/en-us/help/4093492/credssp-updates-for-cve-2018-0886-march-13-2018
Fix: Run updates for Windows
How to Install Zabbix Agent on Windows 2016 and avoid the: Windows error service could not be started. Error 1053: The service did not respond to the start or control request in a timely fashion.
Download – https://www.zabbix.com/download_agents
If you have the agent service installed incorrectly now, you can remove it by running “zabbix_agentd.exe –uninstall”.
cd c:\zabbix
zabbix_agentd.exe --uninstall
New Install
- Create directory C:\zabbix and place zabbix_agentd.exe and zabbix_agentd.win.conf files there.
- Edit the zabbix_agentd.win.conf file and set the values:
LogFile=C:\zabbix\zabbix_agentd.log
Server = IP address of your Zabbix server
# ListenPort = 10050 Leave it commented as is if you don’t change the defaults
ServerActive = IP of your Zabbix server
Hostname = computer that will be monitored as listed in the zabbix server hosts setup
![]()
3. Open command prompt and execute:
C:\zabbix\zabbix_agentd.exe --config C:\zabbix\zabbix_agentd.win.conf --install
zabbix_agentd.exe [5584]: service [Zabbix Agent] installed successfully
zabbix_agentd.exe [5584]: event source [Zabbix Agent] installed successfully

4. Start Windows service.
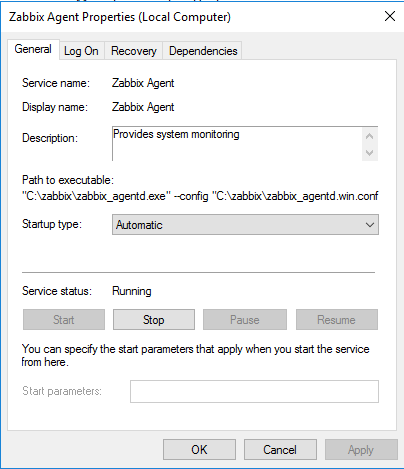
If you receive an error – Windows Agent – Error 1053 – that the service could not be started, run the uninstall above and restart the installation and make sure the files are in the correct directory and the config file changes match what you need.
Please find more info here: https://www.zabbix.com/documentation/4.0/manual/appendix/install/windows_agent
Adding a firewall rule in Windows.
Go to Windows Firewall. Add new rule. Choose port, TCP, Specific Local Ports. Add port 10050.

Taking Ownership of Files and Folders in Windows Server. Here are some notes on how to do this:
If you are an administrator, an authorized user, or a backup operator, you can take ownership of a file or folder by completing the following steps:
1. In Windows Explorer, open the file or folder’s Properties dialog box by right-clicking the file or folder and then clicking Properties.
2. On the Security tab, click Advanced to display the Advanced Security Settings dialog box.
3. On the Owner tab, click Edit.This opens the Advanced Security Settings dialog box for editing.
4. In the Change Owner To list, select the new owner.If you’re taking ownership of a folder, you can take ownership of all subfolders and files within the folder by selecting the Replace Owner On Subcontainers And Objects option.
5. Click OK twice when you have finished.
Assigning Ownership
If you are an administrator or the current owner of a file, you can assign ownership of a file or a folder to another user or group by completing these steps:
1. In Windows Explorer, open the file or folder’s Properties dialog box by right-clicking the file or folder and then clicking Properties.
2. On the Security tab, click Advanced to display the Advanced Security Settings dialog box.
3. On the Owner tab, click Edit. This opens the Advanced Security Settings dialog box for editing.
4. Click Other Users Or Groups to display the Select User, Computer, Service Account, Or Group dialog box.
5. Type the name of a user or a group, and then click Check Names. If multiple names match the value you entered, you’ll see a list of names and can choose the one you want to use. Otherwise, the name will be filled in for you, and you can click OK to close the Select User, Computer, Service Account, Or Group dialog box.
6. In the Change Owner To list, select the new owner. If you’re assigning ownership of a folder, you can assign ownership of all subfolders and files within the folder by selecting the Replace Owner On Subcontainers And Objects option.
7. Click OK twice when you have finished.
Codero
I recently added MailEnable to a Windows server and wanted to add SSL. I checked and there is an application that you can use to add the Let’s Encrypt SSL.
Quick Start
Download from https://certifytheweb.com/ and install it.
Click ‘New Certificate’, choose your IIS site (which must have 1 or more hostname bindings set). Save your settings and click ‘Request Certificate’
All done!
Are you having trouble accessing your Windows Server 2012 machine using remote desktop, even after adding the user to the Remote Desktop Users group? Remote Desktop appears to accept the login credentials but then you receive the following error message:
“To sign in remotely, you need the right to sign in through Remote Desktop Services. By default members of the Administrators group have this right. If the group you’re in does not have the right, or if the right has been removed from the Administrators group, you need to be granted the right manually.”
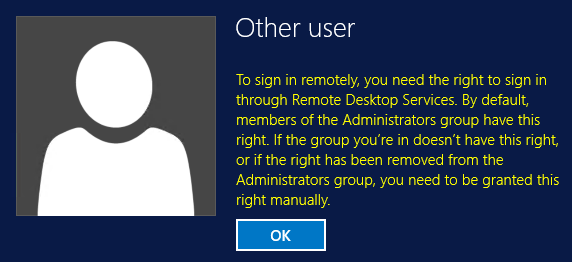
With Server 2012 it seems that you now also need to grant the user remote access privileges though the Local Security Policy as well as the Remote Desktop Users group.
To grant this access, search for and open the Local Security Policy program.
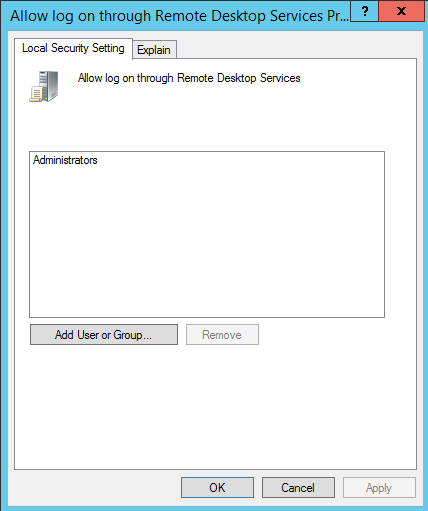
Expand Local Policies and select User Rights Assignment. A list of polices will appear on the right hand side. Right click on the policy named “Allow log on through Remote Desktop Services” and select Properties.
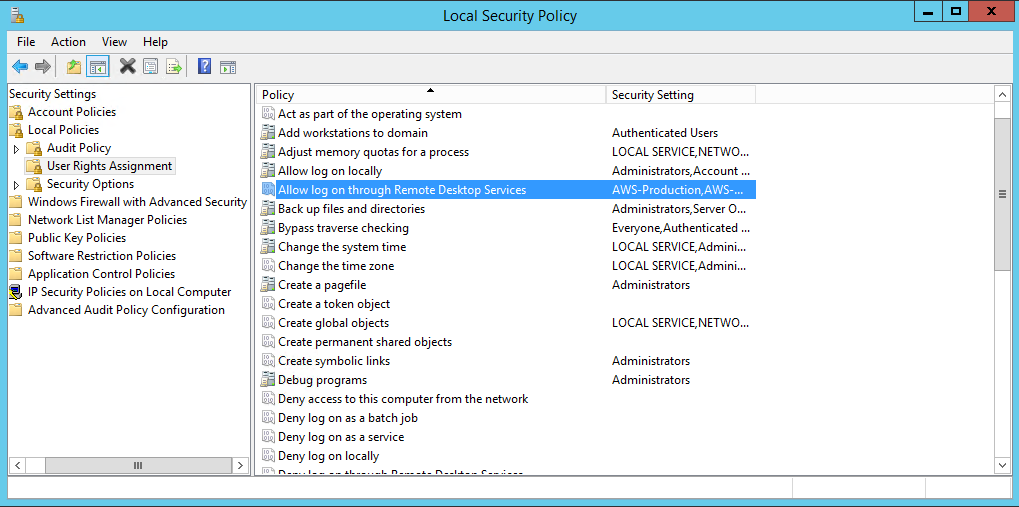
You will now have the option to add users or groups to the policy.
Test the login…
Since i am logging into a domain as a domain user, I received the following error:

Login to the Computer as Administrator (not the domain controller or AD server).
Got to Start > Right Click on “This PC. Go to Remote Settings.

Go to Select users.
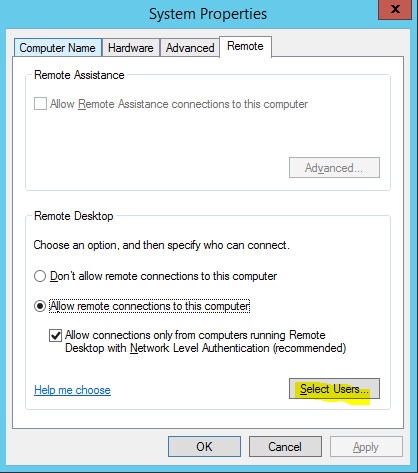
Click Add.
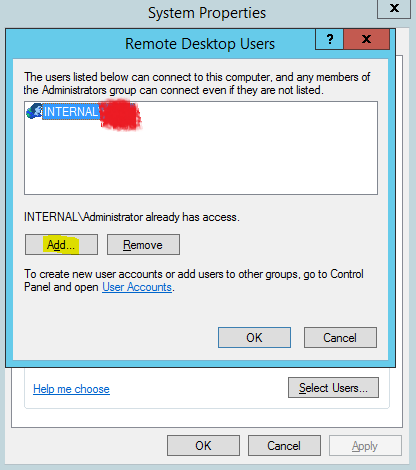
Type part of the name. In this example, lisa. Click “Check Names”. The name now appears as the domain username. Click OK and OK. Now login.